Labels

3D Printing (24) 40K (62) Abyssal Dwarf (2) accessories (5) Adeptus Arbites (4) Adeptus Mechanicus (1) ADMech (1) Age of Sigmar (2) Agents of the Imperium (2) Angron (2) Anime (4) Antenocitis Workshop (32) Anvil Industries (5) AoS (4) ArmorCast (3) Army (4) Army Painter (10) Astra Militaria (24) Atenociti's Workshop (7) Atenocity (1) Atlantis Miniatures (4) Avatars of War (1) banner (4) base coat (16) base color (8) bases (45) Basilean (1) Battlefoam (1) Beasts (2) big lobbas (1) Bitspudlo (1) Black Scorpion (1) Black Templar (1) Blood Rain (16) Board Games (32) Bolt Action (1) Bombshell (1) Bones (14) Bretonnian (1) Bruegleburg (4) Bruxx (2) Campaign (20) carapace (1) Carnevale (8) chaos (25) Chaos Dwarf (2) chaos gate (3) Chaos Space Marines (18) Citadel (2) claw (1) Clawed Fiends (1) clear resin (1) Construction Guide (1) Contagion (12) conversion (3) Counts as (25) Craftworld Eldar (2) Custome Counters (2) Customeeple (1) Daemon Prince (4) Daemonettes (1) Daemons (5) Dark Angels (4) Dark Eldar (47) Dark Elf (6) Dark Souls (7) Darkness & Light (3) Darksword (2) Deadzone (15) Death Guard (9) decals (1) Deepcut Studios (3) Demented Games (3) dicebox (1) Dorothy (2) dragon (2) Dreadnought (5) Dreadtober (5) Drukhari (2) Dryad (1) Duncan "Shadow" Louca (1) Dwarf (7) epicast (2) Evangelion (3) Executrix (1) eyes (2) Fallout Wasteland Warfare (11) Fantasy Battles (19) Fast Panda (3) FBN (1) Fight Like a Girl (1) Finecast (4) Flames of War (4) Fluff (14) Forest Goblins (2) forge world (50) fortress (8) fortress name (2) Forward Base (10) free hand (1) Frostgrave (8) Game Mats (3) game room (1) Games Workshop (13) gamesday 2011 (1) gargantuan squiggoth (8) Geekfest 2010 (1) Geekfest 2011 (4) ghouls (1) Gloomhaven (1) Goblins (2) gobsmasha (1) golden demon (1) Greasus Goldtooth (2) greenstuff (10) Greenstuff World (1) Grotesques (3) Guest Painter (3) gunwagon (1) GW (8) GW Technical Paint (11) Halo Fleet Battles (1) Harlequin (1) Heresy Girls (5) Heresy Suppression Force (10) Hexy-Shop (1) Hi-Tech (2) highlight (2) horror (1) Imperial Guard (23) Infinity (23) Inquisition (4) Iron Empire (17) Iron Halo (1) Jailbirds (35) Joan of Arc (3) JR Miniatures (1) juggernaut (10) khorne (1) Kickstarter (43) Kill Team (1) Kingdom Death (17) Kings of War (9) Kromlech (3) KST (4) Kurganova (3) Land Raider (1) Large Scale (4) Lead Adventurers (3) legacy models (2) lighting (7) Lizardman (1) Lost Islands KS (2) lust elves (12) made for Infinity (33) Malice (1) Malifaux (13) Mantic (37) mawloc (1) max mini (2) MDF (28) mecha (3) Mechanicum (1) Mercenary Grots (1) Metallic (1) Miniature Figure Painting (7) miniature wargames scenery (3) model building (4) Modiphius (2) Mordheim (24) Movement Trays (1) moving (6) Mystery (4) Mythic Games (1) names of things (14) narratives (22) Necrons (3) Night Goblins (1) Nose Art (1) Nurgle (16) objective markers (2) Obliterators (2) Ogre Kingdoms (6) Oldhammer (4) orange (1) Orcs (1) ork (26) osl (2) P3 (1) Patreon (1) Plague (1) Plastic (4) Post Apocalypse (8) Pre-Heresy (2) Primarch (2) Primer (6) Privateer Press (1) Project Thunderhawk (28) prototyping (1) Proxies (24) ptimer (1) Rackham (2) Raging Heroes (125) Rampage (6) Ravager (1) razorwing (1) Realm of Chaos (1) Reaper (34) red (25) repair (6) resin (27) Resurrectionist (2) Resurrectionists (1) Retinue (1) review (1) ripper swarm (6) ripperswarm (1) Roleplaying (1) RPG (31) runtbot (7) Sacred Heart (1) scatter (7) Sci-Fi Space Battles (6) Scibor (2) Secret Weapon (77) Serene Dawn (12) Setting the scene (23) Shading (1) Silver Compass Designs (1) Sisters of Battle (25) Sisters of Eternal Mercy (11) Sisters of Sigmar (4) Skaven (4) Skin (2) Skirmish Game (8) Slaanesh (1) Slann (1) SnapMaker (5) Spartan Games (1) Sslyth (1) Star Saga (32) Starfinder (4) Steampunk (2) Stone Crusher (3) Strigoi (1) studio (1) Studio Miniatures (1) Studio Swelter (4) SUPERCaT (1) Supers (1) Tabletop (9) Tabletop Art (3) Tabletop World (36) tank pit (1) Tantalus (6) Terminator (2) terrain (58) TGG (20) TGG the Game (3) TGG2 (22) The Dickensians (2) The Old World (2) The Order of Vampire Hunters (13) The World That Was (1) Theme (33) Third Party conversion bits (1) Thor Minatures (1) Thousand Sons (1) thunderhawk (3) Titanite Demon (1) tools (2) Toughest Girls in the Galaxy (9) Toughest Girls of the Galaxy (6) Toughest Girls of the Galaxy 2 (7) trukk (3) tutorial (2) Twisted (7) tyranid (12) UAF (1) Ubiquitous Rat (1) unboxing (4) Undead (2) undercoats (4) Undertown (15) Unwritten (5) Urkin (1) Vallejo (5) Vampire Counts (4) Vampire Hunter (2) Vampires (1) Vampiric Flesh (1) Vanguard (4) varnish (2) Vatican (3) vehicle (13) Venom (3) Video (1) Vikings (1) Void Elf (17) Void Elves (15) War Machine (1) War World Scenics (1) Warbands (3) Warchimera (3) Warhammer (12) Warpath (18) wash (33) water effects (17) weathering (61) weathering powder (14) WFB (1) WH40K (40) WHFB (14) WiP (22) Witch Hunters (5) wood (2) Wood Elf (4) World Eaters (2) Wracks (1) wraiths (1) WW2 (1) Wyrd (5) yellow (1) Ynnari (5) Zoggit (1) zombies (1)

Wednesday, October 20, 2021

Raging Heroes Berserkers and Warriors

I've been a follower of Raging Heroes for many years now and have been an avid collector of their 3D print file Patreon, and now through their in house service, even though I didn't have a 3D Resin printer until now. I've done a fair bit of FDM Printing but that is really limited to terrain or accessories and I've never had any luck printing humanoid figures in any game scale. With the addition of the Photon Mono X printer to my workshop all of that has changed! I still have a lot to learn but the earliest results are now making their way to the paint desk.
First up are the troops from the Raging Heroes Viking Gods and Heroes theme from the Patreon.  these models have really heroic proportions and are quite beefy models in line with RH's more recent offerings.

I'm hoping to use these in Frostgrave and Kings of War. The bases are also printed from the set and painted in a winter theme. The set has bases sized from 25mm to 50mm. These are 30 mm bases.

I thought the cloaks to be made from the hides of Black Bears for which I imagined this fraternity to have traveled to the wilderness of North America to obtain.

I also had a stab at a unifying tartan for their kilts. These will be repeated throughout the warband.

Flesh tone: are Dark Flesh (Vallejo (V)),Flesh Wash (Secret Weapon (SW)), Dark Flesh (V) Layer, Sunny Flesh (V) Top Layer.

Bear Hide: Carbon Gray (Reaper (R)),Cobalt Grey (R) drybrush, Soft Body Black Wash (SW),Sunny Flesh (V) weathering. 

The Kilts are a bit more complex and I'll likely do a post on just that as I get more comfortable with the process. I think these were a good first attempt and should improve with more iterations.

Hair colors: A lot of red heads a couple of blondes and a guy with black hair... Vikings.

From a printing perspective some of the weapons, particularly the two handed axes, have a bit of a curve to them like they are flexing with the swing. I like the look as it implies motion but I don't know if its an intentional effect or just fortuitous.

The regular Warriors have much more tartan visible so it was easier to get a flow going. 

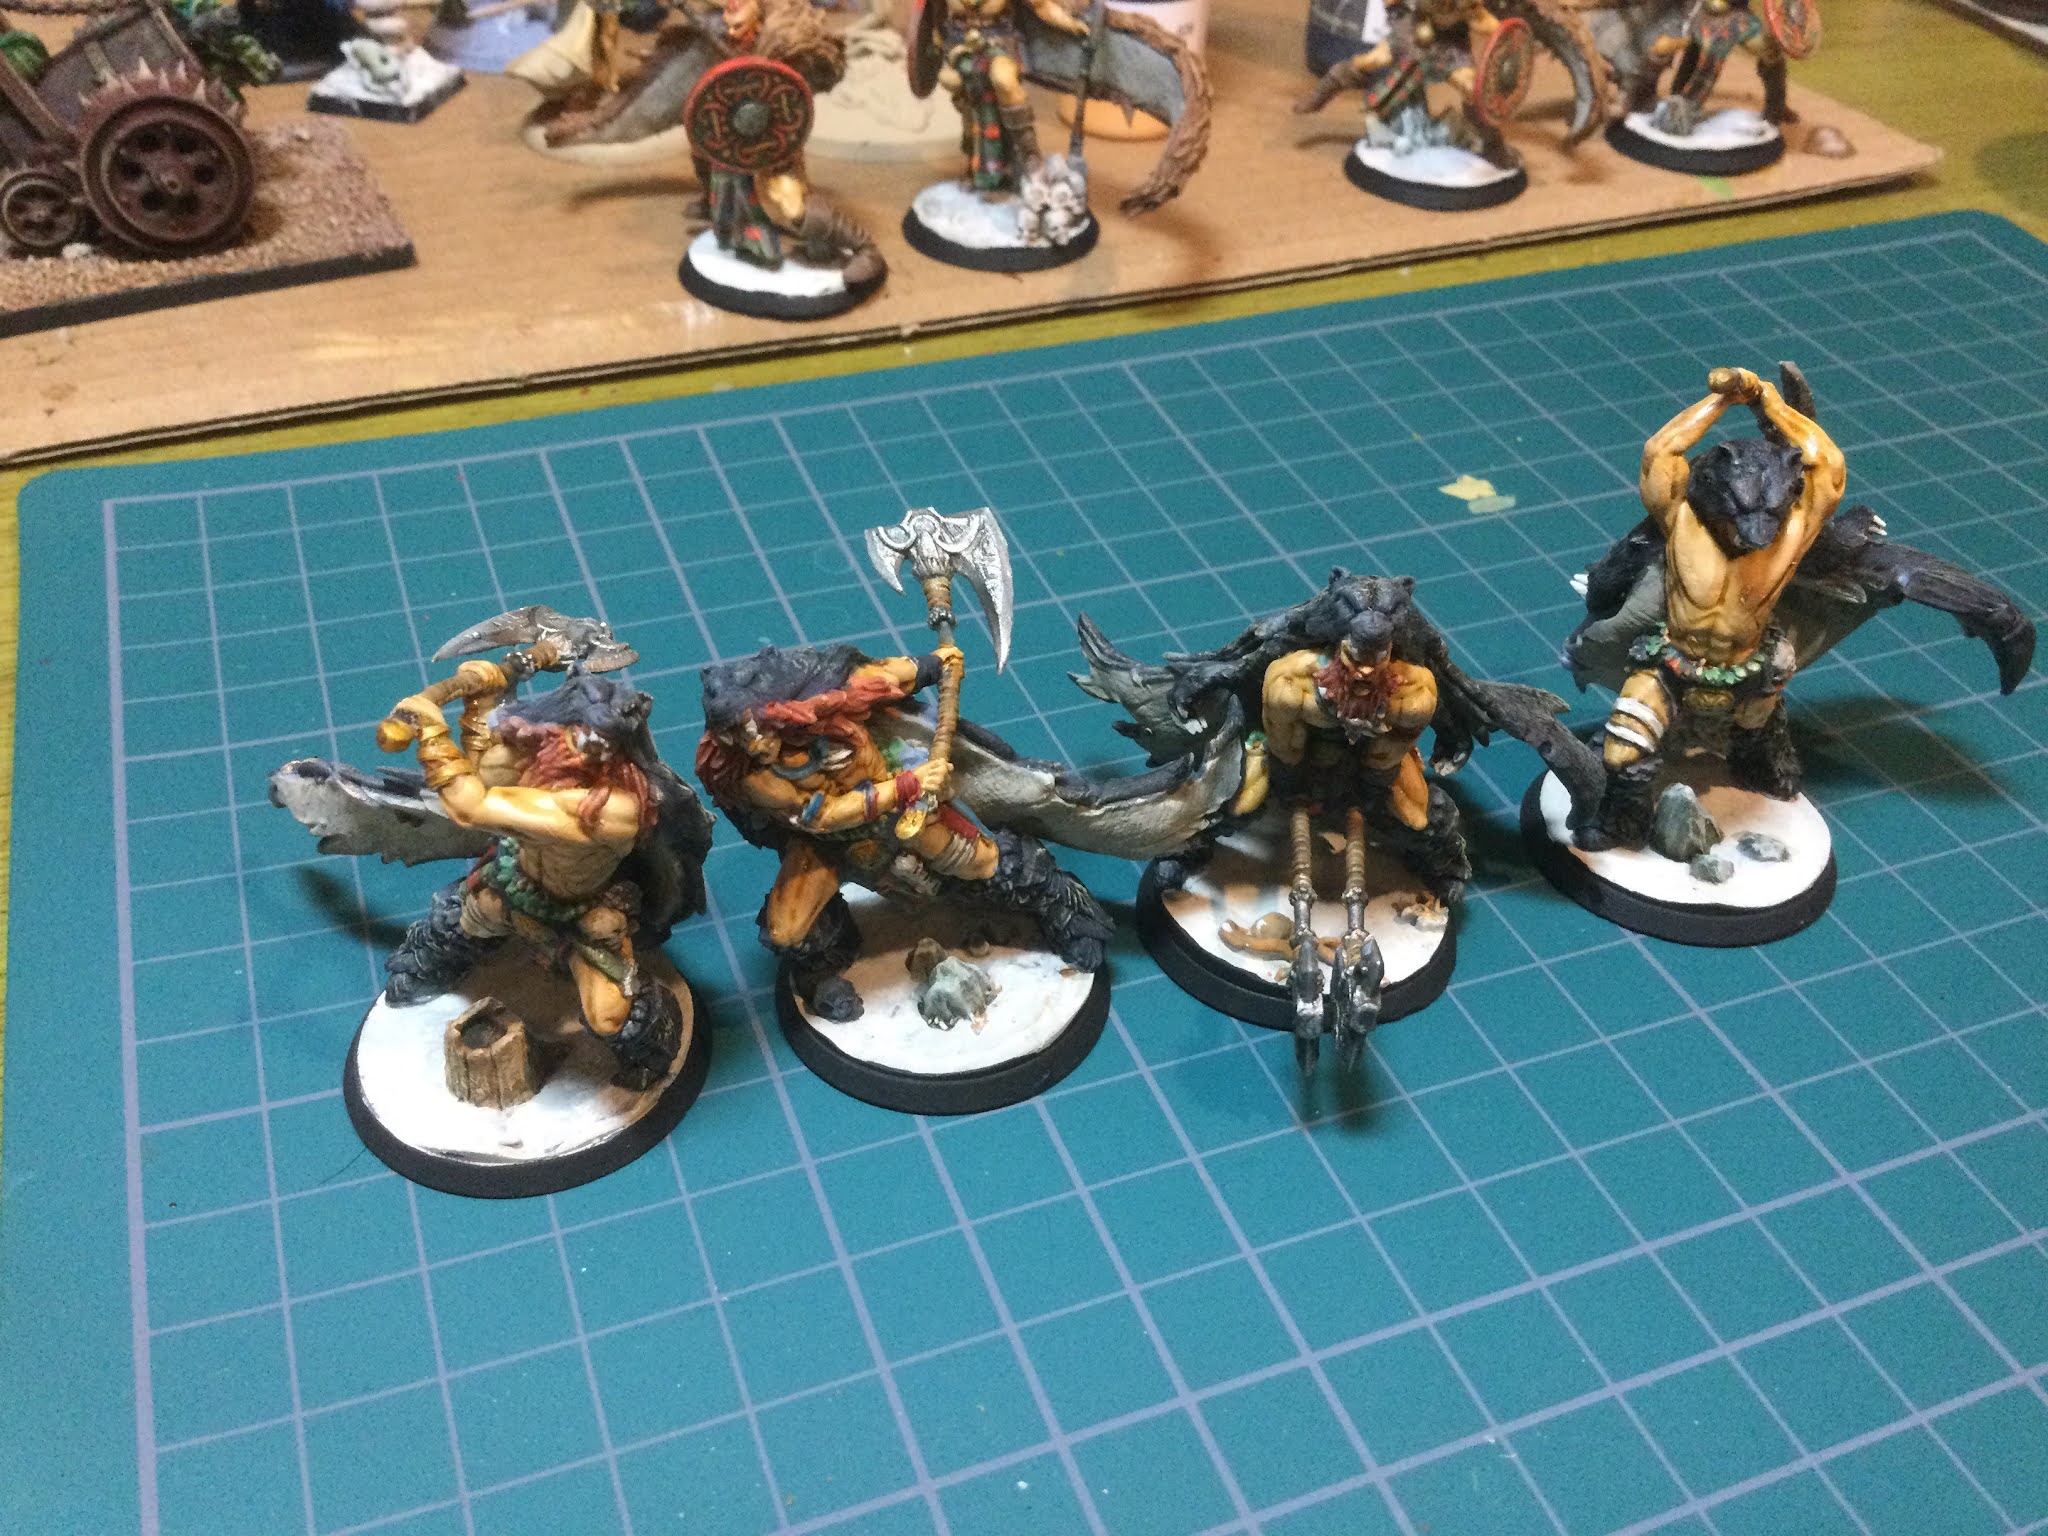
You'll notice that these guys are in super wide leg stances. So wide, in fact, that it was difficult to contain them on the 30mm bases. Since I want to use these as gaming pieces I really did not want to make the move to 40mm bases because that is usually more of a monster or crewed weapon size. The result was some creative mounting...

The first of these has a stance so wide it literally cannot be contained on a 30 mm base. I decided to mount him with one foot firmly planted on the ground and his kilt attached to a rock to support him solidly. I think its a passable look of a warrior leaping over the rocks to press the attack.

The next fellow had a ...slightly... less wide stance and has the insole of one foot and the very back of his heel touch the base... it was a little dicey and one foot has an extra bit of support on the bottom to insure continued contact.

This guy is more less aggressively spread and you can see the shield design. I kept to the same general colors as were used in the tartan to strengthen the theme.
The group Leader is, ironically, the only one that fit easily onto the 30mm base.
The group shot. One thing I'd love to see RH do is increase the number of troop poses. typically there are 3 troopers and one Troop Leader for a total of 4 discrete poses. Many games use unit sizes that range from 5 to 10. These print as a single piece so it would be nice to have a couple more unique poses. With 5 poses they could be printed as mirrors giving the feel of 10 different poses. Just a thought.

Overall I am super happy to finally be printing these out. The themes are lavish and include Centerpieces and Terrain bits that make the journey from imagination to physical model only because they can be 3D printed. 
 

Tuesday, May 11, 2021

Forward Base: Habitat 5 part 6 wrapping up


Wrapping up Hab 5 construction by adding the exterior steps, some resin details, and the exterior light acrylic.

Antenocitis Workshop have recently released some new steps and stairs for Forward Base which use acrylic steps for a super cool Sci-Fi look. I've not used them on Hab 5 because its a Vehicle Garage and Maintenance building so I rather liked the industrial grate feeling of the stock step but I will be using the new kits when some of the entertainment and command buildings show up on my desk.

As steps go these are pretty easy. I set the stringers in first and then set the steps while there was still some flex in the glue.
There are two exterior personnel doors.  In retrospect I might have made the steps removable for ease of storage between games... that may yet occur if the prove too vulnerable jutting out as they do.  The vehicle ramps are hinged and fold flat against the side of the building when not in use so they are much less of a concern. 

Next up are they acrylic exterior lights.

One of the upgrades to the building included full light brackets instead of the tiny resin caps that are usually used for mounting the lights. I really like the full brackets but they have a small disadvantage in that they have a set length... (Doh! I have, somewhat belatedly, realized I "could" have cut the bracket to alter their length a bit.  It would have been fussy but totally doable... oh well... lessons learned!)
  The acrylic rod provided with the kit was just a bit short of what is required to fully fill all the brackets.  With the stock endcaps I would measure the rod and set the individual light length according to rod supply... except... that I think of Forward Base as a modular system with many interchangeable parts which means, for example, all lights used for all "Hab 1" style buildings should be the same length... so it looks wonky fast if that is not the case. 

Left you see the universal jig that is evolving to cover the various Hab light lengths. 

Right we see... I ran out of acrylic rod! Not to worry I'll swipe some from the next building I open and fill it in. Antenocitis also sometimes has acrylic rod available separately which is super useful.
The fixture count was odd.  There were six brackets but 7 scribed locations for them. Its not a big issue as this middle location is a bit camouflaged by the other scribed details.

You can see here the Bay Doors in their closed position. The resin face is inside the bays as thsi orientation gave the best fit.

I didn't have any vehicles close to hand for a comparison but I did have the Forge World Gargantuan Squiggoth on the table for some repairs. The poor thing took a hit to the tail and some of the Big Shootas during the move here. Its all better now. You can see the Hab 5 is large enough to offer even this big fella some cover!

It also occurred to me that Hab 5 might make a good Lair for a Supers Game... Its a really big space with room for a couple of vehicles and multi level combat internally... food for thought!


Wednesday, April 28, 2021

Forward Base: Habitat 5 part 5 "Beyond the Rough Guide"


From here forward we're kind of on our own. The "Rough Guide" over at Antenocitis Workshop does not cover the interior catwalks and stairs or the external resin bits. This building is from the Forward Base Kickstarter and may have been redesigned when the range was revamped a while back.

First order of business is to identify parts and dry fit everything... and I mean everything! I can't stress this enough.

Here I've found the stringers for the stairs and set them dry into the sockets.

Here I set in the "T" shaped catwalk. My first surprise came here. The catwalk did not fall into position on  the stringers. Like by a full 1/8". I though wow... I've never had a piece, that I was certain was the right part, miss by this much. Turns out the error was entirely mine. I had assumed that the catwalk was intended to be removable and would just sit, unglued, on the frame but this is not the case.

There is a slot on the back wall that accepts the Catwalk. When in position it settles securely onto the stringers. The fit is tight enough, and the snap effect pronounced enough, that I am positive this is intended to be a one-time operation. This really exemplifies why the dry fit is such an important step.

Next up... the steps. I finally identified the yellow frames as steps... I know... I'm a bit slow... I had wondered for a while what those were... and where the steps were... and didn't put it together until now.

On the plus side these steps were loads easier to build than the usual system Antenocitis Workshop uses. they also are very broad and it looks like models with modest bases could actually stand securely on them!


I started by dry fitting all the steps to make sure they didn't need any adjustment and to note the way they fit was supposed to work. From there it was gluing the top step and the bottom step into position and then placing the stringers and Catwalk in position before everything had dried.

Once that step had dried I added in the remaining steps and leveled them as I went. The notches are a little shallow so its easy to get something just a bit tilted... you can see through he bay door that the center step droops a bit. This got adjusted after the picture.

A view of the adjusted steps through the regular door.
With the interior wrapped up it was time to look at the exterior details. Here you can see that a resin vent has been added. The upgrade kit also included resin replacements for the two lower square white vents but these were not perforated and I ended up liking the way they looked when painted so will save those bits for another project.
The large resin exhaust fans are in position. The slotted MDF remains as is on the inside and would have looked fine on the outside but the resin caps are very nice and help with the flatness that MDF designs tend to have.

At this point I began dry fitting the ladders and made a major discovery!

The ladders extended downward well below the level of the floor...
... which allowed me to finally identify what these bits were! These are part of the Hab X Booster packets. Apparently the boosters are for lifting the Habs off the ground and allow for cool stairs etc...

I got these Boosters for all the Habitats but now have to decide which buildings can take them. Habitat 3 for example is a small living quarters Habitat that can be stacked on top of other Habitat types via an MDF clip arrangement.  In that case the Booster doesn't get used.

Fortunately the Larger Habitats like Hab 5 will all take them so there is not decision to make... on with the Boosting!
Now that the building is boosted those pesky ladders fit perfectly. Another victory for the dry-fit!

There are three ladders. This long one, a shorter one that is affixed between the Bay Doors, and a very short one that allows access between the shorter roof and the taller section.  These ladders interact very much with the removable roof panels so care needs to be taken when fitting and gluing these into position. Pay particular attention to the fit of the shortest ladder as one of the roof panels has to be able to slot in under it and the other panel slots in from the side. Just be sure that the lower roof panel is not obstructed, or accidentally glued in... either condition would be a major fail!

The other two ladders can be seen here under clamps.

The bay door ladder has a tight fit between the bay doors and should be used to help position them. I did not do this and ended up having to shave  a bit off the back side of one of the lower tabs to get a flush fit.

For next time... non-functional exterior acrylic rod lights, possibly some functional interior (key fob style) lights, and some odds and ends like resin covers for the etched power couplings.


 Other than some weathering, all that will remain is to make some decisions about the various doors. Non of them are "working" doors and are either stood into place, held in place by compression, or Glued in place.  At the moment I'm leaving these unglued and will revisit them if that doesn't work out in practice. When the range was redesigned one of the big revisions was to replace the non-functional acrylic "Hologram" doors with working MDF/acrylic doors, many of which have a structure that implies a small airlock. 


Friday, April 16, 2021

Forward Base: Habitat 5 WiP Part 4 "The Ramps"


Today we move beyond the Rough Guide, add the ramps, and begin sorting the left over parts to see where to go next.


First up... I somehow missed installing this workbench which is clearly shown in the drawings of the rough guide. It went in without a hitch but, due to the nature of MDF, there was a risk that the back right corner would separate and tent up. To reduce the risk of that I used a chopstick to press the corner down.

Beyond the Rough Guide...
This is a first gen Kickstarter version of this building and the Rough Guide doesn't address any of the optional resin components.

I assembled and painted the garage door frames and then glued the resin garage doors to their MDF counterpart to get door textures on both sides of the piece in the same way that I did the vent covers in the walls. Unlike the vent resins, which are slightly larger then the MDF they replace, the Garage Door resin is slightly smaller than the MDF it replaces. This will be tricksey later...


The resin frames don't precisely conform to the opening so I used a Sharpie to blacken round the edges. These small spaces will be recessed once the resin is on and won't be visible. More importantly I intend to use this lip to let the garage door sit in the right position when the doors are "closed".

Above the door here you can see one of the resin Vents. Because the resin is larger than the cut-out it sits very nicely and self levels once the MDF vent is glued behind it. 


Time for more adventures with clamps, blue tape, and Super Phatic glue!

At this point I realized that the Garage Doors were going to be reluctant to sit in the door frames resin side out. The largest part of the door is smaller than the opening and the locker wall just inside the door prevents clean access to the inside lip.  I can magnetize the doors, and will probably have to anyway, so they don't fall over when bumped or jostled, but the doors sit very well in the reverse orientation.


 Onward to the Ramps!

The habitat 5 ramp instructions are pretty clear and easy to follow for building the hinges. The hinges were constructed and here you see the top and bottom view of the ramps.

As always I'll go back at the end and dress up the scuffs from where the MDF parts were removed from their frame. Reaper "Nut Brown" is almost a perfect match to the seared brown edges.


I stood the building on end to line up the ramps the way I wanted and glued the hinges on. The ramps work as designed although I'm gonna have to dirty up the underside... not that the building should be deployed with the ramps in the upright position but... ya never know!


 Extra resin bits...

There are a couple of power supply panels that attach to the outside of the building, three fan covers, two vid screen frames, six light fixtures (I actually need seven but one seems to have escaped during the long Winter pause so I may need to fabricate on from the MDF Frame debris pile)

...and then came the five angular pod things... these took a minute to figure out but once I got looking at the spare MDF pile and how the ladders must attach to the building it became clear that these are Feet to support the building above ground level. Its interesting because these are optional resin bits but the ladders require the building to be elevated or the ladders would have to be cut down to fit.

Not shown are a handful of small resin vent covers that I ended up putting in the spare parts bin because the interior etched areas that they cover were not perforated like the main vents. I ended up wanting to keep the interior vent details all MDF and painted similarly. These covers won't go to waste though! Its always handy to have a few extra bits like those.

Next up... finish painting these extra resins and sort out the remaining MDF installation that wasn't covered in the Rough Guide. This is mostly exterior ladders and interior catwalks. I seem to be missing the steps for the catwalk access so I'll have to take another look round to see if they wandered off during he extended time this sat on my desk. At any rate I think general construction should be finished in one more session and then any additional weathering or detailing will be tackled. There is one spot on the outside of the building that just looks unfinished so I'll have to do something to dress that up.

Back to the desk!


Wednesday, March 31, 2021

Reaper Fantasy Scenics Ritual Circle and Statue

Reaper Bones 4 has a Fantasy Scenics segment that I'm working my way through.  Today I've got the Ritual Circle and The Statue.. which also includes a small ruined temple.

For the Ritual Circle I thought I'd go more towards a horizontal Stargate or Portal since more of my scenarios would find that useful. Transiting models can stand right on it.

First its a black Primer coat then the red lettering with Blood Red (Reaper (R)) and a Drybrush to Highlight the edges of the lettering with Fiery Orange (R).

A quick Drybrush of the whole model follows moving through Cloudy Gray (R), Sky Gray (R) and Solid White (R).

Then the Washes. Blue (Secret Weapon (SW)) in the circle center and inner Surface of the Arc Structures then Sapphire around the outer edge of the circle and on the outer side and crevices of the Arc Structures. The coverage of these was intentionally uneven and the edges blended. Once completely dry Solid White (R) was dry brushed near the cracked details and to create some sense of motion across the main circle. The edges of detail on the Arc Structures were treated the same way.

The sandy earth areas were washed with Flesh (SW) and Dry Brushed with Sunny Skin Tone (Vallejo (V)).

For scale you can see a WiP Wood Elf from Atlantis Miniatures.


The Statue and Temple were treated similarly to the Ritual Circle but use a lot more colors. The floors got some of the same Flesh (SW) as a glaze in places to show the effects of traffic and time.

The Pillars have glazes of Blood Red (SW) and Green (SW) and are re dry brushed with Solid White (R) in an effort to represent some of the more complex Marbles and other stone types used in temple construction.

The Statue itself got a wash of Blood Red (SW) and The Robe of Verdigris Light Green (SW) before getting a final dry brush of Solid White (R).

Both of these models are intended as regular to heavy use game scenery so I avoided putting in details like weeds and leaf accumulations in favor of simple and durable in hopes that they wear better.

Our Atlantis Miniatures Wood Elf WiP has returned to provide scale.

Speaking of the Wood Elves. Here is a WiP shot taken just after the red lettering was started on the Ritual Circle.

These have had color blocks and shading done but not yet highlights or fine detail. I'm using a lot of blue and purple to shade to give some verve to the green base color. I'm painting the bases at the same time as the model to see if that helps to get a camouflaged feel but maintain enough separation to keep them from actually disappearing into the base. Early days on these.
 

Wednesday, February 17, 2021

Atlantis Miniatures Wood Elves WiP


I'm really excited about these Wood Elf minis from Atlantis Minatures. They are part of a Kickstarter fullfillment so might not be up in the shop yet but they historically move pretty quickly from Kickstarter to regular product.  Very nice and kinda rare!
The models came with an assortment of bases. Some are fully detailed resin some are beveled plastic rounds. There was a good supply of basing bling to add details like forest critters, mushrooms, vines, big stones, and the like. This really inspired me to dive into the greenstuff and get to sculpting!
There are four different types of mounts in the set. A giant elk for the Male Warlord, a big panther for the Female Warlord, large Stags, and smaller Deer.

There are male and female versions of all the elves so this will make for a very thematic, and very scary, wood elf Kinband Warparty. You'll be seeing more of these soon but I wanted to say these are not your kinder, gentler type of "Wood Elf"... they are more like "Feral Elf"... many have horns themselves... they look like the sort of merciless forest guardians that might even eat any trespassers they find! They are gonna be fun! 

Friday, January 22, 2021

Forward Base: Habitat 5 WiP part 3


A quickie today as the resin/MDF hybrid vents get installed en masse.

Lots of clamps!

I think there were 9 small vents and 8 Large ones.

These were fussy to paint even though the scheme is simple.


The end result however was very cool.  The vents show well on both sides and the final glue up went without a hitch.  In the bottom picture the MDF inside vents are visible as well as the resin outer pieces.


The important part is to assemble the vents so that the smaller MDF portion is precisely centered on the larger resin bit and the overhang is even all the way round.  This has the effect of lining everything up nicely with no adjustment required during the clamping.

The White Formula is: Graveyard Bone (Reaper (R)) x2 over Black Primer, Dry-Brush Splintered Bone (R) edge with Storm Shadow wash (Secret Weapon) wash interior areas of vent grilles with Storm Shadow on both large and small vents.


Next up for Hab 5 are the ramps to the vehicle doors and the resin upgrades to that same area.  After the ramps we'll be moving beyond the "Rough Guide" to do the remaining interior details, access ladders, additional air handlers, figure out what to do about the area around the side door that looks unfinished and out of place... and finally... add the acrylic light fixtures to the outside.  That should finish the build except for any weathering that I decide to do later.  That will be done as a batch of buildings to help me keep the effects consistent. 

Thursday, January 21, 2021

Mixed Stone Ruin Process


 After working for a long time in the Greystone Village format I started thinking that I needed some other complimentary stone colors to liven the place up!

This is a step by step of the process used to get to the end state you see on the left.  

This is a very fast process but gave a solid result.


The model is a ruined doorway from the Reaper Bones 4 Kickstarter Fantasy Scenics set.


I undercoated this with Krylon Camo Brown paint/primer.

Picked out some areas of color with 4 basic colors.

Stormy Grey (Reaper(R)), Grey Mist (R), Handle Wood (R), and Krylon Camo Brown. (This is the undercoat color and was not re-applied... just left "bare")


 Stormy Grey is a very dark grey, Grey Mist is a lighter grey with a fair bit of blue added. Handle Wood is a very light brown that is almost tan and the Krylon Camo Brown is a very dark bark brown.

Base coats of the greys were brushed on damp while the handle wood was wet stippled on to give the uneven coverage an irregular rocky texture instead of weak brush strokes.


First highlight layer:
Sky Gray (R) Drybrush over all grays.
Sunny Skin Tone (Vallejo (V)) Drybrush over all browns except the "ground" part of the base.

This starts tying the different colors together so they will look like they've been standing in a pile together for a long time.  The underlying color differences are reduced a little but still have a variegated appearance.
Lining:
Sewer Water Wash (Secret Weapon (SW))
Line all rocks and cracks edge the divots. This is fast and easy and uses a mid size brush with a decent tip just wipe off any excess that looks like a brush stroke.

Damp brush Saddle Brown (R) over the "Ground"
Of course more could be done with the ground but this is a generic game piece that to look at home in a dungeon, a jungle, or in the frozen wilds so it remains neutral here.


Final Step before sealer!

Lightly drybrush the whole model with Splintered Bone (R) focus a little extra coverage on the tops, edges, and broken stone to make them pop.

Splintered Bone is a bright off-white color.


Reaper Dwarf for scale.