Labels

3D Printing (25) 40K (62) Abyssal Dwarf (2) accessories (5) Adeptus Arbites (4) Adeptus Mechanicus (1) ADMech (1) Age of Sigmar (2) Agents of the Imperium (2) Angron (2) Anime (4) Antenocitis Workshop (32) Anvil Industries (5) AoS (4) ArmorCast (3) Army (4) Army Painter (10) Astra Militaria (24) Atenociti's Workshop (7) Atenocity (1) Atlantis Miniatures (4) Avatars of War (2) banner (4) base coat (16) base color (8) bases (45) Basilean (1) Battlefoam (1) Beasts (2) big lobbas (1) Bitspudlo (1) Black Scorpion (1) Black Templar (1) Blood Rain (16) Board Games (32) Bolt Action (1) Bombshell (1) Bones (14) Bretonnian (1) Bruegleburg (4) Bruxx (2) Campaign (20) carapace (1) Carnevale (8) chaos (25) Chaos Dwarf (2) chaos gate (3) Chaos Space Marines (18) Citadel (2) claw (1) Clawed Fiends (1) clear resin (1) Construction Guide (1) Contagion (12) conversion (3) Counts as (25) Craftworld Eldar (2) Custome Counters (2) Customeeple (1) Daemon Prince (4) Daemonettes (1) Daemons (5) Dark Angels (4) Dark Eldar (47) Dark Elf (6) Dark Souls (7) Darkness & Light (3) Darksword (2) Deadzone (15) Death Guard (9) decals (1) Deepcut Studios (3) Demented Games (3) dicebox (1) Dorothy (2) dragon (2) Dreadnought (5) Dreadtober (5) Drukhari (2) Dryad (1) Duncan "Shadow" Louca (1) Dwarf (7) epicast (2) Evangelion (3) Executrix (1) eyes (2) Fallout Wasteland Warfare (11) Fantasy Battles (19) Fast Panda (3) FBN (1) Fight Like a Girl (1) Finecast (4) Flames of War (4) Fluff (14) Forest Goblins (2) forge world (50) fortress (8) fortress name (2) Forward Base (10) free hand (1) Frostgrave (8) Game Mats (3) game room (1) Games Workshop (13) gamesday 2011 (1) gargantuan squiggoth (8) Geekfest 2010 (1) Geekfest 2011 (4) ghouls (1) Gloomhaven (1) Goblins (2) gobsmasha (1) golden demon (1) Greasus Goldtooth (2) greenstuff (10) Greenstuff World (1) Grotesques (3) Guest Painter (3) gunwagon (1) GW (8) GW Technical Paint (11) Halo Fleet Battles (1) Harlequin (1) Heresy Girls (5) Heresy Suppression Force (10) Hexy-Shop (1) Hi-Tech (2) highlight (2) horror (1) Imperial Guard (23) Infinity (23) Inquisition (4) Iron Empire (17) Iron Halo (1) Jailbirds (35) Joan of Arc (3) JR Miniatures (1) juggernaut (10) khorne (1) Kickstarter (43) Kill Team (1) Kingdom Death (17) Kings of War (9) Kromlech (3) KST (4) Kurganova (3) Land Raider (1) Large Scale (4) Lead Adventurers (3) legacy models (2) lighting (7) Lizardman (1) Lost Islands KS (2) lust elves (12) made for Infinity (33) Malice (1) Malifaux (13) Mantic (37) mawloc (1) max mini (2) MDF (28) mecha (3) Mechanicum (1) Mercenary Grots (1) Metallic (1) Miniature Figure Painting (7) miniature wargames scenery (3) model building (4) Modiphius (2) Mordheim (24) Movement Trays (1) moving (6) Mystery (4) Mythic Games (1) names of things (14) narratives (22) Necrons (3) Night Goblins (1) Nose Art (1) Nurgle (16) objective markers (2) Obliterators (2) Ogre Kingdoms (6) Oldhammer (4) orange (1) Orcs (1) ork (26) osl (2) P3 (1) Patreon (1) Plague (1) Plastic (4) Post Apocalypse (8) Pre-Heresy (2) Primarch (2) Primer (6) Privateer Press (1) Project Thunderhawk (28) prototyping (1) Proxies (24) ptimer (1) Rackham (2) Raging Heroes (125) Rampage (6) Ravager (1) razorwing (1) Realm of Chaos (1) Reaper (34) red (25) repair (6) resin (28) Resurrectionist (2) Resurrectionists (1) Retinue (1) review (1) ripper swarm (6) ripperswarm (1) Roleplaying (1) RPG (31) runtbot (7) Sacred Heart (1) scatter (7) Sci-Fi Space Battles (6) Scibor (2) Secret Weapon (77) Serene Dawn (12) Setting the scene (23) Shading (1) Silver Compass Designs (1) Sisters of Battle (25) Sisters of Eternal Mercy (11) Sisters of Sigmar (4) Skaven (4) Skin (2) Skirmish Game (8) Slaanesh (1) Slann (1) SnapMaker (5) Spartan Games (1) Sslyth (1) Star Saga (32) Starfinder (4) Steampunk (2) stl (1) Stone Crusher (3) Strigoi (1) studio (1) Studio Miniatures (1) Studio Swelter (4) SUPERCaT (1) Supers (1) Tabletop (9) Tabletop Art (3) Tabletop World (36) tank pit (1) Tantalus (6) Terminator (2) terrain (58) TGG (20) TGG the Game (3) TGG2 (22) The Dickensians (2) The Old World (2) The Order of Vampire Hunters (13) The World That Was (1) Theme (33) Third Party conversion bits (1) Thor Minatures (1) Thousand Sons (1) thunderhawk (3) Titanite Demon (1) tools (2) Toughest Girls in the Galaxy (9) Toughest Girls of the Galaxy (6) Toughest Girls of the Galaxy 2 (7) trukk (3) tutorial (2) Twisted (7) tyranid (12) UAF (1) Ubiquitous Rat (1) unboxing (4) Undead (2) undercoats (4) Undertown (15) Unwritten (5) Urkin (1) Vallejo (5) Vampire Counts (4) Vampire Hunter (2) Vampires (1) Vampiric Flesh (1) Vanguard (4) varnish (2) Vatican (3) vehicle (13) Venom (3) Video (1) Vikings (1) Void Elf (17) Void Elves (15) War Machine (1) War World Scenics (1) Warbands (3) Warchimera (3) Warhammer (13) warhammer the old world (1) Warpath (18) wash (33) water effects (17) weathering (61) weathering powder (14) WFB (1) WH40K (40) WHFB (14) WiP (22) Witch Hunters (5) wood (2) Wood Elf (4) World Eaters (2) Wracks (1) wraiths (1) WW2 (1) Wyrd (5) yellow (1) Ynnari (5) Zoggit (1) zombies (1)
Showing posts with label Setting the scene. Show all posts

Tuesday, April 12, 2022

Atlantis Miniatures: Wood Elf Warband


Atlantis Miniatures take on the wood elves is deliciously feral. Cast in a very high quality resin they are easy to handle, finely featured, require little or no clean up and take paint well. 

They are not your happy woodland tribe full of song and drink... oh no!...they are the wrath of the wood and are festooned with horns, bones, and living companion creatures.

I've imagined this as a Kinband that share a lot of common features.  The red, blond, and sandy hair for example. 

All of them share the mystical green/blue elven cloak and most have a skull attached at the waist, often with belts or strings of red beads.

There seems to be a correlation between the presence, and size, of antler like horns and the social status of the individual.

These first two are typical of the offering which usually has a male and a female version of each type of character. Here we see two Spell Caster/Wizard types.

I've further imagined this group to be travelling in a swamp so the bases are water soaked with stones and dead trees dominating the theme.

The set included a couple of scenic bases for specific models and a generous amount of scenic scatter like mushrooms, stumps, roots, and small animals. The remaining features were quick sculpts of greenstuff. The result was an entire warband with unique, but coherently themed, bases. It was a good approach and a nice alternative to the usual limitations of commercial base sets where there would be between 5 and 10 unique bases that would have to be repeated in various aspects throughout the project.

Here are two Assassins/Scouts, again in male and female versions. 


The druid is the only model that does not seem to have a female version.

These elves are obviously Hunters and use a lot of animal components in their wardrobe.

Below are grouped by weapon type. The warband has Bow, Spear, Pole arm, and Sword represented.


Bows.


Swords.
Many of the cloaks have complex embossed symbols.


The Elf Princess and her Guard all with a type of Polearm.


The Princess is differentiated by her blue cloak but she retains the mystic green hooded robe. The Princess and the Prince lead their family's infantry in its grim task.

As for infantry... all that remains is the Prince, and a small group of spear.  The rest of the warband is the cavalry lead by male and female Warlords.

Wednesday, March 31, 2021

Reaper Fantasy Scenics Ritual Circle and Statue

Reaper Bones 4 has a Fantasy Scenics segment that I'm working my way through.  Today I've got the Ritual Circle and The Statue.. which also includes a small ruined temple.

For the Ritual Circle I thought I'd go more towards a horizontal Stargate or Portal since more of my scenarios would find that useful. Transiting models can stand right on it.

First its a black Primer coat then the red lettering with Blood Red (Reaper (R)) and a Drybrush to Highlight the edges of the lettering with Fiery Orange (R).

A quick Drybrush of the whole model follows moving through Cloudy Gray (R), Sky Gray (R) and Solid White (R).

Then the Washes. Blue (Secret Weapon (SW)) in the circle center and inner Surface of the Arc Structures then Sapphire around the outer edge of the circle and on the outer side and crevices of the Arc Structures. The coverage of these was intentionally uneven and the edges blended. Once completely dry Solid White (R) was dry brushed near the cracked details and to create some sense of motion across the main circle. The edges of detail on the Arc Structures were treated the same way.

The sandy earth areas were washed with Flesh (SW) and Dry Brushed with Sunny Skin Tone (Vallejo (V)).

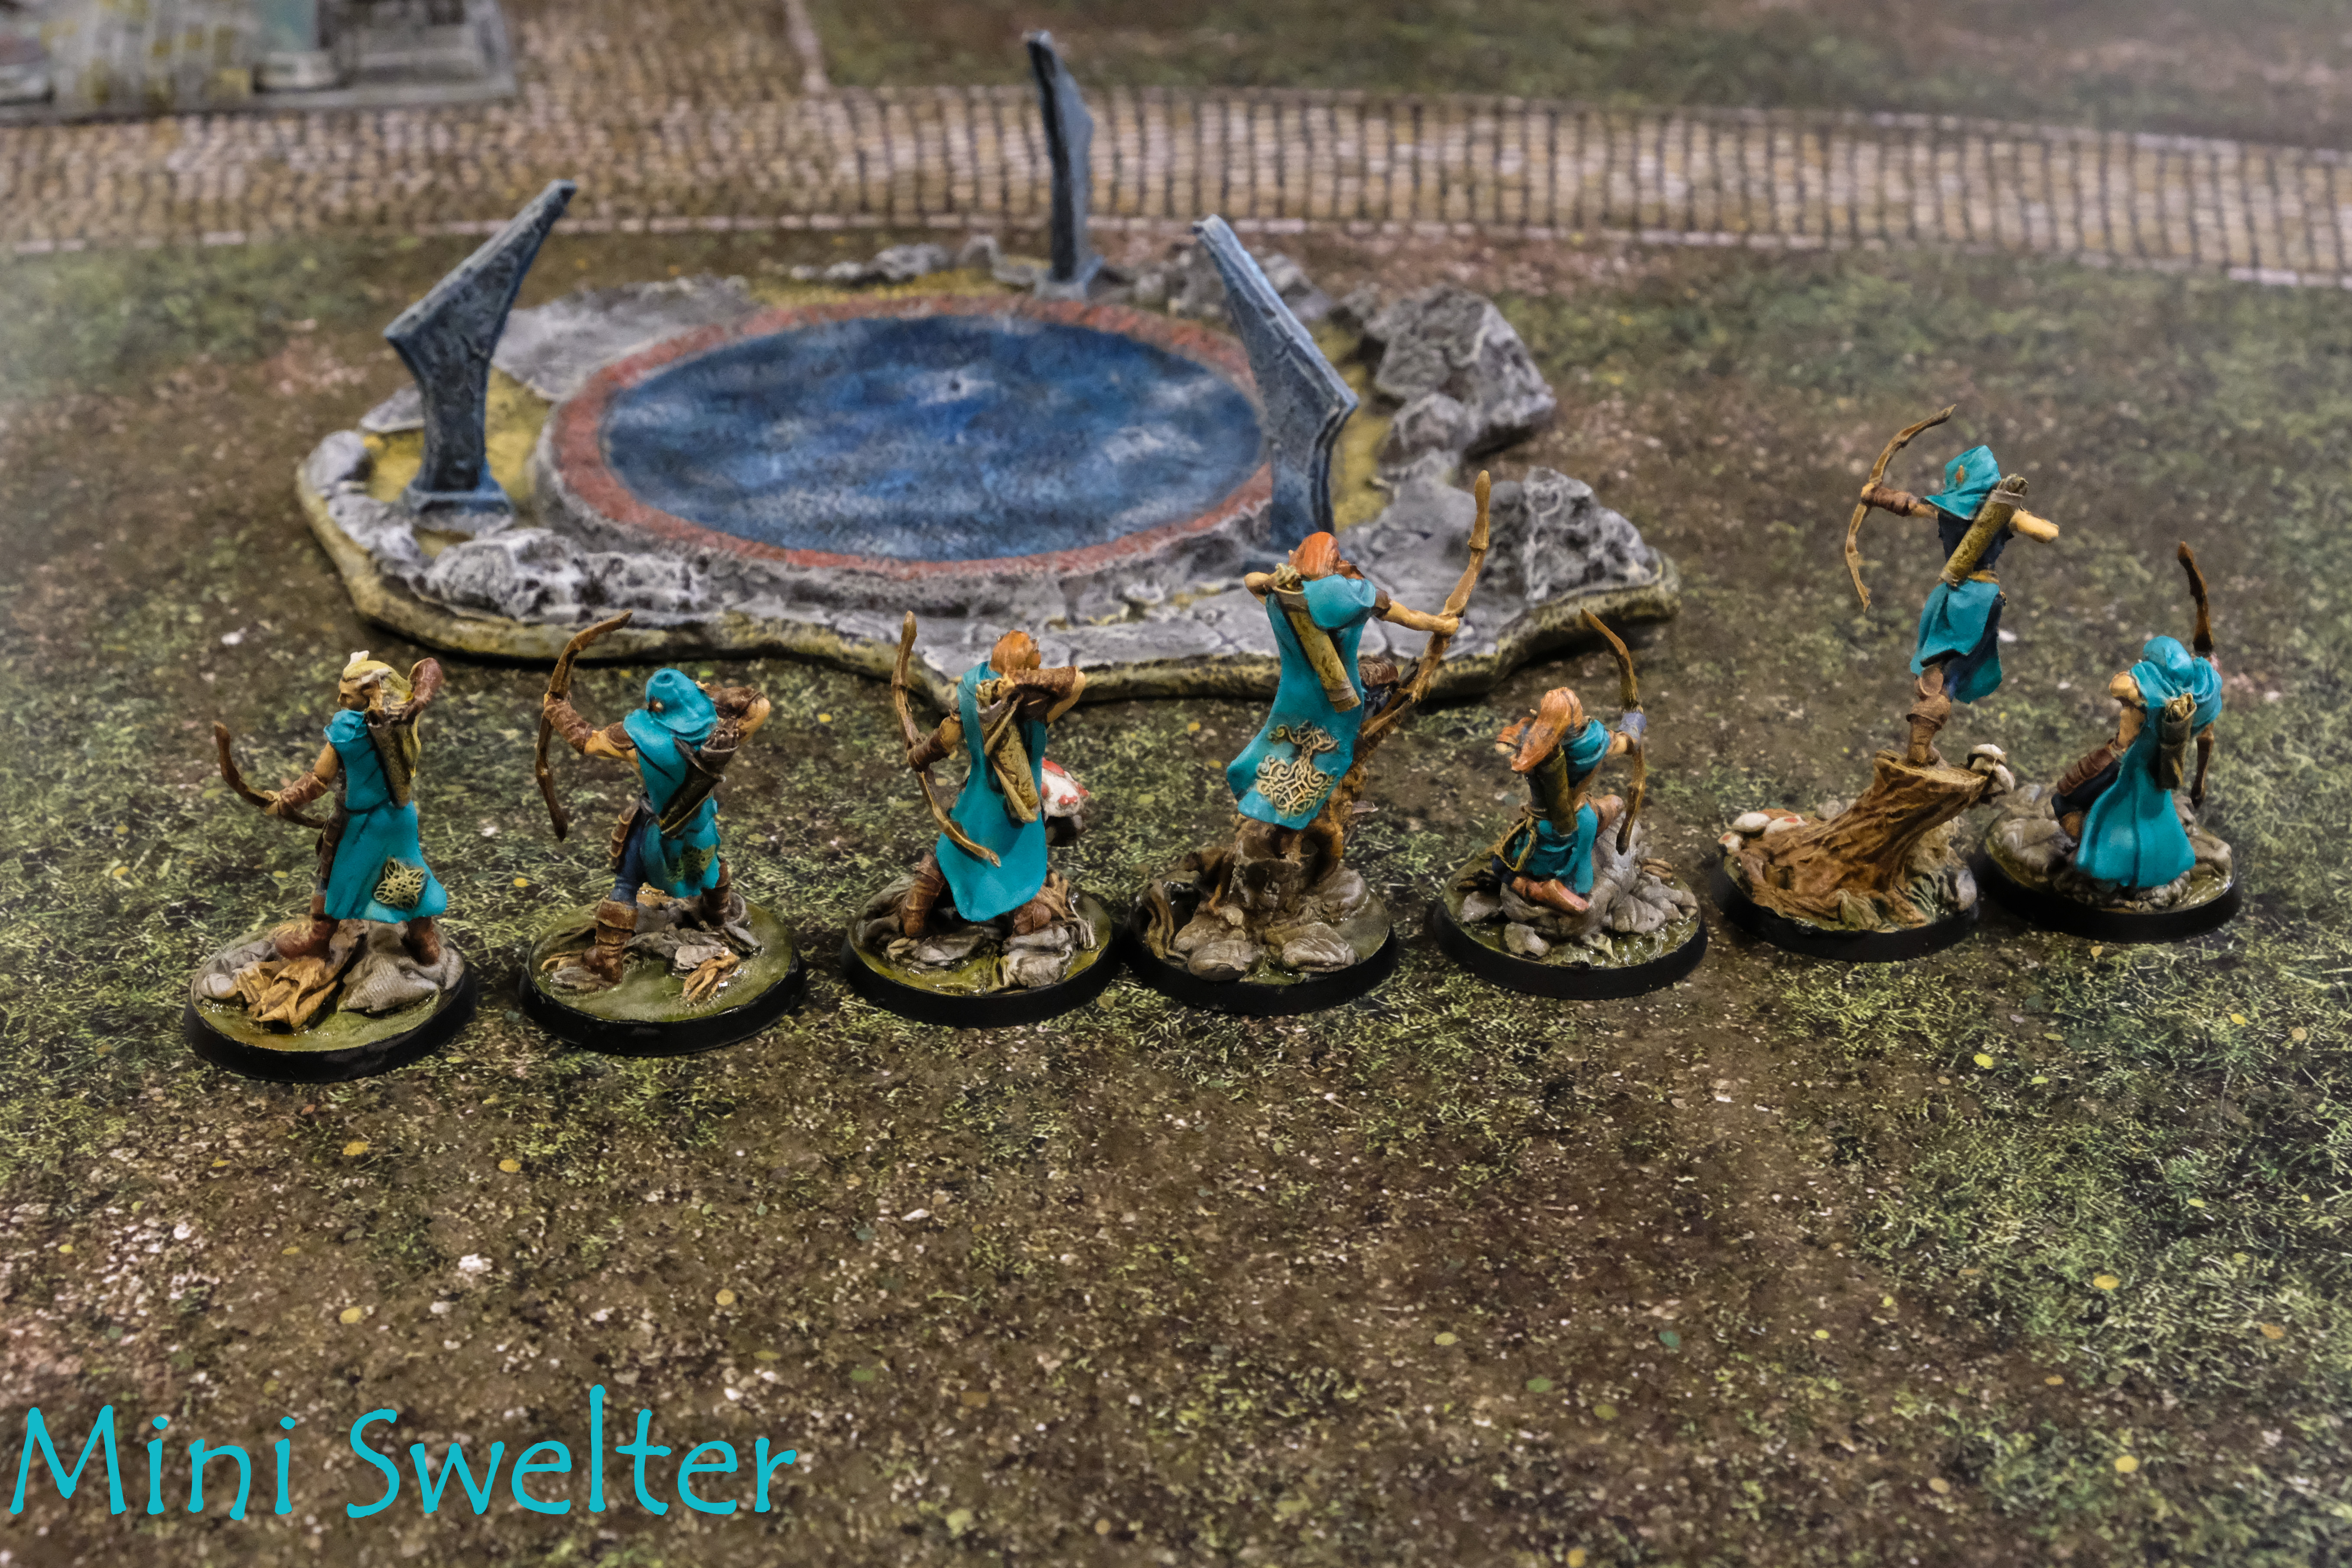
For scale you can see a WiP Wood Elf from Atlantis Miniatures.


The Statue and Temple were treated similarly to the Ritual Circle but use a lot more colors. The floors got some of the same Flesh (SW) as a glaze in places to show the effects of traffic and time.

The Pillars have glazes of Blood Red (SW) and Green (SW) and are re dry brushed with Solid White (R) in an effort to represent some of the more complex Marbles and other stone types used in temple construction.

The Statue itself got a wash of Blood Red (SW) and The Robe of Verdigris Light Green (SW) before getting a final dry brush of Solid White (R).

Both of these models are intended as regular to heavy use game scenery so I avoided putting in details like weeds and leaf accumulations in favor of simple and durable in hopes that they wear better.

Our Atlantis Miniatures Wood Elf WiP has returned to provide scale.

Speaking of the Wood Elves. Here is a WiP shot taken just after the red lettering was started on the Ritual Circle.

These have had color blocks and shading done but not yet highlights or fine detail. I'm using a lot of blue and purple to shade to give some verve to the green base color. I'm painting the bases at the same time as the model to see if that helps to get a camouflaged feel but maintain enough separation to keep them from actually disappearing into the base. Early days on these.
 

Wednesday, February 17, 2021

Atlantis Miniatures Wood Elves WiP


I'm really excited about these Wood Elf minis from Atlantis Minatures. They are part of a Kickstarter fullfillment so might not be up in the shop yet but they historically move pretty quickly from Kickstarter to regular product.  Very nice and kinda rare!
The models came with an assortment of bases. Some are fully detailed resin some are beveled plastic rounds. There was a good supply of basing bling to add details like forest critters, mushrooms, vines, big stones, and the like. This really inspired me to dive into the greenstuff and get to sculpting!
There are four different types of mounts in the set. A giant elk for the Male Warlord, a big panther for the Female Warlord, large Stags, and smaller Deer.

There are male and female versions of all the elves so this will make for a very thematic, and very scary, wood elf Kinband Warparty. You'll be seeing more of these soon but I wanted to say these are not your kinder, gentler type of "Wood Elf"... they are more like "Feral Elf"... many have horns themselves... they look like the sort of merciless forest guardians that might even eat any trespassers they find! They are gonna be fun! 

Friday, January 22, 2021

Forward Base: Habitat 5 WiP part 3


A quickie today as the resin/MDF hybrid vents get installed en masse.

Lots of clamps!

I think there were 9 small vents and 8 Large ones.

These were fussy to paint even though the scheme is simple.


The end result however was very cool.  The vents show well on both sides and the final glue up went without a hitch.  In the bottom picture the MDF inside vents are visible as well as the resin outer pieces.


The important part is to assemble the vents so that the smaller MDF portion is precisely centered on the larger resin bit and the overhang is even all the way round.  This has the effect of lining everything up nicely with no adjustment required during the clamping.

The White Formula is: Graveyard Bone (Reaper (R)) x2 over Black Primer, Dry-Brush Splintered Bone (R) edge with Storm Shadow wash (Secret Weapon) wash interior areas of vent grilles with Storm Shadow on both large and small vents.


Next up for Hab 5 are the ramps to the vehicle doors and the resin upgrades to that same area.  After the ramps we'll be moving beyond the "Rough Guide" to do the remaining interior details, access ladders, additional air handlers, figure out what to do about the area around the side door that looks unfinished and out of place... and finally... add the acrylic light fixtures to the outside.  That should finish the build except for any weathering that I decide to do later.  That will be done as a batch of buildings to help me keep the effects consistent. 

Thursday, November 19, 2020

Forward Base: Habitat 5 - The Workshop WiP

Forward Base: Habitat 5 - The Workshop


Habitat 5 is a workshop with two vehicle bays that should be an early structure for a new outpost.

The kit is from the Forward Base Kickstarter by Antenocitis' Workshop and this one includes the resin upgrade as well as the other additional rewards from that campaign.

I sprayed all the MDF with a dead-flat sealer and began painting the details.  These kits are pre-painted which does not mean that no painting needs to be done but rather that they have a single color per sheet paintable coating which allows for the painted surface to look a lot less like painted MDF.

You can see here the ramps are on a yellow colored sheet and I've painted in details like safety markings, logos, tools, etc... The floors and walls are grey and roof panels white. 

These are weathered panels which means the laser cutter was turned up to do some light scorching. It makes for a nice effect on the large areas that I leave unpainted like the grey floor of the vehicle bays.

I still have tool boxes and some cabinets to paint in before assembly.

Then came cleaning and priming the resin components and familiarizing myself with the types of parts that might be included. I learned from some earlier builds that the resin parts need to be considered from the very beginning as they sometimes completely replace structures early in the build process.
For vents and doors the MDF is pre-cut so the etched part can be removed and replaced with a resin upgrade. I have removed the parts to be replaced, turned them round, and glued them to the back side of the resin replacements. Now I'm in the process of painting both sides. In this way I get detailed vents and garage doors on both sides.


More on Hab 5 next installment... I also got a little work done on the body bags and am starting the ice vending machines and porta-loos for the Post Apocalypse table.

Last, but far from least, The massive Etherfields boardgame arrived just as I was coming up to post!

With a 17.5 kg mailing weight this thing is a real beast.  I'll be taking a look inside after my wife gets home so she can enjoy it too.

Cheers

Tuesday, July 7, 2020

Forward Base Habitat 3 construction process part 2

 One of the common issues with MDF buildings is that they look like MDF buildings.  Part of this is the way they interlock with visible joins but another way is that the overlap surfaces tend to be ignored in terms of details.

Antenocitis Workshop addresses the second issue by including a detail card for the end-caps.  This glues in place and ensures that the nooks and crannies have detailing that is thematically similar to the rest of the model. 


 These thin cards are easily attached with tacky glue or Super-Phatic (very thin, strong, PVA).  I clamp them in place for a few minutes to ensure a strong bond.
 Here is a "before" shot showing the plain end-caps.  Since the MDF is pre-painted it actually looks fine as it is... but its gonna be so much better after!


 To the right the end-caps have been installed and the detailing is very nice.  You will notice a difference in color between the edges of the end-caps and the base MDF.  This is easily sorted later with a quick touch-up pass using Nut Brown (Reaper) paint.


Clamping up the rest of the assembled shell.
 The remaining bits.  The two topmost thin strips that we were careful not to glue into place during the build, the roof/lid, and the end-caps for them.  Its best to wait to install the end-caps for these parts until after the resin goes in.  For the most part they work if the ends are aligned but small differences in the shell construction can be adjusted for in the final fit of these.
 Moving on to the remaining resin. Some of the resin was installed earlier in "part 1". To the left is what remains. (There is one extra locker shown as I was touching up a part from a previous Hab 3).

The large bunk wall usually requires a hot water bath to adjust for warping.  This is likely due to the big hole in it for the bunk assembly.  Its easy to straighten and when the bunk is attached to the wall it reinforces the shape nicely.
 At this point all the remaining resin gets pre-fitted, sanded as required to adjust the fit and then painted.  These are often a very tight fit that should be adjusted via sanding the edges of the resin bits until they fit snugly but don't require force to get into position. Keep in mind that the height of the resin will also likely need to be adjusted to be level with the top of the MDF.  I failed to notice that during this build and the top retaining strips were very tricky to get installed.

 The pre-fit of these parts is critical and should not be skipped.
 The painted walls can now be slid into place.  I align them using the printed floor graphics.

   Antenocitis Workshop really excels at minute details and photographic elements like video screens etc.  All the graphic elements here are from them except the tabletop which is repurposed from some hobby packaging.


Once the interior resin is in place the Topmost strips are finally glued into position and  the remaining end-caps can be installed.

Test fit the roof/lid for alignment mark with pencil and glue in the lid end-caps.  There can be some variation so be careful to get the alignment right before gluing these in place. Carefully trim the overhang, if any, with a sharp hobby knife.


Now its touch up time.  Go round the whole model with Nut Brown and toch up the spots where the MDF shows bare... like where it was previously attached to the frame etc... 
 A "in progress" view to the right.  you can clearly see the difference between the touched up end caps and those not touched up.
All that remains for "part 3" are the exterior acrylic lights... which are a tiny bit tricksey..., the interior/exterior scatter, and the lower "feet"  which are unique to Hab 3 and help it interlock when stacking with other buildings in the series (specifically Habitat 1 or Habitat 4) and should not be installed until their companion buildings top lugs have been installed to make sure they line up properly. 

Part 3 will be a bit coming as I'll want to finish this after building Habitat 1 or 4...

Cheers

Wednesday, June 17, 2020

Archaica Schola Wargaming shop opens in the Undertown!


 I'm so excited to show you Archaica Schola Wargaming a new 28mm MDF kit from Antenocitis Workshop!

This is the stock kit plus the upgrade pack with a few additional decals added but otherwise straight out of the box.  No painting or weathering was done.  I expect I'll dirty up the outside of it eventually but I'm trying to decide where it fits into my building group.
 I've assigned it for the moment to the Undertown.. which is where all real wargames shops reside... but the building looks a little upscale for the neighborhood so it may be relocated to Midtown or the Mall... I'll probably do weathering at that point to make it blend better.

I added LED light to the ground floor but left the upper level without illumination while I think of an unobtrusive way to accomplish that.
 The kit is pretty spectacular and features a large clear acrylic roof so you can see the game room while playing... of course that is waaaaay tooo much sun for your average gamer to endure so I think it'll be an evening hotspot and mostly empty by the light of day.

Still... it does a great job of advertising that the buildings have live spaces inside.... which is awesome!
I ended up gluing in the game tables and the advertising walls instead of magnetizing them this time because they are easy to maneuver models around or on.  There are no resin parts in this kit and everything is MDF or clear acrylic.

The cute anime girl is from a Guilty Crown radio control car decal set.  I also got a girl in a wheelchair to mark a handicap parking space and some block text for another outside wall from the same sheet.  Everything else comes with the kit.
 Stocked snack shelves of snacks, hobby supplies, paints and washes, and an assortment of tabletop miniature game products as well as three display cases for painted miniatures... lots of fun to be had in here!
 This place will probably serve as the group hangout for the RPG I'm brewing up around the Kingdom Death: Death High mini line... I'm thinking a kind of Sci-Fi Knights of the Dinner Table meets Haganai and Angel Beats feel with a group of friends who rotate through playing different RPGs as well as dealing with life in a "Sci-Fi Supernatural Martial Arts Comedy" setting.  Might be fun... might be a mess... we'll see!
 A view of the Handicap parking space which is usually under an overhang.
Archaica Schola in situ.

Saturday, May 23, 2020

Let there be light! The Undertown illuminated.


The Undertown has lights in the form of LED Keychain Torches blutacked to the ceilings.  These provide about 12 continuous hours of illumination.  The batteries are replaceable but it may be cheaper to just replace the whole torch when as required. I got them from Amazon for around $0.50 each including shipping in lots of 20.

The lights make a big difference even when the room is fully lit.  Interior details can be seen through the windows in rooms that were otherwise in full shadow.

Whiskey Jacks gets great effects in the main saloon and through the slits of the armored windows windows and doors of the back office.
 Following are a lot of pictures of the various buildings of the Undertown where some buildings are illuminated and others in the photo are not.  The difference really jumps out. There some pictures of the fully illuminated table in various ambient light states.  At the end are a couple of shots of the A-Z Mart (weathered) which is pretty eerie looking.

 All of these buildings, most of the scatter terrain, and the game mat are from Antenocitis Workshop.
Sake shop upstairs fashion outlet downstairs.

 Flats

Lit and unlit buildings.

 The Neo-Tiki Hotel.

Neo Tiki Hotel office and guest services.
 The Data Trust.

 The computer screens really pop in the Data Trust. Full table regular room light.


 Full table at half room light.

 Full table in the dark.


 A-Z Mart regular light.
A-Z Mart in the "Vamps and Zombies and Weres... oh my!" dark