Labels

3D Printing (25) 40K (62) Abyssal Dwarf (2) accessories (5) Adeptus Arbites (4) Adeptus Mechanicus (1) ADMech (1) Age of Sigmar (2) Agents of the Imperium (2) Angron (2) Anime (4) Antenocitis Workshop (32) Anvil Industries (5) AoS (4) ArmorCast (3) Army (4) Army Painter (10) Astra Militaria (24) Atenociti's Workshop (7) Atenocity (1) Atlantis Miniatures (4) Avatars of War (2) banner (4) base coat (16) base color (8) bases (45) Basilean (1) Battlefoam (1) Beasts (2) big lobbas (1) Bitspudlo (1) Black Scorpion (1) Black Templar (1) Blood Rain (16) Board Games (32) Bolt Action (1) Bombshell (1) Bones (14) Bretonnian (1) Bruegleburg (4) Bruxx (2) Campaign (20) carapace (1) Carnevale (8) chaos (25) Chaos Dwarf (2) chaos gate (3) Chaos Space Marines (18) Citadel (2) claw (1) Clawed Fiends (1) clear resin (1) Construction Guide (1) Contagion (12) conversion (3) Counts as (25) Craftworld Eldar (2) Custome Counters (2) Customeeple (1) Daemon Prince (4) Daemonettes (1) Daemons (5) Dark Angels (4) Dark Eldar (47) Dark Elf (6) Dark Souls (7) Darkness & Light (3) Darksword (2) Deadzone (15) Death Guard (9) decals (1) Deepcut Studios (3) Demented Games (3) dicebox (1) Dorothy (2) dragon (2) Dreadnought (5) Dreadtober (5) Drukhari (2) Dryad (1) Duncan "Shadow" Louca (1) Dwarf (7) epicast (2) Evangelion (3) Executrix (1) eyes (2) Fallout Wasteland Warfare (11) Fantasy Battles (19) Fast Panda (3) FBN (1) Fight Like a Girl (1) Finecast (4) Flames of War (4) Fluff (14) Forest Goblins (2) forge world (50) fortress (8) fortress name (2) Forward Base (10) free hand (1) Frostgrave (8) Game Mats (3) game room (1) Games Workshop (13) gamesday 2011 (1) gargantuan squiggoth (8) Geekfest 2010 (1) Geekfest 2011 (4) ghouls (1) Gloomhaven (1) Goblins (2) gobsmasha (1) golden demon (1) Greasus Goldtooth (2) greenstuff (10) Greenstuff World (1) Grotesques (3) Guest Painter (3) gunwagon (1) GW (8) GW Technical Paint (11) Halo Fleet Battles (1) Harlequin (1) Heresy Girls (5) Heresy Suppression Force (10) Hexy-Shop (1) Hi-Tech (2) highlight (2) horror (1) Imperial Guard (23) Infinity (23) Inquisition (4) Iron Empire (17) Iron Halo (1) Jailbirds (35) Joan of Arc (3) JR Miniatures (1) juggernaut (10) khorne (1) Kickstarter (43) Kill Team (1) Kingdom Death (17) Kings of War (9) Kromlech (3) KST (4) Kurganova (3) Land Raider (1) Large Scale (4) Lead Adventurers (3) legacy models (2) lighting (7) Lizardman (1) Lost Islands KS (2) lust elves (12) made for Infinity (33) Malice (1) Malifaux (13) Mantic (37) mawloc (1) max mini (2) MDF (28) mecha (3) Mechanicum (1) Mercenary Grots (1) Metallic (1) Miniature Figure Painting (7) miniature wargames scenery (3) model building (4) Modiphius (2) Mordheim (24) Movement Trays (1) moving (6) Mystery (4) Mythic Games (1) names of things (14) narratives (22) Necrons (3) Night Goblins (1) Nose Art (1) Nurgle (16) objective markers (2) Obliterators (2) Ogre Kingdoms (6) Oldhammer (4) orange (1) Orcs (1) ork (26) osl (2) P3 (1) Patreon (1) Plague (1) Plastic (4) Post Apocalypse (8) Pre-Heresy (2) Primarch (2) Primer (6) Privateer Press (1) Project Thunderhawk (28) prototyping (1) Proxies (24) ptimer (1) Rackham (2) Raging Heroes (125) Rampage (6) Ravager (1) razorwing (1) Realm of Chaos (1) Reaper (34) red (25) repair (6) resin (28) Resurrectionist (2) Resurrectionists (1) Retinue (1) review (1) ripper swarm (6) ripperswarm (1) Roleplaying (1) RPG (31) runtbot (7) Sacred Heart (1) scatter (7) Sci-Fi Space Battles (6) Scibor (2) Secret Weapon (77) Serene Dawn (12) Setting the scene (23) Shading (1) Silver Compass Designs (1) Sisters of Battle (25) Sisters of Eternal Mercy (11) Sisters of Sigmar (4) Skaven (4) Skin (2) Skirmish Game (8) Slaanesh (1) Slann (1) SnapMaker (5) Spartan Games (1) Sslyth (1) Star Saga (32) Starfinder (4) Steampunk (2) stl (1) Stone Crusher (3) Strigoi (1) studio (1) Studio Miniatures (1) Studio Swelter (4) SUPERCaT (1) Supers (1) Tabletop (9) Tabletop Art (3) Tabletop World (36) tank pit (1) Tantalus (6) Terminator (2) terrain (58) TGG (20) TGG the Game (3) TGG2 (22) The Dickensians (2) The Old World (2) The Order of Vampire Hunters (13) The World That Was (1) Theme (33) Third Party conversion bits (1) Thor Minatures (1) Thousand Sons (1) thunderhawk (3) Titanite Demon (1) tools (2) Toughest Girls in the Galaxy (9) Toughest Girls of the Galaxy (6) Toughest Girls of the Galaxy 2 (7) trukk (3) tutorial (2) Twisted (7) tyranid (12) UAF (1) Ubiquitous Rat (1) unboxing (4) Undead (2) undercoats (4) Undertown (15) Unwritten (5) Urkin (1) Vallejo (5) Vampire Counts (4) Vampire Hunter (2) Vampires (1) Vampiric Flesh (1) Vanguard (4) varnish (2) Vatican (3) vehicle (13) Venom (3) Video (1) Vikings (1) Void Elf (17) Void Elves (15) War Machine (1) War World Scenics (1) Warbands (3) Warchimera (3) Warhammer (13) warhammer the old world (1) Warpath (18) wash (33) water effects (17) weathering (61) weathering powder (14) WFB (1) WH40K (40) WHFB (14) WiP (22) Witch Hunters (5) wood (2) Wood Elf (4) World Eaters (2) Wracks (1) wraiths (1) WW2 (1) Wyrd (5) yellow (1) Ynnari (5) Zoggit (1) zombies (1)
Showing posts with label Project Thunderhawk. Show all posts

Sunday, July 31, 2011

Gamesday 2011 Runtbot and Thunderhawk

 The Runtbot made first cut in category 4 Large Monster 40k.  I'm really happy with that and I think the model shows improvement over my entries last year.  I got a lot of one on one time with the judges afterwards for some really helpful feedback and am looking forward to next year.


Project Thunderhawk arrived intact to the Last Chance Qualifier for Armies on Parade.  It did not move forward from there but I think it gave a lot of folks something really rare to see and enjoy.  I'm going to continue working on the project as the actual painting needs to be completed.  There are a half a dozen flat arts and the actual finishing shading etc  to be done although that will take place at a bit more leisurely pace than I've had to maintain until now.

I did pick up a lot of new toys at the show and will start some projects for next year's demon as well as diving with both feet into the Dark Eldar Update and finishing up the Gargantuan Squiggoth.

I'm still traveling so will be back to regular updates once I get home!

Tuesday, July 26, 2011

Azrael arives

 Azrael enters the Hangar of the Sword of Retribution.   Tomorrow the hangar will actually get assembled.  I've still got to sort out a little flat art for one of the walls.

I had a little paint disaster on the hangar wall and ended up having to repaint the beige entirely. 
A Dark Angel Tactical squad in progress.  Should finish that up tomorrow as well.


Got to score fresh batteries tomorrow!  Lest I forget!

Sunday, July 24, 2011

Comapanions for Ferrum Ira

 Some companions for Ferrum Ira.  The Land Raider crusader is also lighted internally although on a much more limited scale than the Thunderhawk.  The Whirlwind is not illuminated.

While moving the Thunderhawk to the hangar to test some spacing I noticed that the port upper wing assembly had come loose.  I'm not certain when this happened.  I ended up re-gluing the assembly and touching up some paint. 

The hangar door is coming along.  Its a bit of a mess with tape in this picture but its now largely free of that and the first round of touch ups are done.


Tuesday, July 19, 2011

Thunderhawk construction complete


 The construction of the actual Thunderhawk is complete today.  Woot!  The last steps were the canopy and the afterburners.  Painting is still ongoing with an enormous amount of touch up required as well as directional detailing.

The display base has been drilled and routed for mounting wire and electric and given base coats of paint.  After drying overnight it'll be sanded and repainted... weather permitting.


Fore and aft views of the new work.  Canopy raised and afterburners open.  The open canopy invites closer inspection and there is some interior lighting to accent the details.  The kit actually includes a full set of closed afterburners as well.  They'll make unique bits for the box! While adding the afterburners one of the wing engines unseated and is not tightly secured at the moment.  Its sitting in its cradle and is pinned in place so there is no danger of it actually falling off but I'll likely tack it in position with some superglue just to keep it still for transport.

Monday, July 18, 2011

Full Metal Thunderhawk Hangar.

 Construction continues at a fevered pace.  Major wood component fabrication is complete.  The bay floor has had insect screen epoxyed onto it to provide some texture and balsa faux doors for the main hanger are complete.  There are two smaller faux doors that will appear in the scene as well as a small tower and some conduit/duct work for the opposite wall.  These smaller components I'm thinking will be started Wednesday.  The two hangar bay walls detach for transport/painting.  Placement of the model in the scene should be done later today so holes can be sited for fastening wires and for electrical attachments.  That should follow up with backside routing of channel for the wiring.  Once the woodworking portion is complete the outside of the display box can be finished with sealer and interior detail construction can begin. 
The heavy bolter sponsons are on although some modelling remains to be done to extend the ammunition feeds to actually connect with the underside of the weapon mounting.  Tail assemblies have been reattached and paint repairs are underway.

A problem with the primer not having bonded well with the underlying metal caused the paint to crack off in large flakes where it had been damaged in the deconstruction process.  This is causing larger areas to need repainting.  Hopefully I can get the cockpit canopy on this evening and begin paint detail clean up and repaints where required.  Many areas just need to be redone completely.

The other current project is, of course, the Runtbot.  The Runtbot base is almost ready to have the masking tape removed although this may be a bit tricky as I seem to have constructed a portion of the scene on the masking tape... oops!   A few areas on the Runtbot itself need revising and highlight touch up.  I'll do this tomorrow if my allergies cooperate... Achoo!

Clock is ticking... back to work I go!

Friday, July 15, 2011

Electro Goblin Raid delays Project Thunderhawk!

You may recall that Project Thunderhawk was damaged during my recent move.  I had just finished the major repairs when someone innocently asked me "When was the last time you turned it on?" 

I grabbed a battery and hooked it up.... nothing.... discovering that the battery was, in fact, dead gave me some momentary relief...whew.... unfortunately the new battery was also unable to ignite the lights... DOH!

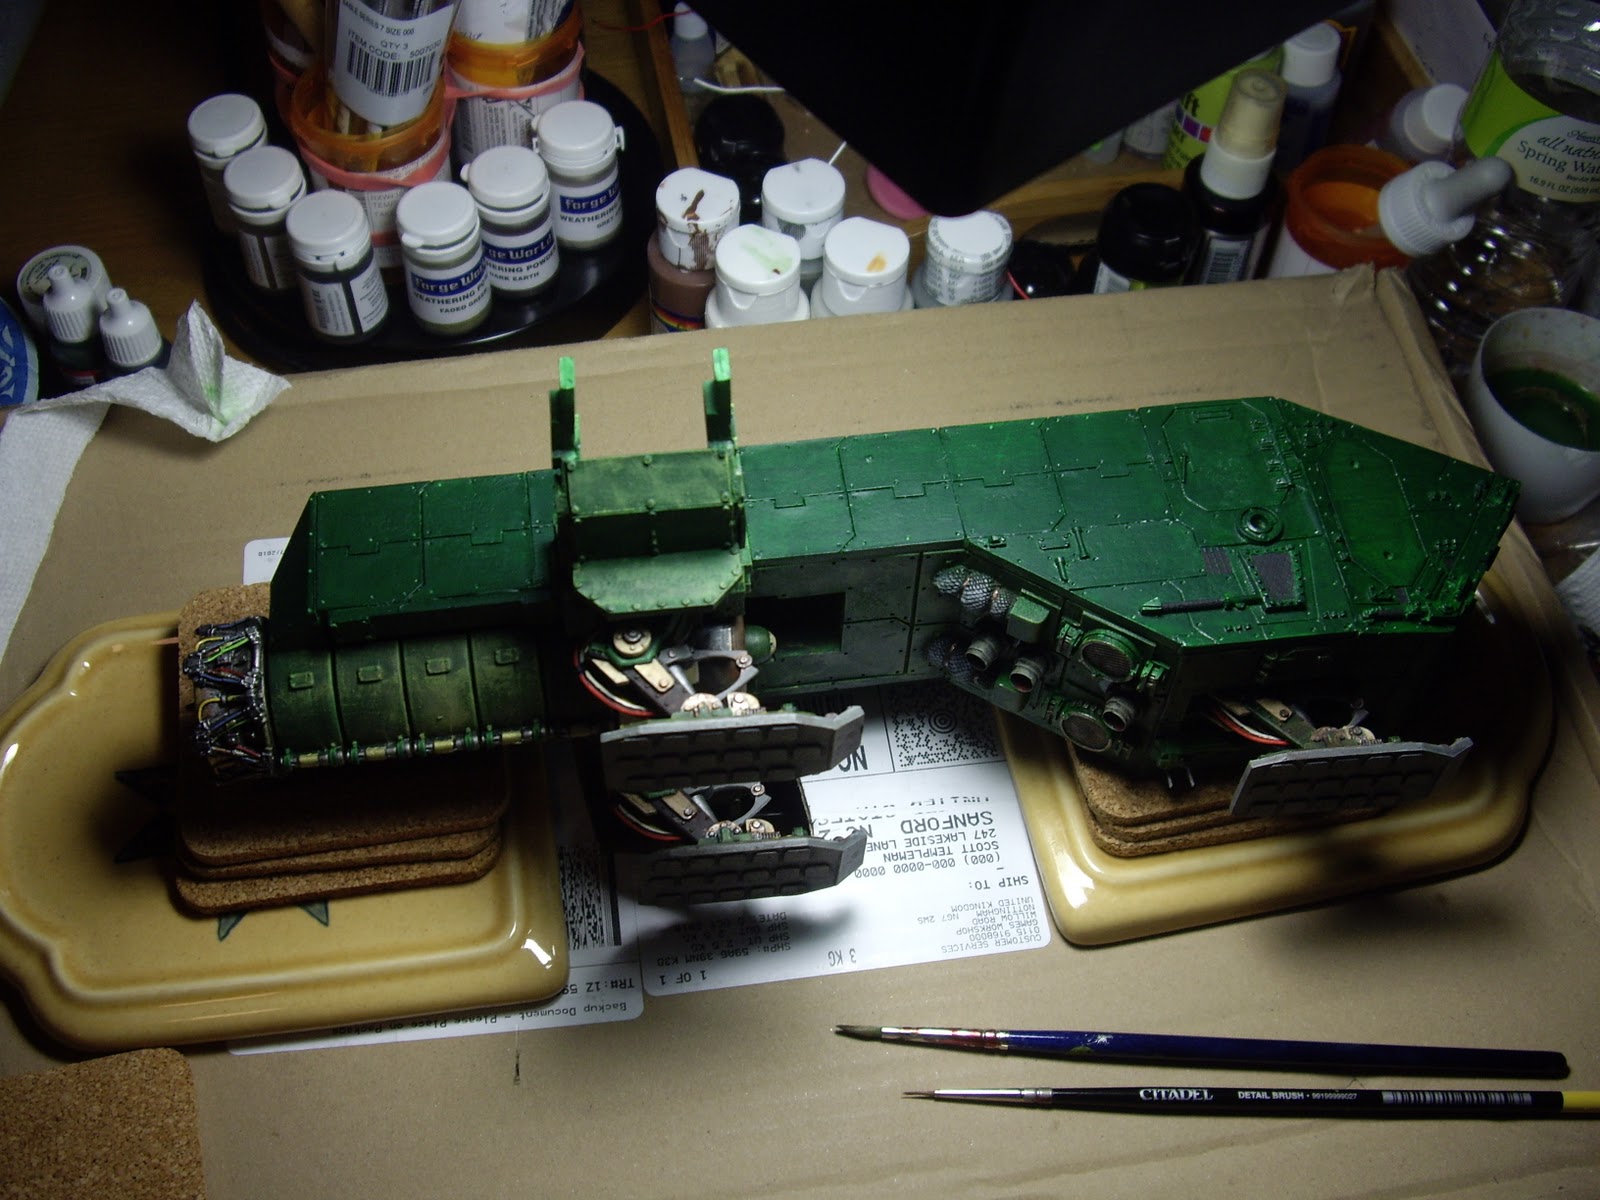
After some testing it seemed that there was a short in the system.  Most likely between the power couple and the first circuit board.

With no other options presenting themselves I began tearing down the model to get to the offending worky bits.  Ultimately the entire upper wing assembly, gun, casemate, and upper hull had to be removed.  The short is still being chased down but has been isolated as directly related to the power couple itself where it passes through the hull.  Hopefully the electrical issue will be solved today and I can begin reconstruction. 

The display base is coming along with basic wood cutting and layouts done.  An experiment with floor texture was largely successful but I'm still floundering around exactly how the on-off switch will appear.  I'm strongly leaning towards a disguised switch involving one of the servitors that will appear in the scene.


 Hull and gun in dry dock getting the joint scrape treatment.
 While its torn down may as well actually solder the wire joins and delete the various wire nuts >.>
Busy couple of days ahead!  Darn Electro-Goblins!

In other news the Runtbot Base is built up and primed and should get base coats done today as well.

Monday, July 11, 2011

Some pix!

 I finally managed to transfer some pictures from my smart phone (apparently the phone is waaaay smarter than I am) I'll get some project Thunderhawk and runtbot status pix up tomorrow.  For now here are a few shots from Geekfest 2011
A massive Green Tide Apocalypse formation charges across the table.


The Ravenwing flanking the Green Tide!
 True line of sight.  Imperial Guard peer through the windows looking for targets.

An indecisive die roll!

Back in dry dockp

Project Thunderhawk is back in dry dock. 

I had initially thought the beastie had made it intact but I appear to have been mistaken.  The main gun and entire upper gun housing was torn off and one of the wings knocked loose and out of alignment.  I've no idea how that came to pass but there it is.  I've also managed to misplace/lose my camera so will be a little bit on pictures.  I've begun repairs and layouts for the scenic base as well. 

In addition to resuming work on the Thunderhawk I'm finishing up the Forgeworld Runtbot.  all that really remains is the base so it should be relatively easy.  I'm raiding my nephew's bits box to create the junk pile--- thanks dude!

Geekfest 2011 was a smashing success and the Corpulous Prime arc of our story project is being wrapped up in after action reports with the aim of generating a campaign rules set (errata is nearly complete then I'll intergrate it into the main body of the rules) and some fiction related to our individual 40k forces. 

Friday, June 3, 2011

Arrived!

After an extended move I'm finally in the house although I'm not entirely unpacked as the renovations monster reared its ugly head! 


The good news is that I will make it to Geekfest 2011 for the continuing saga of Corpulous Prime.  In this installment the world will be subjected to the rigors of a full blown WAAAGH! in addition to the existing factional fighting.  Should be a great couple of weeks of modelling and mayhem!

I did take a couple of hours to work on one of the new Finecast models.  A Harlequin Shadowseer.  The model is beautiful and had very little mold release although it is indeed frail.  I manage to snap the wrist of the gun hand while removing the model from the frame.  It was easily repaired but I'm not certain how robust these things will be for actual gaming... especially given that they are replacements for the exceedingly durable metal minis.  My Ork, Eldar, Chaos, Space Marine, and Imperial Guard armies still include models (both metal and plastic) I purchased 30+ years ago and I wonder how many of the Finecasts will still be serviceable as game pieces in 2041 and beyond.  Time will tell I suppose.
Project Thunderhawk seems to have made the move relatively intact.  No small achievement for the Metal Beastie!  It is scheduled to return to the dry dock for finishing work immediately following the 4th of July weekend with an eye to finishing the project before Games Day at the end of the month.

I should be back to regular MiniSwelter updates by the first week of August and do plan to drop in stuff as I am able prior to that.

That concludes the mini update for MiniSwelter!

Tuesday, February 1, 2011

Flappy bits!

Ferrum Ira is shaping up now.  Today I added the large side imperial eagles, engine access and attitude covers, wing engine intake cowls and fans, vertical stabilizer, the control flaps for all wing surfaces, canards and forward heavy bolter arrays.  Remaining construction items for the model itself include the cockpit hatch, the afterburners, hulltop flashing, and the wing mounted heavy bolters.  Once all of this is in place I can do touch ups and a blending weathering treatment.  The detail bits really have broken up the massive green hull making the whole bit more engaging.

Sunday, January 23, 2011

Doors and more

Added Details for port and starboard hatches.  These are from Forge World brass and resin accessories.Also got the targeting sponsons on.


The various control surfaces; flaps, the vertical and horizontal stabilizers and canards are all getting the base coat work ups.   The detail bits should break up the great green hull slabs.

Thursday, January 20, 2011

BooM!

 Finally got some time in today!  Here is an Ork Medallion that will adorn a stompa in the near future His teef are as angry as mine! In addition to the medallion I've dome some work on The Changeling and some minor terrain features.  I'm staring to put some other large projects in the queue as well, primarily an update to my Dark Eldar Army and a slew of Ork toys.
On another note Ferrum Ira got the upper casement added as well as details for the crewed nacelles.  Things should pick up steam from this point.  The targeting arrays are about 50% complete and  I shoulod be able to install most of the add on details in the next couple of days with the  most work remaining to be done on the interior of the cockpit hatch and the attitudinal flaps.  The afterburners are painted (both versions) and I just have to decide which set to use.  I'm leaning toward the fully opened set at the moment. 

Now I'll have to get serious about designing the display base.  I've had several iterations of ideas about it, the surviving elements of which include a decorative power switch and apparatus for the off board power, servitors and mechanics, and some integrated support stands to help relieve the landing gear of bearing the whole weight of the model in the long term.

Thursday, December 16, 2010

Upper wing assembly installed

The upper wing assembly is in place and some additional filling is underway.  For once the weight of the beast was helpful in getting the wings to line up and hopefully these sturdy supports will be up to the task of supporting the wings and wing engines.  Now that these structures are in place I can tidy up the gaps and blend the paint together.

The next item to tackle will be the upper casement and the Gun itself as well as the topside gunner position.

Monday, December 13, 2010

Engines added to the Full Metal Thunderhawk

A few weeks have gone by since my last progress report.  In the interim my wife returned from an overseas deployment and we took a vacation.  Of course that lands us squarely in the holiday season so there are a lot of interruptions.  Realistically I won't get a whole lot done until after New Year.  In the meantime I am poking a stick at this when I have some time and am in the same building!  Here I've added the main bodies of the wing mounted engines.  The engines still have afterburners and the intake fan/nacelle but they can be added after the upper wing assembly.  Even though the pieces fit together snugly during the test fittings things have changed slightly so there will be some additional filling to work in.  I'm hoping to get the upper wing assembly installed this week as the wings cannot support the engine weight without it.  The elastic bands are doing a good job of stabilizing the situation but I'll feel better when the wings are finally locked in place.   Of course I have to finish the filling and blending before that can happen so I'm hoping to get to that tomorrow.

Name wise I ultimately went with went with Ferrum Ira many thanks to DimmyK!

I should be able to begin the display base layout now that the dimensions are known.  I have a lot of concept sketches that I need to put to scale.

Wednesday, October 20, 2010

Adding dimmer and a working name

No photos today.  I've decided to add in a dimmer so I can trim the level of light the spotlights put out.  For most viewing, in a well lit room, they are probably fine but in lower light situations and for photography purposes I'd like to be able to regulate the amount of light they put out.  The searchlights are on their own board but share a power supply with the board that controls the navigation lights.  I'll have to add in a pot to adjust only the board running the searchlights.  Fortunately there seems to be several spots on the hull where I can conceal the pot.

Otherwise I'm currently working on base coats for the upper hull sections and weathering the upper wing plates.  I wand to add the engines and upper wings soon because they bear the load of the main wing and keep it in alignment.  I can't finish that until I finalize the electronics though because the beastie will effectively be a sealed unit once the upper wings are installed.

As near as I can tell the naming conventions for the Dark Angels are very GW latin Dante-esque things so I've about settled on a name.

Caedis Irae


Maybe Frank can translate it for me... just to see if it doesn't really mean "Made of Fail" or something similar.
Or, since I haven't put the name on it yet maybe you can recommend something that works in the fact that this is the all metal version of the Thunderhawk....  Ferrus Ira(e) (not sure of the gender of Ferrus) or hmmm....

Sunday, October 17, 2010

Lights on

 The lights went on today.  The power coupling issue turned out to be a short due to an insufficiently wide opening damaging some insulation.  The cockpit lights turned out not to be a failure of pre-installation testing but rather that I physically broke one of the leads on the LED while positioning the cockpit.  That's all fixed and the cockpit is installed .. for the third (and hopefully final) time.

The searchlight fall areas are roughed in although the final layout will depend on how I approach the off board lights that should illuminate the upper structure of the model.
It is possible that the on board lights will be illumination landing crew work spaces instead of the landing gear.  From here I'll have to do the engines and upper structure.  I'm a little concerned about the Canard installation as I've closed the forward hull.  I've got them on long brass rod so it "should" be fairly straight forward to slide them into position even with the hull closed.  The top isn't pinned on so I could rip it out if need be.
Here you should be able to make out some of the cockpit lighting.  The fail photography doesn't help here but I'm happy with the way it turned out.  there are some illuminated buttons floor light and some side panel effects.  Its all pretty low key.

The next element that I'm really not looking forward to is adding the upper wing assembly.  Hopefully I've got the wings in good alignment when it comes time.  The wing engines will have to go on before the top wing is added and that sharply limits what little flexibility there is in the wing assembly.

Friday, October 15, 2010

Adventures in electricity.

Most of the last couple of days has been spent installing the wiring harness.  Day one it went all together but failed to actually work.  After a bit of head scratching on day two I got it all going but discovered that the blue LED for the cockpit displays had come loose.  This resulted in a rip out of the cockpit and then gluing the LED into its position in the mounting bracket.    After some cussing the cockpit got back into position.  It was a tricky process and required some minor repositioning of the pilots and some touch up of the dings they got on the way in.  I then relit the harness and discovered that the Blue LED is now dead...   I'm going to sleep on it but I think I may have to replace the LED.   The other major problem is that, while the light harness works when connected to the power supply, the actual off-board power coupler does not. I'll have to do some more tests to sort that.

Thursday, October 14, 2010

Seachlights and Guns

 The forward gun sponsons are painted up and ready to install.  This won't happen for a bit yet as they (and many other detail bits) will make extensive handling of the model more complicated.  They'll be added after the superstructure is complete.  I'm currently sorting out lettering details before adding the lower wing assemblies.
Here are the roughed in searchlights.  I'm adding some stress reducers for the wires as the lights will be adjustable in most directions until their final positioning.  I need to weather the gaskets nearest the light housing to remove the shine and touch up some glue stains around the base of the sleeves.  You can also see the power coupling for the off-board power supply.  This will get a servitor carrying the power wire as part of the display base.

Friday, October 8, 2010

A jig, an engine and some dirt.

 Engine intake cowls are finished they were primed black then painted Bolt Gun Metal followed by a brush up of Dwarf Bronze and a really off color Shining Gold (All Workshop).  The final highlights are Rustungs Farbe which I believe is a Gamecraft paint labeled for the Fantasy Forest Hobby shop.
 The cockpit got a liner to reduce the effect of the back wall not being quite square.  I am still sorting out if I want to leave this shroud in place or replace it with some wire bundles.  The border of the cockpit has been painted in black and yellow industrial stripes since this photo was taken.  I'm still trimming the stripes and am not certain that I've gotten them to line up 100% yet. A large Imperial eagle has been added just in front of the cockpit and covers the surface flaw completely.

 I had to make a jig to hold the model on its side while I start weathering and detailing.  The jig has a hole in it to accommodate the wing struts and some cork coasters to hold the thing in place without damage.There are several hard decorative bits to attach as well as the bow bolter sponsons that will have to wait until both sides have had been nearly finished.
Here is some of the weathering.  There are several vents that have exhaust stains and a little battle damage as well as some just plain grime here.  I'll add flat art at this point and then adjust the weathering again before sealing it and flipping the model to do the other side.

Monday, October 4, 2010

Skids

 The Landing skids are just about ready to be installed.  I think there remains a little bit of work to do on the actual cylinders.  I'd like to add some oily residue and then polish the main cylinder surface.    The searchlight mountings are painted and installed. Once the skids go on I'll be able to run the actual light housings.  The main issue with the searchlights is that they won't be adjustable once the model is complete.  I'm thinking about ways to make the laterally mobile.. at least in a small arc but that would be the extent of it.  This means I'll likely have to wait to lock down their final facing until the model is essentially complete.


Next step is to weather the lower wing assemblies.  Ideally I can finish all of the underside weathering and not have to deal with lifting the model much after that.