Labels

3D Printing (25) 40K (62) Abyssal Dwarf (2) accessories (5) Adeptus Arbites (4) Adeptus Mechanicus (1) ADMech (1) Age of Sigmar (2) Agents of the Imperium (2) Angron (2) Anime (4) Antenocitis Workshop (32) Anvil Industries (5) AoS (4) ArmorCast (3) Army (4) Army Painter (10) Astra Militaria (24) Atenociti's Workshop (7) Atenocity (1) Atlantis Miniatures (4) Avatars of War (2) banner (4) base coat (16) base color (8) bases (45) Basilean (1) Battlefoam (1) Beasts (2) big lobbas (1) Bitspudlo (1) Black Scorpion (1) Black Templar (1) Blood Rain (16) Board Games (32) Bolt Action (1) Bombshell (1) Bones (14) Bretonnian (1) Bruegleburg (4) Bruxx (2) Campaign (20) carapace (1) Carnevale (8) chaos (25) Chaos Dwarf (2) chaos gate (3) Chaos Space Marines (18) Citadel (2) claw (1) Clawed Fiends (1) clear resin (1) Construction Guide (1) Contagion (12) conversion (3) Counts as (25) Craftworld Eldar (2) Custome Counters (2) Customeeple (1) Daemon Prince (4) Daemonettes (1) Daemons (5) Dark Angels (4) Dark Eldar (47) Dark Elf (6) Dark Souls (7) Darkness & Light (3) Darksword (2) Deadzone (15) Death Guard (9) decals (1) Deepcut Studios (3) Demented Games (3) dicebox (1) Dorothy (2) dragon (2) Dreadnought (5) Dreadtober (5) Drukhari (2) Dryad (1) Duncan "Shadow" Louca (1) Dwarf (7) epicast (2) Evangelion (3) Executrix (1) eyes (2) Fallout Wasteland Warfare (11) Fantasy Battles (19) Fast Panda (3) FBN (1) Fight Like a Girl (1) Finecast (4) Flames of War (4) Fluff (14) Forest Goblins (2) forge world (50) fortress (8) fortress name (2) Forward Base (10) free hand (1) Frostgrave (8) Game Mats (3) game room (1) Games Workshop (13) gamesday 2011 (1) gargantuan squiggoth (8) Geekfest 2010 (1) Geekfest 2011 (4) ghouls (1) Gloomhaven (1) Goblins (2) gobsmasha (1) golden demon (1) Greasus Goldtooth (2) greenstuff (10) Greenstuff World (1) Grotesques (3) Guest Painter (3) gunwagon (1) GW (8) GW Technical Paint (11) Halo Fleet Battles (1) Harlequin (1) Heresy Girls (5) Heresy Suppression Force (10) Hexy-Shop (1) Hi-Tech (2) highlight (2) horror (1) Imperial Guard (23) Infinity (23) Inquisition (4) Iron Empire (17) Iron Halo (1) Jailbirds (35) Joan of Arc (3) JR Miniatures (1) juggernaut (10) khorne (1) Kickstarter (43) Kill Team (1) Kingdom Death (17) Kings of War (9) Kromlech (3) KST (4) Kurganova (3) Land Raider (1) Large Scale (4) Lead Adventurers (3) legacy models (2) lighting (7) Lizardman (1) Lost Islands KS (2) lust elves (12) made for Infinity (33) Malice (1) Malifaux (13) Mantic (37) mawloc (1) max mini (2) MDF (28) mecha (3) Mechanicum (1) Mercenary Grots (1) Metallic (1) Miniature Figure Painting (7) miniature wargames scenery (3) model building (4) Modiphius (2) Mordheim (24) Movement Trays (1) moving (6) Mystery (4) Mythic Games (1) names of things (14) narratives (22) Necrons (3) Night Goblins (1) Nose Art (1) Nurgle (16) objective markers (2) Obliterators (2) Ogre Kingdoms (6) Oldhammer (4) orange (1) Orcs (1) ork (26) osl (2) P3 (1) Patreon (1) Plague (1) Plastic (4) Post Apocalypse (8) Pre-Heresy (2) Primarch (2) Primer (6) Privateer Press (1) Project Thunderhawk (28) prototyping (1) Proxies (24) ptimer (1) Rackham (2) Raging Heroes (125) Rampage (6) Ravager (1) razorwing (1) Realm of Chaos (1) Reaper (34) red (25) repair (6) resin (28) Resurrectionist (2) Resurrectionists (1) Retinue (1) review (1) ripper swarm (6) ripperswarm (1) Roleplaying (1) RPG (31) runtbot (7) Sacred Heart (1) scatter (7) Sci-Fi Space Battles (6) Scibor (2) Secret Weapon (77) Serene Dawn (12) Setting the scene (23) Shading (1) Silver Compass Designs (1) Sisters of Battle (25) Sisters of Eternal Mercy (11) Sisters of Sigmar (4) Skaven (4) Skin (2) Skirmish Game (8) Slaanesh (1) Slann (1) SnapMaker (5) Spartan Games (1) Sslyth (1) Star Saga (32) Starfinder (4) Steampunk (2) stl (1) Stone Crusher (3) Strigoi (1) studio (1) Studio Miniatures (1) Studio Swelter (4) SUPERCaT (1) Supers (1) Tabletop (9) Tabletop Art (3) Tabletop World (36) tank pit (1) Tantalus (6) Terminator (2) terrain (58) TGG (20) TGG the Game (3) TGG2 (22) The Dickensians (2) The Old World (2) The Order of Vampire Hunters (13) The World That Was (1) Theme (33) Third Party conversion bits (1) Thor Minatures (1) Thousand Sons (1) thunderhawk (3) Titanite Demon (1) tools (2) Toughest Girls in the Galaxy (9) Toughest Girls of the Galaxy (6) Toughest Girls of the Galaxy 2 (7) trukk (3) tutorial (2) Twisted (7) tyranid (12) UAF (1) Ubiquitous Rat (1) unboxing (4) Undead (2) undercoats (4) Undertown (15) Unwritten (5) Urkin (1) Vallejo (5) Vampire Counts (4) Vampire Hunter (2) Vampires (1) Vampiric Flesh (1) Vanguard (4) varnish (2) Vatican (3) vehicle (13) Venom (3) Video (1) Vikings (1) Void Elf (17) Void Elves (15) War Machine (1) War World Scenics (1) Warbands (3) Warchimera (3) Warhammer (13) warhammer the old world (1) Warpath (18) wash (33) water effects (17) weathering (61) weathering powder (14) WFB (1) WH40K (40) WHFB (14) WiP (22) Witch Hunters (5) wood (2) Wood Elf (4) World Eaters (2) Wracks (1) wraiths (1) WW2 (1) Wyrd (5) yellow (1) Ynnari (5) Zoggit (1) zombies (1)
Showing posts with label Warhammer. Show all posts

Saturday, May 25, 2024

Avatars of War Trolls!

Avatars of War has made some really great models over the years and these trolls are no exception!

Their .stl files print well, came presupported and gave my fussy machines little problem.

I elected to do three trolls with great weapon in blue to be used as Stone Trolls.


These were done quickly using the zenithal primer method followed by a basecoat of Blue Black wash (Secret Weapon). Colors were blocked in and the whole model washed with Soft Tone ink (Army Painter) 

Blue highlights are Deep Sky Blue (Vallejo Model Color).

Whites are the Reaper Bone Triad.

Metals are Engine Metal (SW) brushed up with Chrome (Vallejo Model Air)
Browns began as Heartwood Brown (Reaper)


The same process was used on the six common trolls except the base wash was Sewer Water (SW).

Vomit is Hexwraith Green (Citadel) brush up is Reaper Copper Verdigris.

Glass bottles are Copper Verdigris with shading from Hexwraith Green 
Reds are Maroon Red (Reaper) highlights Neo Burnt Red (SW).

Greys are Stone Gray (Reaper) brush up Misty Gray (Reaper).

Brassy metals are Brass Casings (SW) Flesh Wash (SW) brush up Chrome.

Bases were previously addressed and were printed in clear resin to to get the translucent effect on the crystals.


Everthing was sealed Dead Flat (Rustoleum) then crystals, eyes, glass, blood, tongues, and gems were spot varnished with Gloss Varnish (Vallejo).

Wednesday, March 30, 2022

Patlee Salamander Stargazer on Celestial Shrine


I've always wanted a Skink Mage Priest to run as a rebel faction hero.  There have been a few notable Skink heroes but the Slann always had a lock on the Mage Priest role.

Raging Heroes Infinite comes to the rescue with the 3D printable Patlee Salamander Stargazer on Celestial Shrine.

This was printed on a Photon Ultra in Anycubic Basic Gray resin and was painted directly on the resin with no primer coat. In retrospect, models with this much gold would probably work out better over black resin.


I'm finding that I can often leverage the color of the resin to either speed up painting or to get new effects. So far paint adhesion and durability have been excellent.


In this case a regular process for the gold color is Brass Casings (Secret Weapon (SW)) base, wash with Flesh Wash (SW), Drybrush Necron Compound (GW). Over black resin that would have been all that was needed. Over the gray I ended up doing some lining with Dark Tone Ink (Army Painter (AP)). I'm still not entirely happy with the color depth for the gold.

 
I've recently been playing a lot of Horizon: Forbidden West and have really enjoyed the way colors are depicted for tribal societies. Its making me reconsider some of my more earth tone heavy schemes for medievals, elves, etc...

Speaking of earth tone heavy schemes... I've been tinkering with some Supers and Pulp Action Heroes with some 3D printable files from Bombshell. I'll also be doing some Retro Sci-Fi and messing around with Counterblast.


Back to the bench!


Wednesday, March 31, 2021

Reaper Fantasy Scenics Ritual Circle and Statue

Reaper Bones 4 has a Fantasy Scenics segment that I'm working my way through.  Today I've got the Ritual Circle and The Statue.. which also includes a small ruined temple.

For the Ritual Circle I thought I'd go more towards a horizontal Stargate or Portal since more of my scenarios would find that useful. Transiting models can stand right on it.

First its a black Primer coat then the red lettering with Blood Red (Reaper (R)) and a Drybrush to Highlight the edges of the lettering with Fiery Orange (R).

A quick Drybrush of the whole model follows moving through Cloudy Gray (R), Sky Gray (R) and Solid White (R).

Then the Washes. Blue (Secret Weapon (SW)) in the circle center and inner Surface of the Arc Structures then Sapphire around the outer edge of the circle and on the outer side and crevices of the Arc Structures. The coverage of these was intentionally uneven and the edges blended. Once completely dry Solid White (R) was dry brushed near the cracked details and to create some sense of motion across the main circle. The edges of detail on the Arc Structures were treated the same way.

The sandy earth areas were washed with Flesh (SW) and Dry Brushed with Sunny Skin Tone (Vallejo (V)).

For scale you can see a WiP Wood Elf from Atlantis Miniatures.


The Statue and Temple were treated similarly to the Ritual Circle but use a lot more colors. The floors got some of the same Flesh (SW) as a glaze in places to show the effects of traffic and time.

The Pillars have glazes of Blood Red (SW) and Green (SW) and are re dry brushed with Solid White (R) in an effort to represent some of the more complex Marbles and other stone types used in temple construction.

The Statue itself got a wash of Blood Red (SW) and The Robe of Verdigris Light Green (SW) before getting a final dry brush of Solid White (R).

Both of these models are intended as regular to heavy use game scenery so I avoided putting in details like weeds and leaf accumulations in favor of simple and durable in hopes that they wear better.

Our Atlantis Miniatures Wood Elf WiP has returned to provide scale.

Speaking of the Wood Elves. Here is a WiP shot taken just after the red lettering was started on the Ritual Circle.

These have had color blocks and shading done but not yet highlights or fine detail. I'm using a lot of blue and purple to shade to give some verve to the green base color. I'm painting the bases at the same time as the model to see if that helps to get a camouflaged feel but maintain enough separation to keep them from actually disappearing into the base. Early days on these.
 

Wednesday, February 17, 2021

Atlantis Miniatures Wood Elves WiP


I'm really excited about these Wood Elf minis from Atlantis Minatures. They are part of a Kickstarter fullfillment so might not be up in the shop yet but they historically move pretty quickly from Kickstarter to regular product.  Very nice and kinda rare!
The models came with an assortment of bases. Some are fully detailed resin some are beveled plastic rounds. There was a good supply of basing bling to add details like forest critters, mushrooms, vines, big stones, and the like. This really inspired me to dive into the greenstuff and get to sculpting!
There are four different types of mounts in the set. A giant elk for the Male Warlord, a big panther for the Female Warlord, large Stags, and smaller Deer.

There are male and female versions of all the elves so this will make for a very thematic, and very scary, wood elf Kinband Warparty. You'll be seeing more of these soon but I wanted to say these are not your kinder, gentler type of "Wood Elf"... they are more like "Feral Elf"... many have horns themselves... they look like the sort of merciless forest guardians that might even eat any trespassers they find! They are gonna be fun! 

Tuesday, November 10, 2020

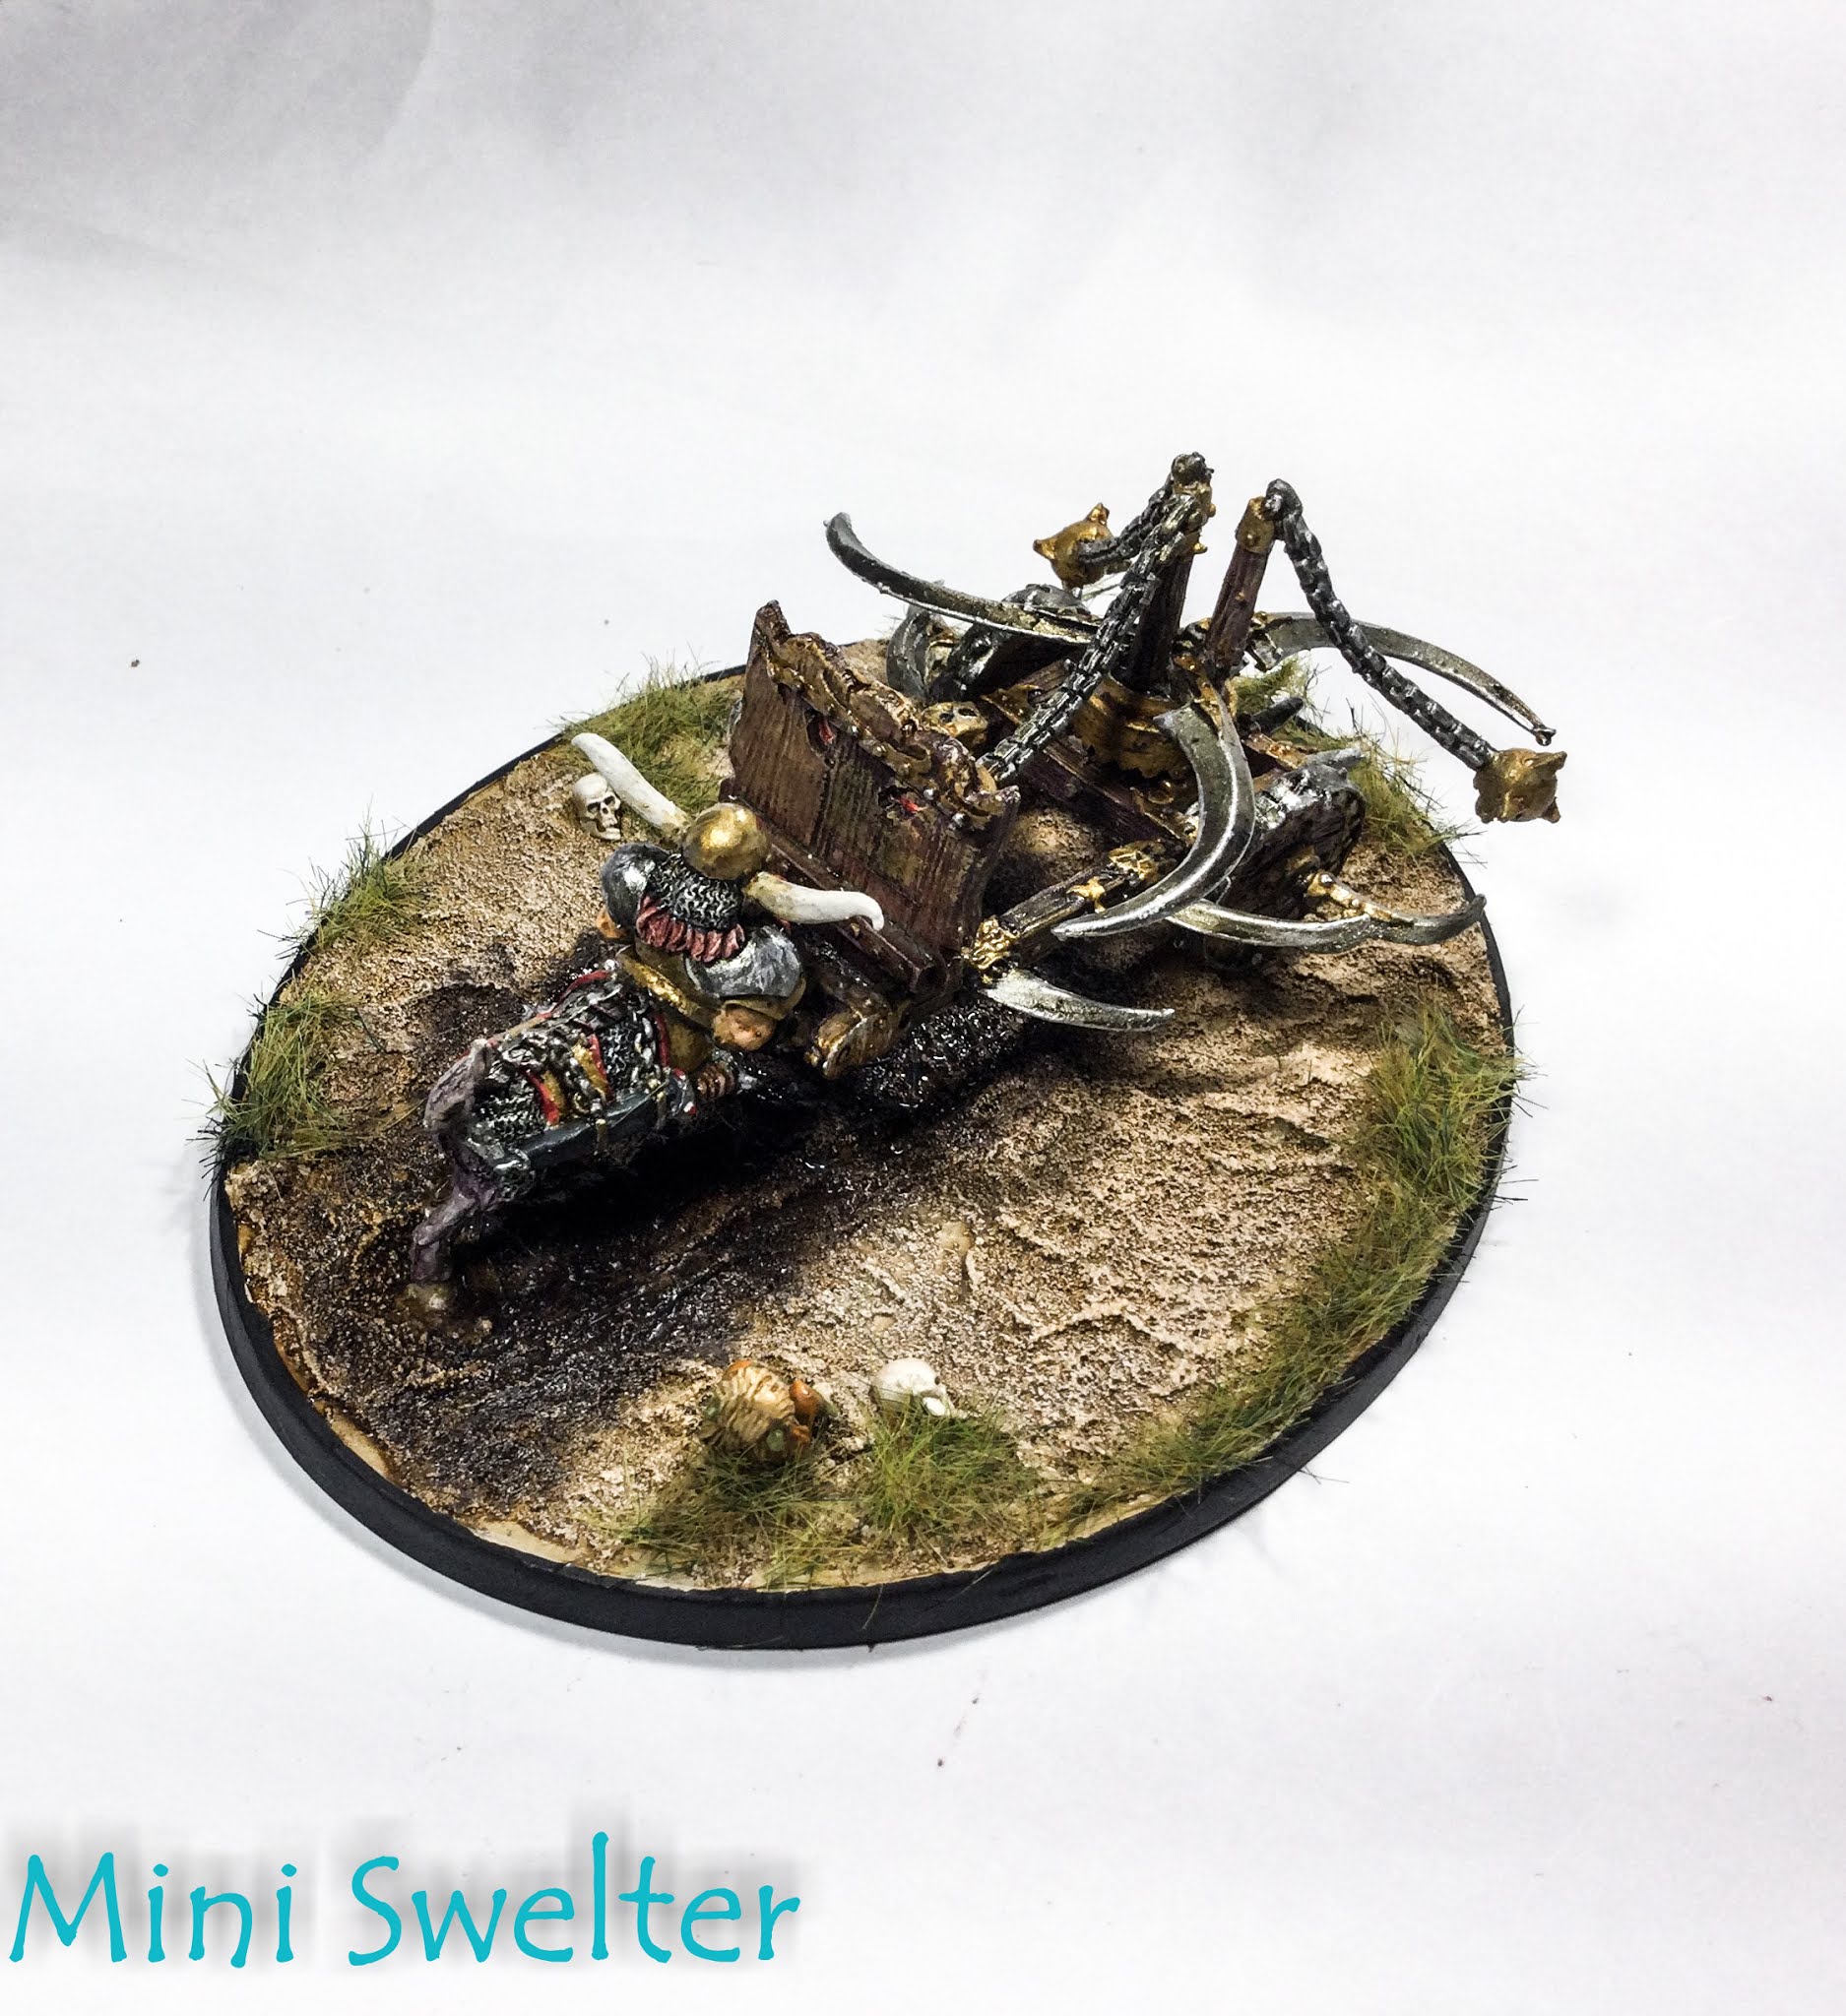
RoC Chaos Dwarf Whirlwind


This guy accompanied many a Chaos Horde into battle in the 80s. The model was showing its age and I thought I'd do some touch ups, rebase it and generally do some long neglected maintenance.  Lets call him Hagar.


First things first... Hagar needed to be removed from his old cardboard base. Typical of the 80s the base was flocked, had a couple of raw pebbles glued to it, and... unusually... a hob-goblin child (Grenadier iirc) added for scenic context.  The little Hob isn't visible here but will show up later as I'll recycle it onto the new base.


Having divested Hagar of his old base it was time to give him a new one. This base was from Reaper (R) and was layered with White Pumice (V). Grooves and hoof tramples were made before the pumice dried also a couple of Citadel (GW) skulls, and the Hob-Child... which is still hidden behind fat old Hagar!


The base was given a coat of Flesh Wash (Secret Weapon (SW) and brushed with Sunny Flesh (Vallejo (V) brushed with Sand (V), and a final top dust of Splintered Bone (R).

I used Wet Mud Weathering Powder (Forge World (FW) set with Glaze Medium (V) to get the churned mud beneath the machine that tracks out the rear of the model.  This dried very flat so I used Satin Varnish (V) to give it a wet look.


Static Grass (mud) was the final bit on the base.

The Hob-Child can be seen sitting in the tattered remains of an orange shift crying as Hagar drives obliviously past her.  Fortunately she was spared the mowing doled out to everyone else!

For Hagar and his machine I retouched rather than re-imagined.  The metal parts of the machine were treated to my usual yellow or white metal work ups and the skin was painted Sunny Flesh (V), Flesh Wash (SW) and Basic Flesh (V).

The shield was updated from a faded gold to a more solid color with Brass Casings (SW), Flesh Wash (SW) and Silver (V) highlights. Baby Poop (SW) was spot washed to add color to the shading. Fresh Blood (R) highlighted with Phoenix Red (V) was used to accent the eyes and color the gums. Teeth were changed from base metal to off-white using Graveyard Bone (R) highlight with Splintered Bone (R).

Wood was Flesh Wash (SW) and Sunny Flesh dry-brush to reinforce the old wood color and make the grains pop.
Hagar's horns were redone as they had faded to a nondescript gray over the past 3+ decades.  Handle Wood (R), Flesh Wash (SW) brushed out with Graveyard Bone (R) and Splintered Bone (R).

Some lining with Soft Body Black (SW) wrapped up the project.

Its great to have Hagar ready to renew his assault on the tabletop! The modern oval base should make a good fit with newer games and not be to much trouble when he returns to the fight Oldhammer style!


Back to the desk!


Tuesday, September 15, 2020

Post Apocalypse Military Checkpoint, Void Elf Executrix Troop, Kings of War Objective and Scenario Markers.

Busy and eclectic week! First up is the WiP tray drying off after a quick sealer. On deck is a Military Check Point in MDF from Antenocitis' Workshop, a goblin casualty from The Battle of Skull Pass (WFB 7ed. Starter set), and a double dose of objectives and accessories terrain from Mantic's Kings of War 3rd Edition Scenarios and Objectives Pack.
The objectives pack will also be handy to replace some of the cardboard counters from Gloomhaven... stay tuned for more on that!

The Army checkpoint is part of the Post Apocalypse, pre-painted, line of MDF terrain from Antenocitis' Workshop. The little guard hut is presented in its pre-painted and weathered condition but I decided that the road barriers needed a spot of paint as they were plain black out of the box.The alternating red and white striping was aided by the barrier arms being pre-scored.  A yellow work up and a red cap tops of the post.

I've been particularly addle-brained the past couple of weeks and, when constructing the barriers for the Army Checkpoint I used some included spare parts to double the size of the counterweight in spite of the instructions being rather clear that only one plate was required... the more the merrier right?


WRONG!

As you can see the extra bit makes the barrier arm non-functional as it impacts the support post very early in its lift... woe is me!

Since there was nothing else for it I decided to have a crack at removing the extra bit with a pair of side snips.

Cha-CHING! the offending bit popped right off and took the glue with it.  One of the advantages of having sealed the part before construction began. Fortunately this was the case with all four arms.  They came away clear and I was able to finish the assembly without further mishap.
The finished barrier arm ready to control movement on the tabletop!

An observation... this kit was more difficult for me than most of the kits from this range... The parts did not go together quite as seamlessly.  I think I needed to build a jig to help with that but part of the problem was that I had to use a different glue than I am used to.  For the other MDF projects I have been using Super-phatic glue which is kind of like the superglue of wood glues. Since it sets so fast I've been able to skip a lot of clamping, banding, and jig making.  I built this kit with Gorilla PVA.  Its a good glue and sets up reasonable quickly... about like a tacky glue... bit not the fast hard set that I was used to so I ended up collapsing the posts a few times and having to rebuild the whole thing on the fly.  Unfortunately it shows on some of them.  I started clamping after the second collapsed assembly so half of them are ok and half of them are a bit ragged.  But they are post apocalypse and have not yet been weathered so... they may yet be battered into submission!

Here is an assembled checkpoint being willfully ignored by a troupe of Void Elf Executrices from Raging Heroes.  I've been using them as Ynnari but continue to refer to them as Void Elves. 
This is the Executrix troop that completes the Executrix command unit I did about a year ago. Fortunately I had done the base coat before the big move so I didn't have to do a lot of color matching... that won't be the case going forward though!


Who said death worshiping Dark Elves have to wear black or red anyway! I mean the power weapons have that Dark Side red light-saber glow... that should cover it!
Mantic's Kings of War objectives... Dragon Egg, Weapons Cache (dead gobbo by GW! 'ow did that git in 'ere ennyway!?! ohh cool static grass)
Runestone and messenger/courier bag... against a stump... with a pistol and a musket... that looks to have ended badly...
Supply crate and ammo pile for a cannon.

Thats all for today...

Next time the Gloomhaven initial unlocked characters and the Kings of War objective treasure chests that didn't make it into this post.


Back to the desk! 


Wednesday, July 29, 2020

WiP Oldhammer Orcs and Gobbos

 Starting to think about painting again and began by tackling some projects that are lingering around the desk. I dislike having unboxed, unpainted, minis hanging about unless I'm working on them so when I came across an old Battle for Skull Pass box... stuffed with some extra bits I thought it would be a good way to knock some rust of the painting skills and clear some open box minis.

In previous, pre COVID-19 posts I knocked out the Night Goblins and Dwarves from the set... sans a Baggage train that is still sitting on the desk...
 Today I went to work on the Forest Goblin Spider Riders from the set and delved into the odds and ends that had hitched a ride in the box.

Like the rest of this project these are, in part, an experiment with painting directly on the plastic.  So far there has been no problems with adhesion but how durable this approach is remains to be seen.

The spider bases were dry-brushed Stormy Gray (Reaper (R)), dry-brushed White (Apple Barrel craft paint (CP) washed with Sewer Water (Secret Weapon (SW)), Stumps are Sunny Flesh (Vallejo (VP)) with a wash of Seraphim Sepia (Citadel (GW)) Stones are Sky Gray (R) and sky gray lightened with White (CP) tiny spiders are Marigold Yellow (R) Brushed with Sunny Flesh (VP).
The spiders were intimidating to look at but turned out to be fun and easy.

The whole model was dry-brushed White (CP) then the Yellow areas were washed with Yellow Snow (SW), the Eyes painted Hexwraith Green (GW), and the legs/carapace washed with Armor Wash (SW). These were painted on the sprue and the clip joins touched up with Sky gray (RP).

This is a fast Tabletop finish that did not involve much cleaning of mold lines etc.  The casts are relatively clean with almost zero flash.
 For odds and ends there was an Orc Chariot and an Orc Command Group.

The chariot was tricksey to build and seems to have a lot of optional extra bits... added to the bits box of course... For the Command Group one extra set of legs and a boar were in the box and would have permitted a single model to be mounted... I opted to save the bits for later and went with a foot command of Champion, Standard Bearer, and Musician.
Skin was US Army reflective green (Panzer Colors line of Vallejo) and a Thrakka Green (GW) wash, Strong Tone (Army Painter (AP)).  Blood Red (GW) eyes and Standard Horn... this Horn will be revisited for shading before being wrapped up...

Rusty metals are Brown Rust (SW), Strong Tone (AP) and a drybrush of Silver (VP) thinned with Armor Wash (SW).

Hair effects are Rust Brown (SW) Heavy dry-brush of White (CP) wash with Just Red (SW).

Blue Orc Banner... Monster Brown (AP), dry-brush White CP, Wash with Blue (SW) light dry-brush with Sunny Flesh (R).

Exposed wood of the Chariot using Monster Brown (AP) wash with Dark Sepia (SW) dry-brush Sunny Flesh (VP)

Still on the desk: Part 3 of Hab 3, Joan of Arc angels and wagons, Raging Heroes Executrix unit. That should make enough space to set about a revamp of the work space and better organizing the pile of stuff waiting its turn.

Tuesday, February 25, 2020

Antenocitis Workshop Asian Wall Set v2, Neo-Tiki Motel Office WiP, and the Accidental Dwarf Army

 Antenocitis Workshop has a couple of new prepainted MDF releases in their Made for Infinity line. 

They are well designed and are sized to be LoS obstructions even for 40K. These will be great with the Asian Restaurants or the Neo-Tiki Motel that Antenocitis also have on offer.  The wood color is actually laser charred and not paint... which makes this kit have a strong odor of burnt wood even before opening the box.  This dissipates eventually and I hit them with some Dead Flat sealer so they can be handled more casually.

 Our trusty Burna Boy is checking out the rental office of the Neo-Tiki Motel. This is a small building with a GIANT sign that services the Neo-Tiki Motel.  This is a WiP and the Neo-Tiki Motel have detailed interiors sold as a separate upgrade pack that contains both interior sets.


  The Asian Wall Set v2 makes 11 wall section and one (working) gate.

The Prepainted MDF has a covering that is a single color with details laser cut in so its not completely or 'finely' painted but it does make a great surface for adding in those extra details if you like without it looking so much like painted MDF.
 It is recommended to varnish or seal the prepainted MDF to reduce smudging from handling.  I had not though of that and wish I'd seen the recommendation before working on Hab 3 from the Forward Base line.  Once the clear acrylic components are installed sealing becomes more tricky! Its a learning process.  My current plan is to seal the interior upgrade pack before removing the components from the MDF sheet and then do any extra detailing after that... resealing if required.  The reason being that the clear acrylic doors and windows really need to be installed before the model is assembled.  Otherwise there is a significant risk of damaging the MDF.


While we're talking about Hab 3 I'm making some progress on the resin bits.  I'm interested to see what the difference is between the old resin accessorized offerings and the new "all MDF" versions.


Lastly a couple of pictures of the Accidental Dwarf Army that is on the painting desk because I has a paint mix error that resulted in me digging out The Battle for Skull Pass box set and... since I was doing the goblins to eat up the erroneous paint mix I , of course, had to do the dwarves because they were there!


These will initially get some use as Imperial Dwarves in Kings of War but will certainly find their way back onto the table in my Oldhammer games.

These guys are a uniformed army while my Freeholds will be built from Atlantis Miniatures Dwarfs and then there is the giant pile of Mantic Dwarfs to grapple with...


Back to the desk!