Labels

3D Printing (25) 40K (62) Abyssal Dwarf (2) accessories (5) Adeptus Arbites (4) Adeptus Mechanicus (1) ADMech (1) Age of Sigmar (2) Agents of the Imperium (2) Angron (2) Anime (4) Antenocitis Workshop (32) Anvil Industries (5) AoS (4) ArmorCast (3) Army (4) Army Painter (10) Astra Militaria (24) Atenociti's Workshop (7) Atenocity (1) Atlantis Miniatures (4) Avatars of War (2) banner (4) base coat (16) base color (8) bases (45) Basilean (1) Battlefoam (1) Beasts (2) big lobbas (1) Bitspudlo (1) Black Scorpion (1) Black Templar (1) Blood Rain (16) Board Games (32) Bolt Action (1) Bombshell (1) Bones (14) Bretonnian (1) Bruegleburg (4) Bruxx (2) Campaign (20) carapace (1) Carnevale (8) chaos (25) Chaos Dwarf (2) chaos gate (3) Chaos Space Marines (18) Citadel (2) claw (1) Clawed Fiends (1) clear resin (1) Construction Guide (1) Contagion (12) conversion (3) Counts as (25) Craftworld Eldar (2) Custome Counters (2) Customeeple (1) Daemon Prince (4) Daemonettes (1) Daemons (5) Dark Angels (4) Dark Eldar (47) Dark Elf (6) Dark Souls (7) Darkness & Light (3) Darksword (2) Deadzone (15) Death Guard (9) decals (1) Deepcut Studios (3) Demented Games (3) dicebox (1) Dorothy (2) dragon (2) Dreadnought (5) Dreadtober (5) Drukhari (2) Dryad (1) Duncan "Shadow" Louca (1) Dwarf (7) epicast (2) Evangelion (3) Executrix (1) eyes (2) Fallout Wasteland Warfare (11) Fantasy Battles (19) Fast Panda (3) FBN (1) Fight Like a Girl (1) Finecast (4) Flames of War (4) Fluff (14) Forest Goblins (2) forge world (50) fortress (8) fortress name (2) Forward Base (10) free hand (1) Frostgrave (8) Game Mats (3) game room (1) Games Workshop (13) gamesday 2011 (1) gargantuan squiggoth (8) Geekfest 2010 (1) Geekfest 2011 (4) ghouls (1) Gloomhaven (1) Goblins (2) gobsmasha (1) golden demon (1) Greasus Goldtooth (2) greenstuff (10) Greenstuff World (1) Grotesques (3) Guest Painter (3) gunwagon (1) GW (8) GW Technical Paint (11) Halo Fleet Battles (1) Harlequin (1) Heresy Girls (5) Heresy Suppression Force (10) Hexy-Shop (1) Hi-Tech (2) highlight (2) horror (1) Imperial Guard (23) Infinity (23) Inquisition (4) Iron Empire (17) Iron Halo (1) Jailbirds (35) Joan of Arc (3) JR Miniatures (1) juggernaut (10) khorne (1) Kickstarter (43) Kill Team (1) Kingdom Death (17) Kings of War (9) Kromlech (3) KST (4) Kurganova (3) Land Raider (1) Large Scale (4) Lead Adventurers (3) legacy models (2) lighting (7) Lizardman (1) Lost Islands KS (2) lust elves (12) made for Infinity (33) Malice (1) Malifaux (13) Mantic (37) mawloc (1) max mini (2) MDF (28) mecha (3) Mechanicum (1) Mercenary Grots (1) Metallic (1) Miniature Figure Painting (7) miniature wargames scenery (3) model building (4) Modiphius (2) Mordheim (24) Movement Trays (1) moving (6) Mystery (4) Mythic Games (1) names of things (14) narratives (22) Necrons (3) Night Goblins (1) Nose Art (1) Nurgle (16) objective markers (2) Obliterators (2) Ogre Kingdoms (6) Oldhammer (4) orange (1) Orcs (1) ork (26) osl (2) P3 (1) Patreon (1) Plague (1) Plastic (4) Post Apocalypse (8) Pre-Heresy (2) Primarch (2) Primer (6) Privateer Press (1) Project Thunderhawk (28) prototyping (1) Proxies (24) ptimer (1) Rackham (2) Raging Heroes (125) Rampage (6) Ravager (1) razorwing (1) Realm of Chaos (1) Reaper (34) red (25) repair (6) resin (28) Resurrectionist (2) Resurrectionists (1) Retinue (1) review (1) ripper swarm (6) ripperswarm (1) Roleplaying (1) RPG (31) runtbot (7) Sacred Heart (1) scatter (7) Sci-Fi Space Battles (6) Scibor (2) Secret Weapon (77) Serene Dawn (12) Setting the scene (23) Shading (1) Silver Compass Designs (1) Sisters of Battle (25) Sisters of Eternal Mercy (11) Sisters of Sigmar (4) Skaven (4) Skin (2) Skirmish Game (8) Slaanesh (1) Slann (1) SnapMaker (5) Spartan Games (1) Sslyth (1) Star Saga (32) Starfinder (4) Steampunk (2) stl (1) Stone Crusher (3) Strigoi (1) studio (1) Studio Miniatures (1) Studio Swelter (4) SUPERCaT (1) Supers (1) Tabletop (9) Tabletop Art (3) Tabletop World (36) tank pit (1) Tantalus (6) Terminator (2) terrain (58) TGG (20) TGG the Game (3) TGG2 (22) The Dickensians (2) The Old World (2) The Order of Vampire Hunters (13) The World That Was (1) Theme (33) Third Party conversion bits (1) Thor Minatures (1) Thousand Sons (1) thunderhawk (3) Titanite Demon (1) tools (2) Toughest Girls in the Galaxy (9) Toughest Girls of the Galaxy (6) Toughest Girls of the Galaxy 2 (7) trukk (3) tutorial (2) Twisted (7) tyranid (12) UAF (1) Ubiquitous Rat (1) unboxing (4) Undead (2) undercoats (4) Undertown (15) Unwritten (5) Urkin (1) Vallejo (5) Vampire Counts (4) Vampire Hunter (2) Vampires (1) Vampiric Flesh (1) Vanguard (4) varnish (2) Vatican (3) vehicle (13) Venom (3) Video (1) Vikings (1) Void Elf (17) Void Elves (15) War Machine (1) War World Scenics (1) Warbands (3) Warchimera (3) Warhammer (13) warhammer the old world (1) Warpath (18) wash (33) water effects (17) weathering (61) weathering powder (14) WFB (1) WH40K (40) WHFB (14) WiP (22) Witch Hunters (5) wood (2) Wood Elf (4) World Eaters (2) Wracks (1) wraiths (1) WW2 (1) Wyrd (5) yellow (1) Ynnari (5) Zoggit (1) zombies (1)
Showing posts with label 40K. Show all posts

Monday, December 7, 2020

Forward Base: Habitat 5 WiP part 2

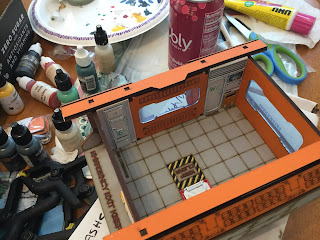
Today sees the construction of the main structure. But first a little more painting of panels and resin bits.

A few of the vent panels were not laser cut so were painted in while painting the punched out vents and their resin replacements/additions. All the vents, windows, doors, etc. were punched out prior to assembling anything and dry fitted to see if they could be easily installed after assembly. This turned out to be true for the vents and garage bay doors but not for the acrylic windows and doors which fit very tightly and were installed prior to general construction.

The MDF vents were glued to the resin parts and painted both sides. You can see the left side are the painted MDF and the right are the painted resin. The white is Graveyard Bone (Reaper(R)) and Splintered Bone (R) over black primer on the resin and clear sealer on the MDF.  On the MDF side the vent cavities are Glowing Mist (R). For the resin Cavities Soft Body Black (Secret Weapon( SW)) wash to clean up the dry brush bleed.

On the interior rear wall of the building the rollup doors for the toolboxes got a thinned  Phoenix Red (R) and the clear acrylic door was placed.  

 This was a tight fit and, in retrospect, I might have positioned it a little differently because this wall gets doubled by the outside wall which leaves this door recessed vis-à-vis the outer wall. Its not a big deal just something to add to my lessons learned when doing future builds.

Now construction can commence in earnest!
Before attempting to slot things together I carefully trim one side of the coating off the tiny tabs.  This coating helps give these kits a smooth finish but it often seems to bunch up when going into slots and the excess has to be cut away afterwards. Cutting off just one side retains the strengthening effect of the coating while reducing the bunching and occurrence of too tight fits to practically zero.

"The Rough Guide to building habitat 5" on the Antenocitis Workshop site notes that this kit is a little complicated and should be approached in a certain way. Believe it!


The first assembly is the Lattice with Beam, Support Struts, Top Side Panels and Roof Guides for the rear part of the building.

 True to its name the guide is a little quirky. As is the usual case with these kits all of the components of the model have very specific names but the parts are not labeled so have to be carefully selected and test fitting is essential. Some of the parts have names that imply the existence of other parts for example "Beam 1" seems to be the only part named "Beam" in the kit so I spent some extra time trying to located the other "Beams" to make sure the one I had selected was actually "Beam 1"

Next up come the first aid stations.  Volgren Troller has very generously supplied a full First Aid Station and sink for each vehicle bay. The Rough Guide was a little fuzzy here. It details about half of building the most complicated side without mentioning the small positional markings on the struts or how the First Aid stations are constructed... and do the same for the other side... which I mistook for a comment about installing the other side wall when it really specifically was referring to the First Aid Stations.  The kit is very well designed so once I started dry fits it became immediately obvious how things were meant to go.

The inner framework, complete with matching First Aid Stations and side catwalks. The catwalks are not only great places for miniatures to lurk but help a lot with giving the tool boxes and other etched features an illusion of depth.

Now comes the Interior Rear Wall.  Once this wall is in position the whole framework can be slotted into the floor.


Floor installed. For as many slots as the floor part has this went together very easily.  The precision of the laser cutting is really great. The Rough Guide helpfully mentions that the floor should be worked starting from the rear wall. The front wall is not yet on and the side walls are still a bit flexible at this point making them a lot easier to deal with in the fitting.
Time for the Front Wall.  This slots into the floor and relies on the flexibility of the Top Side Panels to be lifted enough to get the wall into position.

Next comes the Exterior Rear Wall which completes the main structure.  There ae still a lot of things remaining to do but this was the tricky bit.

Remember those resin vent panels? Add them in here as they get painted. The printed side is reversed to show the etched detail on the other side of the wall panel and the slightly larger resin side allows for the whole thing to be glued in flush.

First picture shows the resin side.

Second picture shows the painted MDF side.

These slide in very easily and add some extra detail. 

Back to the desk to work on the ramps, doors, ladders, interior details etc...


Thursday, November 19, 2020

Forward Base: Habitat 5 - The Workshop WiP

Forward Base: Habitat 5 - The Workshop


Habitat 5 is a workshop with two vehicle bays that should be an early structure for a new outpost.

The kit is from the Forward Base Kickstarter by Antenocitis' Workshop and this one includes the resin upgrade as well as the other additional rewards from that campaign.

I sprayed all the MDF with a dead-flat sealer and began painting the details.  These kits are pre-painted which does not mean that no painting needs to be done but rather that they have a single color per sheet paintable coating which allows for the painted surface to look a lot less like painted MDF.

You can see here the ramps are on a yellow colored sheet and I've painted in details like safety markings, logos, tools, etc... The floors and walls are grey and roof panels white. 

These are weathered panels which means the laser cutter was turned up to do some light scorching. It makes for a nice effect on the large areas that I leave unpainted like the grey floor of the vehicle bays.

I still have tool boxes and some cabinets to paint in before assembly.

Then came cleaning and priming the resin components and familiarizing myself with the types of parts that might be included. I learned from some earlier builds that the resin parts need to be considered from the very beginning as they sometimes completely replace structures early in the build process.
For vents and doors the MDF is pre-cut so the etched part can be removed and replaced with a resin upgrade. I have removed the parts to be replaced, turned them round, and glued them to the back side of the resin replacements. Now I'm in the process of painting both sides. In this way I get detailed vents and garage doors on both sides.


More on Hab 5 next installment... I also got a little work done on the body bags and am starting the ice vending machines and porta-loos for the Post Apocalypse table.

Last, but far from least, The massive Etherfields boardgame arrived just as I was coming up to post!

With a 17.5 kg mailing weight this thing is a real beast.  I'll be taking a look inside after my wife gets home so she can enjoy it too.

Cheers

Thursday, September 24, 2020

Temporary Military Command Centre

This is from Antenocitis' Workshop (AW)survival line and is described on the website as "Temporary Military Command Centre" but is also described in the kit as "Military Office". Whichever handle it goes by it Makes a handy addition to the Post Apocalypse collection. 
Shown here with Canoness Veridyan for scale this is one of the easier of AW's models to build. Its got a lot of space inside due to the magic of laser etching.  There are a lot of interior details like desks, fire extinguishers, weapon racks, computers, data storage banks, maps, and clocks but none of them intrude on the playspace. Quite clever really. It allows you to cram a squad in there without acrobatics.

Its one of AW's pre-painted MDF line and the only things I painted at all were the gray desks and server cabinets and the blue water of the wall map.  Touch up the MDF snip points with Nut Brown (Reaper) and its done.  Like all the models in this line the prepaint is pretty basic but is totally playable straight out of the box and provides a nice launch point if you want a more detailed finish.  I'll likely add some weathering and graffiti to match the themes on the AZ Mart I did earlier. 
Lots of windows and the lack of actual furniture makes it easy to see which models have access.

I love the real furniture that is available for many of these buildings but there is a certain practicality in having some frequent use structures without a lot of clutter for a travel set or a pick up game.
The exterior is complete with an Air Conditioner that serves as the handle for removing the roof and a freely rotating removable radar/satellite dish. 

A great, quick to build, addition to the tabletop!
 

Tuesday, August 11, 2020

Epicast Stompa revisited

While unpacking the workshop I rediscovered an old friend from 40K 2nd Edition... Its from Epicast back in the bad old days when GW licensed a few outside companies Like Epicast, and, later, Armorcast to produce stuff that occurred in the fluff but GW itself was not producing.  Eventually all of those licenses were withdrawn and consolidated back into what we now know as Forge World.

These early models came with rules in the form of Data Sheets so they could be played, with the consent of your opponent, without any new rule books being required.

Second edition was the high water mark of the cartoon style for 40k and my Orks were as cartoon-y as they come. These first couple of pictures are of the Stompa appear (with the addition of the beginnings of some lining that I started before remembering to snap a photo) as I played it for decades.  Bright primary colors and almost zero weathering, highlighting, or shading.  The roof tiles over the rear assualt doors were perhaps the only attempt at weathering.  

This was not entirely a sacrifice on the altar of speed.  The cartoon style really relied on mass color coding with a very small number of spot details as focal points... much like Anime does even now. I wanted to update this old can a bit so it didn"t look super incongruous with my current Orks but retained its 2 ed. roots.

Below is the result.


As you can see I chose not to start over from scratch and just continued on over the old paint.

I started with a lot of Brown Rust (Secret Weapon(SW)) to move the nearly monochrome green into a two color scheme, jazz up the freehand chevrons, and to make the iron jaws of the skull a bit more fearsome. This was all large brush stippling.

Following the Brown Rust I did a full model Drybrush with Silver (Vallejo(V)) followed by a full model wash with Armor Wash (SW) and then wiped away the excess wash with a paper towel.  

Orange Rust (SW) was stippled in the central areas of any Brown Rust areas, Phoenix Red (V) stippled over red areas. 

Brass Casing (SW) was used to touch up and shade gold areas and Engine Metal (SW) touched up and highlighted all metal areas. The battlecannon barrel mouth got some thin coats of Orange Heat (SW) fading into Purple Heat (SW) fading into the base green.  The entire model then was lined with Rust Shadow (SW) with extra effort directed at establishing a more detailed impression of a blade track for the chainsword.


The model has always been unsteady on its feet and prone to falling over so in a final omage to 2nd ed., and to play with my newly rediscovered static grass applicator, I  grabbed a big oval bass and loaded it up with 2mm static grass.  In 2nd. ed almost all the armies I encountered, including my own, were straight up flocked unlike the more significant efforts expended on modern bases.


Here is the completed model with some Ork Burna Boyz making their wicked way into the Undertown... gonna be a bad day for someone!


 Back to the desk!

Cheers

Friday, August 7, 2020

Joan of Arc 15mm Core Game, GW Forest Goblin Spider Riders, an Epicast Stomper Tune-up in progress and fun with static grass!

The Joan of Arc game is so ambitious!  Its a board game, a Tanletop Mini Game, its a Historical Game, its a Fantasy Game. It has an RPG and its almost an action RPG right out of the box... It even has aerial combat because.... Angels and Dragons... whew!  Its gonna be a fun ride!


From the core box: The Tarasque, The Unicorn, The Archangel Gabriel, 4 Angels, 2 Bullock Wagons.

As you can see you can go full on fantasy right out of the starter box... I think one of the scenarios is a werewolf hunt even... or you can stay with the historical scenarios. Its a great transitional game.

These were all sprayed a dark camo green primer (Rustoleum), damp-brushed with white craft paint and washed with Secret Weapon (SW) Washes.  The wagons then got a dry-brush of Sunny Flesh (Vallejo(V)) to make the wood pop.


Below is the tray ready for re-interment in the game box... In this Golden Era of Mega-Games I'm going to have to put some thought into how to condense the numerous expansions.


The angels got sky themed bases to go with the sky tiles in the aerial combat portion of the game.  Sky Blue (Warpaints) Stipple with white, wash with Blue (SW).  White robes are layered Graveyard Bone and Splintered Bone from the (Reaper) Bone Triad.   Gold is Brass Casings (SW) Flesh Wash (SW) dry-brush Silver (V).


 Being easily distracted by shiny things... I was unable to simply put the static grass applicator back into its box and decided to fix a long standing problem... namely my ancient 40K second edition Epicast Stompa!  Its never stood well on its own and is heavy enough to take out models it happen to fall on...doh! So I thought I'll just slap a base on it and its "problem solved!" ... 


...then I noticed that the old second edition paint-job looked really, really, dated so... doing something I very rarely do... I decided to do a bit of an update.  These are the pictures of its original state except for some black lining I started to do before remembering to snap a photo.  I'm going to preserve some elements of the original and bring it up to date without starting from scratch.  Well, that's the plan anyway!


The completed Forest Goblin Spider Riders. Ready for an Oldhammer rumble!

Speaking of a rumble I literally hate this new Blogger interface!  Its more primitive than its predecessor and seems specifically designed to be rigid and unwieldy.  For example I'd like to put this sentence at the bottom of the page... but I can't do that without actually removing the picture below... fabulous improvement... This update would normally have taken be about 15 minutes to compose on the fly but I've been at this now for three hours and still can't get the words and the pictures to go where I want them.

MADE
  OF
 FAIL  

Tuesday, July 7, 2020

Forward Base Habitat 3 construction process part 2

 One of the common issues with MDF buildings is that they look like MDF buildings.  Part of this is the way they interlock with visible joins but another way is that the overlap surfaces tend to be ignored in terms of details.

Antenocitis Workshop addresses the second issue by including a detail card for the end-caps.  This glues in place and ensures that the nooks and crannies have detailing that is thematically similar to the rest of the model. 


 These thin cards are easily attached with tacky glue or Super-Phatic (very thin, strong, PVA).  I clamp them in place for a few minutes to ensure a strong bond.
 Here is a "before" shot showing the plain end-caps.  Since the MDF is pre-painted it actually looks fine as it is... but its gonna be so much better after!


 To the right the end-caps have been installed and the detailing is very nice.  You will notice a difference in color between the edges of the end-caps and the base MDF.  This is easily sorted later with a quick touch-up pass using Nut Brown (Reaper) paint.


Clamping up the rest of the assembled shell.
 The remaining bits.  The two topmost thin strips that we were careful not to glue into place during the build, the roof/lid, and the end-caps for them.  Its best to wait to install the end-caps for these parts until after the resin goes in.  For the most part they work if the ends are aligned but small differences in the shell construction can be adjusted for in the final fit of these.
 Moving on to the remaining resin. Some of the resin was installed earlier in "part 1". To the left is what remains. (There is one extra locker shown as I was touching up a part from a previous Hab 3).

The large bunk wall usually requires a hot water bath to adjust for warping.  This is likely due to the big hole in it for the bunk assembly.  Its easy to straighten and when the bunk is attached to the wall it reinforces the shape nicely.
 At this point all the remaining resin gets pre-fitted, sanded as required to adjust the fit and then painted.  These are often a very tight fit that should be adjusted via sanding the edges of the resin bits until they fit snugly but don't require force to get into position. Keep in mind that the height of the resin will also likely need to be adjusted to be level with the top of the MDF.  I failed to notice that during this build and the top retaining strips were very tricky to get installed.

 The pre-fit of these parts is critical and should not be skipped.
 The painted walls can now be slid into place.  I align them using the printed floor graphics.

   Antenocitis Workshop really excels at minute details and photographic elements like video screens etc.  All the graphic elements here are from them except the tabletop which is repurposed from some hobby packaging.


Once the interior resin is in place the Topmost strips are finally glued into position and  the remaining end-caps can be installed.

Test fit the roof/lid for alignment mark with pencil and glue in the lid end-caps.  There can be some variation so be careful to get the alignment right before gluing these in place. Carefully trim the overhang, if any, with a sharp hobby knife.


Now its touch up time.  Go round the whole model with Nut Brown and toch up the spots where the MDF shows bare... like where it was previously attached to the frame etc... 
 A "in progress" view to the right.  you can clearly see the difference between the touched up end caps and those not touched up.
All that remains for "part 3" are the exterior acrylic lights... which are a tiny bit tricksey..., the interior/exterior scatter, and the lower "feet"  which are unique to Hab 3 and help it interlock when stacking with other buildings in the series (specifically Habitat 1 or Habitat 4) and should not be installed until their companion buildings top lugs have been installed to make sure they line up properly. 

Part 3 will be a bit coming as I'll want to finish this after building Habitat 1 or 4...

Cheers