Labels

3D Printing (25) 40K (62) Abyssal Dwarf (2) accessories (5) Adeptus Arbites (4) Adeptus Mechanicus (1) ADMech (1) Age of Sigmar (2) Agents of the Imperium (2) Angron (2) Anime (4) Antenocitis Workshop (32) Anvil Industries (5) AoS (4) ArmorCast (3) Army (4) Army Painter (10) Astra Militaria (24) Atenociti's Workshop (7) Atenocity (1) Atlantis Miniatures (4) Avatars of War (2) banner (4) base coat (16) base color (8) bases (45) Basilean (1) Battlefoam (1) Beasts (2) big lobbas (1) Bitspudlo (1) Black Scorpion (1) Black Templar (1) Blood Rain (16) Board Games (32) Bolt Action (1) Bombshell (1) Bones (14) Bretonnian (1) Bruegleburg (4) Bruxx (2) Campaign (20) carapace (1) Carnevale (8) chaos (25) Chaos Dwarf (2) chaos gate (3) Chaos Space Marines (18) Citadel (2) claw (1) Clawed Fiends (1) clear resin (1) Construction Guide (1) Contagion (12) conversion (3) Counts as (25) Craftworld Eldar (2) Custome Counters (2) Customeeple (1) Daemon Prince (4) Daemonettes (1) Daemons (5) Dark Angels (4) Dark Eldar (47) Dark Elf (6) Dark Souls (7) Darkness & Light (3) Darksword (2) Deadzone (15) Death Guard (9) decals (1) Deepcut Studios (3) Demented Games (3) dicebox (1) Dorothy (2) dragon (2) Dreadnought (5) Dreadtober (5) Drukhari (2) Dryad (1) Duncan "Shadow" Louca (1) Dwarf (7) epicast (2) Evangelion (3) Executrix (1) eyes (2) Fallout Wasteland Warfare (11) Fantasy Battles (19) Fast Panda (3) FBN (1) Fight Like a Girl (1) Finecast (4) Flames of War (4) Fluff (14) Forest Goblins (2) forge world (50) fortress (8) fortress name (2) Forward Base (10) free hand (1) Frostgrave (8) Game Mats (3) game room (1) Games Workshop (13) gamesday 2011 (1) gargantuan squiggoth (8) Geekfest 2010 (1) Geekfest 2011 (4) ghouls (1) Gloomhaven (1) Goblins (2) gobsmasha (1) golden demon (1) Greasus Goldtooth (2) greenstuff (10) Greenstuff World (1) Grotesques (3) Guest Painter (3) gunwagon (1) GW (8) GW Technical Paint (11) Halo Fleet Battles (1) Harlequin (1) Heresy Girls (5) Heresy Suppression Force (10) Hexy-Shop (1) Hi-Tech (2) highlight (2) horror (1) Imperial Guard (23) Infinity (23) Inquisition (4) Iron Empire (17) Iron Halo (1) Jailbirds (35) Joan of Arc (3) JR Miniatures (1) juggernaut (10) khorne (1) Kickstarter (43) Kill Team (1) Kingdom Death (17) Kings of War (9) Kromlech (3) KST (4) Kurganova (3) Land Raider (1) Large Scale (4) Lead Adventurers (3) legacy models (2) lighting (7) Lizardman (1) Lost Islands KS (2) lust elves (12) made for Infinity (33) Malice (1) Malifaux (13) Mantic (37) mawloc (1) max mini (2) MDF (28) mecha (3) Mechanicum (1) Mercenary Grots (1) Metallic (1) Miniature Figure Painting (7) miniature wargames scenery (3) model building (4) Modiphius (2) Mordheim (24) Movement Trays (1) moving (6) Mystery (4) Mythic Games (1) names of things (14) narratives (22) Necrons (3) Night Goblins (1) Nose Art (1) Nurgle (16) objective markers (2) Obliterators (2) Ogre Kingdoms (6) Oldhammer (4) orange (1) Orcs (1) ork (26) osl (2) P3 (1) Patreon (1) Plague (1) Plastic (4) Post Apocalypse (8) Pre-Heresy (2) Primarch (2) Primer (6) Privateer Press (1) Project Thunderhawk (28) prototyping (1) Proxies (24) ptimer (1) Rackham (2) Raging Heroes (125) Rampage (6) Ravager (1) razorwing (1) Realm of Chaos (1) Reaper (34) red (25) repair (6) resin (28) Resurrectionist (2) Resurrectionists (1) Retinue (1) review (1) ripper swarm (6) ripperswarm (1) Roleplaying (1) RPG (31) runtbot (7) Sacred Heart (1) scatter (7) Sci-Fi Space Battles (6) Scibor (2) Secret Weapon (77) Serene Dawn (12) Setting the scene (23) Shading (1) Silver Compass Designs (1) Sisters of Battle (25) Sisters of Eternal Mercy (11) Sisters of Sigmar (4) Skaven (4) Skin (2) Skirmish Game (8) Slaanesh (1) Slann (1) SnapMaker (5) Spartan Games (1) Sslyth (1) Star Saga (32) Starfinder (4) Steampunk (2) stl (1) Stone Crusher (3) Strigoi (1) studio (1) Studio Miniatures (1) Studio Swelter (4) SUPERCaT (1) Supers (1) Tabletop (9) Tabletop Art (3) Tabletop World (36) tank pit (1) Tantalus (6) Terminator (2) terrain (58) TGG (20) TGG the Game (3) TGG2 (22) The Dickensians (2) The Old World (2) The Order of Vampire Hunters (13) The World That Was (1) Theme (33) Third Party conversion bits (1) Thor Minatures (1) Thousand Sons (1) thunderhawk (3) Titanite Demon (1) tools (2) Toughest Girls in the Galaxy (9) Toughest Girls of the Galaxy (6) Toughest Girls of the Galaxy 2 (7) trukk (3) tutorial (2) Twisted (7) tyranid (12) UAF (1) Ubiquitous Rat (1) unboxing (4) Undead (2) undercoats (4) Undertown (15) Unwritten (5) Urkin (1) Vallejo (5) Vampire Counts (4) Vampire Hunter (2) Vampires (1) Vampiric Flesh (1) Vanguard (4) varnish (2) Vatican (3) vehicle (13) Venom (3) Video (1) Vikings (1) Void Elf (17) Void Elves (15) War Machine (1) War World Scenics (1) Warbands (3) Warchimera (3) Warhammer (13) warhammer the old world (1) Warpath (18) wash (33) water effects (17) weathering (61) weathering powder (14) WFB (1) WH40K (40) WHFB (14) WiP (22) Witch Hunters (5) wood (2) Wood Elf (4) World Eaters (2) Wracks (1) wraiths (1) WW2 (1) Wyrd (5) yellow (1) Ynnari (5) Zoggit (1) zombies (1)
Showing posts with label Raging Heroes. Show all posts

Wednesday, March 30, 2022

Patlee Salamander Stargazer on Celestial Shrine


I've always wanted a Skink Mage Priest to run as a rebel faction hero.  There have been a few notable Skink heroes but the Slann always had a lock on the Mage Priest role.

Raging Heroes Infinite comes to the rescue with the 3D printable Patlee Salamander Stargazer on Celestial Shrine.

This was printed on a Photon Ultra in Anycubic Basic Gray resin and was painted directly on the resin with no primer coat. In retrospect, models with this much gold would probably work out better over black resin.


I'm finding that I can often leverage the color of the resin to either speed up painting or to get new effects. So far paint adhesion and durability have been excellent.


In this case a regular process for the gold color is Brass Casings (Secret Weapon (SW)) base, wash with Flesh Wash (SW), Drybrush Necron Compound (GW). Over black resin that would have been all that was needed. Over the gray I ended up doing some lining with Dark Tone Ink (Army Painter (AP)). I'm still not entirely happy with the color depth for the gold.

 
I've recently been playing a lot of Horizon: Forbidden West and have really enjoyed the way colors are depicted for tribal societies. Its making me reconsider some of my more earth tone heavy schemes for medievals, elves, etc...

Speaking of earth tone heavy schemes... I've been tinkering with some Supers and Pulp Action Heroes with some 3D printable files from Bombshell. I'll also be doing some Retro Sci-Fi and messing around with Counterblast.


Back to the bench!


Wednesday, October 20, 2021

Raging Heroes Berserkers and Warriors

I've been a follower of Raging Heroes for many years now and have been an avid collector of their 3D print file Patreon, and now through their in house service, even though I didn't have a 3D Resin printer until now. I've done a fair bit of FDM Printing but that is really limited to terrain or accessories and I've never had any luck printing humanoid figures in any game scale. With the addition of the Photon Mono X printer to my workshop all of that has changed! I still have a lot to learn but the earliest results are now making their way to the paint desk.
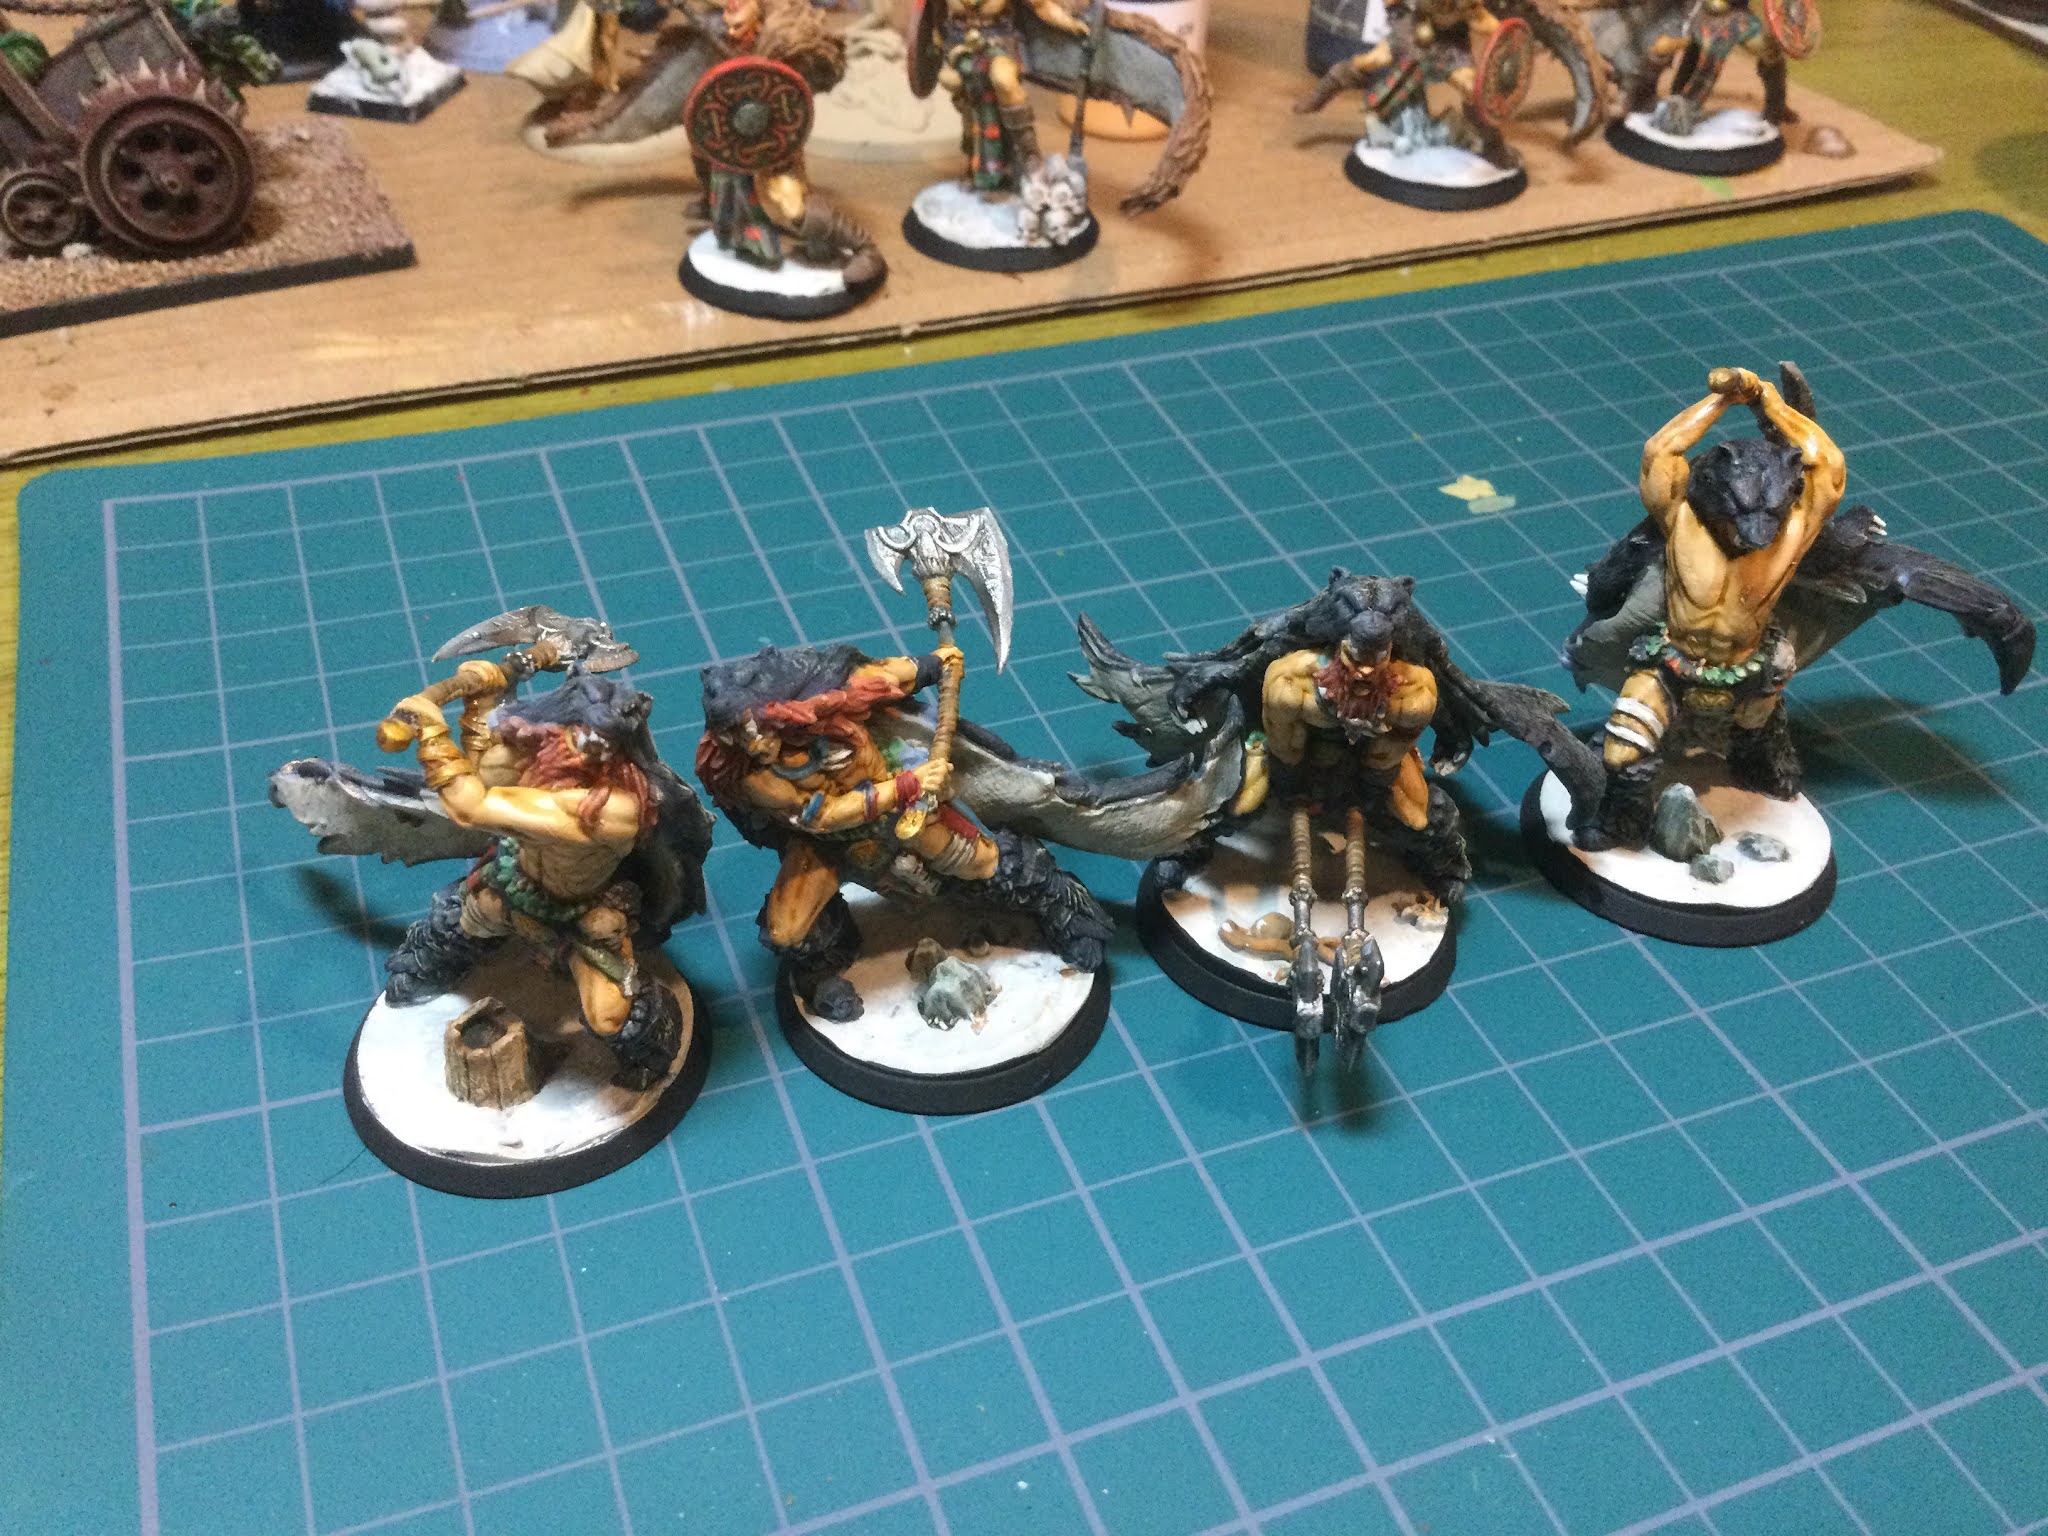
First up are the troops from the Raging Heroes Viking Gods and Heroes theme from the Patreon.  these models have really heroic proportions and are quite beefy models in line with RH's more recent offerings.

I'm hoping to use these in Frostgrave and Kings of War. The bases are also printed from the set and painted in a winter theme. The set has bases sized from 25mm to 50mm. These are 30 mm bases.

I thought the cloaks to be made from the hides of Black Bears for which I imagined this fraternity to have traveled to the wilderness of North America to obtain.

I also had a stab at a unifying tartan for their kilts. These will be repeated throughout the warband.

Flesh tone: are Dark Flesh (Vallejo (V)),Flesh Wash (Secret Weapon (SW)), Dark Flesh (V) Layer, Sunny Flesh (V) Top Layer.

Bear Hide: Carbon Gray (Reaper (R)),Cobalt Grey (R) drybrush, Soft Body Black Wash (SW),Sunny Flesh (V) weathering. 

The Kilts are a bit more complex and I'll likely do a post on just that as I get more comfortable with the process. I think these were a good first attempt and should improve with more iterations.

Hair colors: A lot of red heads a couple of blondes and a guy with black hair... Vikings.

From a printing perspective some of the weapons, particularly the two handed axes, have a bit of a curve to them like they are flexing with the swing. I like the look as it implies motion but I don't know if its an intentional effect or just fortuitous.

The regular Warriors have much more tartan visible so it was easier to get a flow going. 

You'll notice that these guys are in super wide leg stances. So wide, in fact, that it was difficult to contain them on the 30mm bases. Since I want to use these as gaming pieces I really did not want to make the move to 40mm bases because that is usually more of a monster or crewed weapon size. The result was some creative mounting...

The first of these has a stance so wide it literally cannot be contained on a 30 mm base. I decided to mount him with one foot firmly planted on the ground and his kilt attached to a rock to support him solidly. I think its a passable look of a warrior leaping over the rocks to press the attack.

The next fellow had a ...slightly... less wide stance and has the insole of one foot and the very back of his heel touch the base... it was a little dicey and one foot has an extra bit of support on the bottom to insure continued contact.

This guy is more less aggressively spread and you can see the shield design. I kept to the same general colors as were used in the tartan to strengthen the theme.
The group Leader is, ironically, the only one that fit easily onto the 30mm base.
The group shot. One thing I'd love to see RH do is increase the number of troop poses. typically there are 3 troopers and one Troop Leader for a total of 4 discrete poses. Many games use unit sizes that range from 5 to 10. These print as a single piece so it would be nice to have a couple more unique poses. With 5 poses they could be printed as mirrors giving the feel of 10 different poses. Just a thought.

Overall I am super happy to finally be printing these out. The themes are lavish and include Centerpieces and Terrain bits that make the journey from imagination to physical model only because they can be 3D printed. 
 

Tuesday, September 15, 2020

Post Apocalypse Military Checkpoint, Void Elf Executrix Troop, Kings of War Objective and Scenario Markers.

Busy and eclectic week! First up is the WiP tray drying off after a quick sealer. On deck is a Military Check Point in MDF from Antenocitis' Workshop, a goblin casualty from The Battle of Skull Pass (WFB 7ed. Starter set), and a double dose of objectives and accessories terrain from Mantic's Kings of War 3rd Edition Scenarios and Objectives Pack.
The objectives pack will also be handy to replace some of the cardboard counters from Gloomhaven... stay tuned for more on that!

The Army checkpoint is part of the Post Apocalypse, pre-painted, line of MDF terrain from Antenocitis' Workshop. The little guard hut is presented in its pre-painted and weathered condition but I decided that the road barriers needed a spot of paint as they were plain black out of the box.The alternating red and white striping was aided by the barrier arms being pre-scored.  A yellow work up and a red cap tops of the post.

I've been particularly addle-brained the past couple of weeks and, when constructing the barriers for the Army Checkpoint I used some included spare parts to double the size of the counterweight in spite of the instructions being rather clear that only one plate was required... the more the merrier right?


WRONG!

As you can see the extra bit makes the barrier arm non-functional as it impacts the support post very early in its lift... woe is me!

Since there was nothing else for it I decided to have a crack at removing the extra bit with a pair of side snips.

Cha-CHING! the offending bit popped right off and took the glue with it.  One of the advantages of having sealed the part before construction began. Fortunately this was the case with all four arms.  They came away clear and I was able to finish the assembly without further mishap.
The finished barrier arm ready to control movement on the tabletop!

An observation... this kit was more difficult for me than most of the kits from this range... The parts did not go together quite as seamlessly.  I think I needed to build a jig to help with that but part of the problem was that I had to use a different glue than I am used to.  For the other MDF projects I have been using Super-phatic glue which is kind of like the superglue of wood glues. Since it sets so fast I've been able to skip a lot of clamping, banding, and jig making.  I built this kit with Gorilla PVA.  Its a good glue and sets up reasonable quickly... about like a tacky glue... bit not the fast hard set that I was used to so I ended up collapsing the posts a few times and having to rebuild the whole thing on the fly.  Unfortunately it shows on some of them.  I started clamping after the second collapsed assembly so half of them are ok and half of them are a bit ragged.  But they are post apocalypse and have not yet been weathered so... they may yet be battered into submission!

Here is an assembled checkpoint being willfully ignored by a troupe of Void Elf Executrices from Raging Heroes.  I've been using them as Ynnari but continue to refer to them as Void Elves. 
This is the Executrix troop that completes the Executrix command unit I did about a year ago. Fortunately I had done the base coat before the big move so I didn't have to do a lot of color matching... that won't be the case going forward though!


Who said death worshiping Dark Elves have to wear black or red anyway! I mean the power weapons have that Dark Side red light-saber glow... that should cover it!
Mantic's Kings of War objectives... Dragon Egg, Weapons Cache (dead gobbo by GW! 'ow did that git in 'ere ennyway!?! ohh cool static grass)
Runestone and messenger/courier bag... against a stump... with a pistol and a musket... that looks to have ended badly...
Supply crate and ammo pile for a cannon.

Thats all for today...

Next time the Gloomhaven initial unlocked characters and the Kings of War objective treasure chests that didn't make it into this post.


Back to the desk! 


Thursday, May 14, 2020

Data Trust interior details


 The interior resin details are done for the Data Trust.

I replaced the little searchlight that I had scratch built to use as a grip for removing the roof with a resin and metal drone control and coms array.  The dish antennas may prove tricky in the long run and complicate storage so I may, at some point, add magnets to these... I'm not certain of the benefit vs the risk of damage as the dishes are metal and there is some weight stress on the connection points that might not be great for magnets... we'll see I suppose.
The control point was painted over a black primer with Orange Heat (Secret Weapon) which is a really interesting technical paint I highlighted with Orange Rust (Secret Weapon) and glazed with Orange Wash (Secret Weapon) lining was Rust Shadow (Secret Weapon) which is fast becoming my favorite liner.

The dishes are metal primed black dry brushed with Silver (Vallejo) washed with Armor Wash (Secret Weapon) red panels are Blood Red (Reaper) glaze of Orange Heat, glaze of Orange Rust liner with Rust Shadow. 


Grey Panels Stormy Grey (Reaper) Brush up with Sky Grey (Reaper)

  I love that you can see details through the open windows and that is my motivation to eventually add LED lighting... once I find the bits!

Raging Heroes Void Elf for scale today.

Exterior Weathering is mostly Forge World Weathering Powders, primarily Medium Earth.


Ground Floor interior details: Food Vending Machine, Large TV, Coffee Station, Interactive Table and two Bench Seats. Details glued to the walls except the table and seats which are magnetized and can be removed as required.

I had already constructed the doors before I looked at the contents of the resin upgrade pack.  The upgrade pack includes replacement door frames and doors that are armored. 

I decided to keep the office style doors that I had already installed and use the armored door elements later... maybe when building a NERVE (Neon Genesis Evangelion) outpost or SD-6 (Alias)style hidden facility.

Moral of the story... always check the upgrade sets before building the base structure!

Data Trust Upstairs interior features four Data Walls and a master interface terminal.  The Data Walls are glued in and the Interface Terminal is magnetized so it can be reoriented or removed.


There is still a lot more of the Undertown to do including an awesome Game Shop! but... its pretty playable at the moment so I think I'll veer into the Post Apocalypse buildings for a bit and get a baseline of buildings set up.  Since we're running Fallout:Wasteland Warfare from time to time I'd better get something more suitable for that built.

Back to the desk!

Wednesday, April 22, 2020

Whiskey Jacks interior

 Whiskey Jacks got a face-lift this week  as part of the big retrofit of interior resin bits courtesy of a mislabeled box in my workshop.  The unfortunate bit is that I was also expecting to find led lights for the interiors of these and they were not in the box... the hunt is on!

The main Bar area got liquor shelves a cashier station, what looks like an off-track betting interface, 2 TV Screens, 3 interactive tables, and 6 seats.
 The resin is glued in place if attached to a wall (TV screens, cabinets, showers, etc) and attached with magnets for stuff that sticks into the room (beds, tables, chairs, coffee stations, etc...) or that might be good to remove for mini placement in some games.  There is also some kind of exterior machinery or power panel with a screen and number pad you can see in the picture below.
 The office space... which in retrospect should probably have been a kitchen... got a coffee station, cashier's interface, and a TV screen.

Being a sparsely furnished area I imagine it works more like a VIP room for dancers so it got some poster-style decorations from a Haganai cel phone deco set.  Featuring Sena and Kobato.  So I guess its now a cosplay Bar too!
 There is an apartment above the Bar that is smaller than a tenement room but furnished similarly to a flat with a shower, toilet, sink, TV, environment control, and a full size bed.  It might be an owner/operator living space, a VIP room, or just a room for rent.  Of course being situated directly above the Bar would make it a pretty loud place to sleep... even for the Undertown.
Next up are the interior resins for the Data Trust, which also includes a metal model drone to park on its roof, and a pair of SleepBox small format rentable rooms that can be deployed practically anywhere... like sidewalks or parking spaces... and are self serve.


Wednesday, March 25, 2020

Whiskey Jacks and a Stepped Tenement added to the Undertown table

Whiskey Jacks is the seedy watering hole that the Undertown needs to survive.  Home of all manner of ill favored leisure pursuits its the bane and the glue of the Undertown.

The kit itself is the most complex of the Undertown buildings I've worked on to date. Its also got the most sparse set of building instructions which seem to assume that you are already familiar with these buildings.. which... I am! so its all good but if you start your Undertown journey with Whisky Jacks be aware that you'll have to search a around the blog a bit to find instructions for some of the sub assemblies.
 One of the coolest features of this kit is also super simple... but brilliant!  It includes security shutters for the doors and windows that are easily placed or removed via some hooks.  This makes the shutters themselves all single piece items and likely to stand up well to use.
 Above you see the security shutters in place and to the left they are removed to reveal the reverse etched window details and doors.  Of course this is the Undertown so the doors and storeroom windows have permanent security bars installed even during business hours.
 I re-enlisted the aid of Sister Scout Celenia for scale from the fabulous Raging Heroes lineup.  Also appearing are some police/security guards from Mantic's Star Saga as obstacles to Sister Celenia's investigation of the moment.  Fortunately she is adept at moving unseen through the Undertown and evades the very alert security team.

.
The upstairs residence (or VIP room) is an example of how it helps to understand the way these buildings are assembled.  The instructions ask you to place the front hall wall before adding the black interior  detail strips and door frame.  This is contrary to all the building instructions I've previously assembled from this series.  Adding the front wall first would make it much more fiddly to glue the interior wall details neatly into place.  Armed with the experience of the previous kits I left the front wall placement until after completing the interior hall details.
 While the interior is not the highly detailed variety that we saw with Suburban Office 2 it does have a nice, operational, bar and I'll come back and detail this up once I make certain I don't have some resin upgrade or scatter package for it in the big box o Undertown stuff.
The Office door was completely missing from the instruction write up but did show up in one of the interior pictures. Be careful when installing the Office door base plate as I got it in backwards and had to drill a new hole due to the door being directional.  Always dry fit first!  The other doors are less fussy but they get build with a definite front and back which is important for a nice fit when closed.
 Whiskey Jacks comes with two main signs... one designed for permanent mounting which, due to my failing to read the entire assembly guide before starting the build, I was unable to attach as designed.  I had already used the alternate part and the glue was well set.  No worries though the detachable sign works quite well (after modifying it to accommodate a larger border wall.  Its set up for single wall thickness and all the roof-line walls are double thick) and I'll be able to convert the other into a detachable sign as well... never too many signs!

 Random Tardus? from the Reaper Bones Line.

The Stepped Tenement allows you to be the vicious Slum Lord of your dreams! Not content with merely providing the miserably small living spaces and thin walls of the basic Tenement it lets you actively oppress the residents by forcing them to walk through every square inch of hallway and stairs in the building to get to their room!  Fiendish!
 The scene is further set with some vending machines and dumpsters.  I believe the Vending Machines here are from Armorcast and the Dumpsters from Antenociti's Workshop.  The rooftop signs are from the Forward Base Kickstarter from Antenociti's Workshop.
 Sister Scout Celenia ghosts past security as they search the Stepped Tenement. heading for the Traffic barriers that are blocking the road out of the Undertown.  The traffic barriers are also from Antenociti's Workshop and still await, as does the rest of Undertown, the addition of proper amounts of graffiti!
Internal view of the Stepped Tenement Its similar to the basic tenement except that the halls alternate sides by floor.  Great for making sure that anyone who is trying to sleep has hallway traffic noise above them, below them, and outside their door.  Evil genius!