Labels

3D Printing (22) 40K (62) Abyssal Dwarf (2) accessories (5) Adeptus Arbites (4) Adeptus Mechanicus (1) ADMech (1) Age of Sigmar (2) Agents of the Imperium (2) Angron (2) Anime (4) Antenocitis Workshop (32) Anvil Industries (5) AoS (4) ArmorCast (3) Army (4) Army Painter (9) Astra Militaria (24) Atenociti's Workshop (7) Atenocity (1) Atlantis Miniatures (4) Avatars of War (1) banner (4) base coat (16) base color (8) bases (45) Basilean (1) Battlefoam (1) Beasts (2) big lobbas (1) Bitspudlo (1) Black Scorpion (1) Black Templar (1) Blood Rain (16) Board Games (32) Bombshell (1) Bones (14) Bretonnian (1) Bruegleburg (4) Bruxx (2) Campaign (20) carapace (1) Carnevale (8) chaos (25) Chaos Dwarf (2) chaos gate (3) Chaos Space Marines (18) Citadel (2) claw (1) Clawed Fiends (1) clear resin (1) Construction Guide (1) Contagion (12) conversion (3) Counts as (25) Craftworld Eldar (2) Custome Counters (2) Customeeple (1) Daemon Prince (4) Daemonettes (1) Daemons (5) Dark Angels (4) Dark Eldar (47) Dark Elf (6) Dark Souls (7) Darkness & Light (3) Darksword (2) Deadzone (15) Death Guard (9) decals (1) Deepcut Studios (3) Demented Games (3) dicebox (1) Dorothy (2) dragon (2) Dreadnought (5) Dreadtober (5) Drukhari (2) Dryad (1) Duncan "Shadow" Louca (1) Dwarf (7) epicast (2) Evangelion (3) Executrix (1) eyes (2) Fallout Wasteland Warfare (10) Fantasy Battles (19) Fast Panda (3) FBN (1) Fight Like a Girl (1) Finecast (4) Flames of War (4) Fluff (14) Forest Goblins (2) forge world (49) fortress (8) fortress name (2) Forward Base (10) free hand (1) Frostgrave (8) Game Mats (3) game room (1) Games Workshop (13) gamesday 2011 (1) gargantuan squiggoth (8) Geekfest 2010 (1) Geekfest 2011 (4) ghouls (1) Gloomhaven (1) Goblins (2) gobsmasha (1) golden demon (1) Greasus Goldtooth (2) greenstuff (10) Greenstuff World (1) Grotesques (3) Guest Painter (3) gunwagon (1) GW (8) GW Technical Paint (11) Halo Fleet Battles (1) Harlequin (1) Heresy Girls (5) Heresy Suppression Force (10) Hexy-Shop (1) Hi-Tech (2) highlight (2) horror (1) Imperial Guard (23) Infinity (23) Inquisition (4) Iron Empire (17) Iron Halo (1) Jailbirds (35) Joan of Arc (3) JR Miniatures (1) juggernaut (10) khorne (1) Kickstarter (43) Kill Team (1) Kingdom Death (17) Kings of War (9) Kromlech (3) KST (4) Kurganova (3) Land Raider (1) Large Scale (4) Lead Adventurers (3) legacy models (2) lighting (7) Lizardman (1) Lost Islands KS (2) lust elves (12) made for Infinity (33) Malice (1) Malifaux (13) Mantic (37) mawloc (1) max mini (2) MDF (28) mecha (3) Mechanicum (1) Mercenary Grots (1) Metallic (1) Miniature Figure Painting (7) miniature wargames scenery (3) model building (4) Modiphius (2) Mordheim (24) Movement Trays (1) moving (6) Mystery (4) Mythic Games (1) names of things (14) narratives (22) Necrons (3) Night Goblins (1) Nose Art (1) Nurgle (16) objective markers (2) Obliterators (2) Ogre Kingdoms (6) Oldhammer (4) orange (1) Orcs (1) ork (26) osl (2) P3 (1) Patreon (1) Plague (1) Plastic (4) Post Apocalypse (6) Pre-Heresy (2) Primarch (2) Primer (6) Privateer Press (1) Project Thunderhawk (28) prototyping (1) Proxies (24) ptimer (1) Rackham (2) Raging Heroes (125) Rampage (5) Ravager (1) razorwing (1) Realm of Chaos (1) Reaper (33) red (25) repair (6) resin (27) Resurrectionist (2) Resurrectionists (1) Retinue (1) review (1) ripper swarm (6) ripperswarm (1) Roleplaying (1) RPG (31) runtbot (7) Sacred Heart (1) scatter (7) Sci-Fi Space Battles (6) Scibor (2) Secret Weapon (75) Serene Dawn (12) Setting the scene (23) Shading (1) Silver Compass Designs (1) Sisters of Battle (25) Sisters of Eternal Mercy (11) Sisters of Sigmar (4) Skaven (4) Skin (2) Skirmish Game (8) Slaanesh (1) Slann (1) SnapMaker (5) Spartan Games (1) Sslyth (1) Star Saga (32) Starfinder (4) Steampunk (2) Stone Crusher (3) Strigoi (1) studio (1) Studio Miniatures (1) Studio Swelter (4) SUPERCaT (1) Supers (1) Tabletop (9) Tabletop Art (3) Tabletop World (36) tank pit (1) Tantalus (6) Terminator (2) terrain (57) TGG (20) TGG the Game (3) TGG2 (22) The Dickensians (2) The Old World (2) The Order of Vampire Hunters (13) The World That Was (1) Theme (33) Third Party conversion bits (1) Thor Minatures (1) Thousand Sons (1) thunderhawk (3) Titanite Demon (1) tools (2) Toughest Girls in the Galaxy (9) Toughest Girls of the Galaxy (6) Toughest Girls of the Galaxy 2 (7) trukk (3) tutorial (2) Twisted (7) tyranid (12) UAF (1) Ubiquitous Rat (1) unboxing (4) Undead (2) undercoats (4) Undertown (15) Unwritten (5) Urkin (1) Vallejo (5) Vampire Counts (4) Vampire Hunter (2) Vampires (1) Vampiric Flesh (1) Vanguard (4) varnish (2) Vatican (3) vehicle (13) Venom (3) Video (1) Vikings (1) Void Elf (17) Void Elves (15) War Machine (1) War World Scenics (1) Warbands (3) Warchimera (3) Warhammer (12) Warpath (18) wash (33) water effects (17) weathering (59) weathering powder (13) WFB (1) WH40K (40) WHFB (14) WiP (22) Witch Hunters (5) wood (2) Wood Elf (4) World Eaters (2) Wracks (1) wraiths (1) Wyrd (5) yellow (1) Ynnari (5) Zoggit (1) zombies (1)

Thursday, April 28, 2022

Fallout APC 3D Print

I really like the retro-futurism of the Fallout series. I was super excited when Modiphius made the APC available as a printable model so here it is!

Printed on the Anycubic Photon Mono X in Anycubic Basic Black Resin.

Base coats were Krylon Camo Green and Camo Tan. Secret Weapon (SW) Dark Sepia Wash for the inside and used as a liner on the outside. Wheels are Tire Black (SW). Here we see a Character from Mantic Games Star Saga for scale.
The model is detailed with an optional troop compartment. If you don't want to open the thing up there is no need to print the interior compartment.  Play Mat is from Antenociti's Workshop's Designed for Infinity range.
Tabletop view of mantic troopers deploying from the APC to deal with some basic Plague. A-Z Mart is from Antenociti's Workshop Survival range of MDF buildings.
Birds eye view. I'm super happy with the design of the APC. As its a file I'm likely to print a bunch in various states of wrecked for post Apoc scenery as well as a few more working models to supplement my Jailbird convoys... and, of course, to use for Fallout!

Back to the desk!
 

Tuesday, April 26, 2022

Atlantis Miniatures Wood Elf Warband part 2

Wrapping up the Wood Elf Warband from Atlantis Miniatures.

The Panther Warlord with a small bear companion.  The Warband continues with male and female versions for every role except the druid.

Continuing with the signature aqua partial cloaks and family group hair colors.

The female cavalry are on Golden Hinds which I thought of as a kind of golden elven type of deer rather than a more natural tan base color.  To that end the color is achieved with Iron Oxide over white and white blazes and other markings via Graveyard Bone and Splintered Bone from the Reaper Bone Triad.

The make up the light cavalry or mounted scout element.


The male riders on Golden Stags to serve in the heavy cavalry and shock role leveraging the massive antlers for additional impact.


The Elk Warlord is the warband's penultimate leader on a truly massive mount with a bird of prey as a personal companion. I went with a dark scheme to contrast the golden mounts of the balance of the warband and make this one even more obviously a centerpiece.
There is also an Elf Prince on foot with bird of prey and a wolf guide. Both the Elf Prince and the Elk Warlord are sporting Dragonbone shields as house/family heirlooms.

These models were great fun to paint and lent themselves to the creation of individual stories.

Back to the desk! 
 

Tuesday, April 12, 2022

Atlantis Miniatures: Wood Elf Warband


Atlantis Miniatures take on the wood elves is deliciously feral. Cast in a very high quality resin they are easy to handle, finely featured, require little or no clean up and take paint well. 

They are not your happy woodland tribe full of song and drink... oh no!...they are the wrath of the wood and are festooned with horns, bones, and living companion creatures.

I've imagined this as a Kinband that share a lot of common features.  The red, blond, and sandy hair for example. 

All of them share the mystical green/blue elven cloak and most have a skull attached at the waist, often with belts or strings of red beads.

There seems to be a correlation between the presence, and size, of antler like horns and the social status of the individual.

These first two are typical of the offering which usually has a male and a female version of each type of character. Here we see two Spell Caster/Wizard types.

I've further imagined this group to be travelling in a swamp so the bases are water soaked with stones and dead trees dominating the theme.

The set included a couple of scenic bases for specific models and a generous amount of scenic scatter like mushrooms, stumps, roots, and small animals. The remaining features were quick sculpts of greenstuff. The result was an entire warband with unique, but coherently themed, bases. It was a good approach and a nice alternative to the usual limitations of commercial base sets where there would be between 5 and 10 unique bases that would have to be repeated in various aspects throughout the project.

Here are two Assassins/Scouts, again in male and female versions. 


The druid is the only model that does not seem to have a female version.

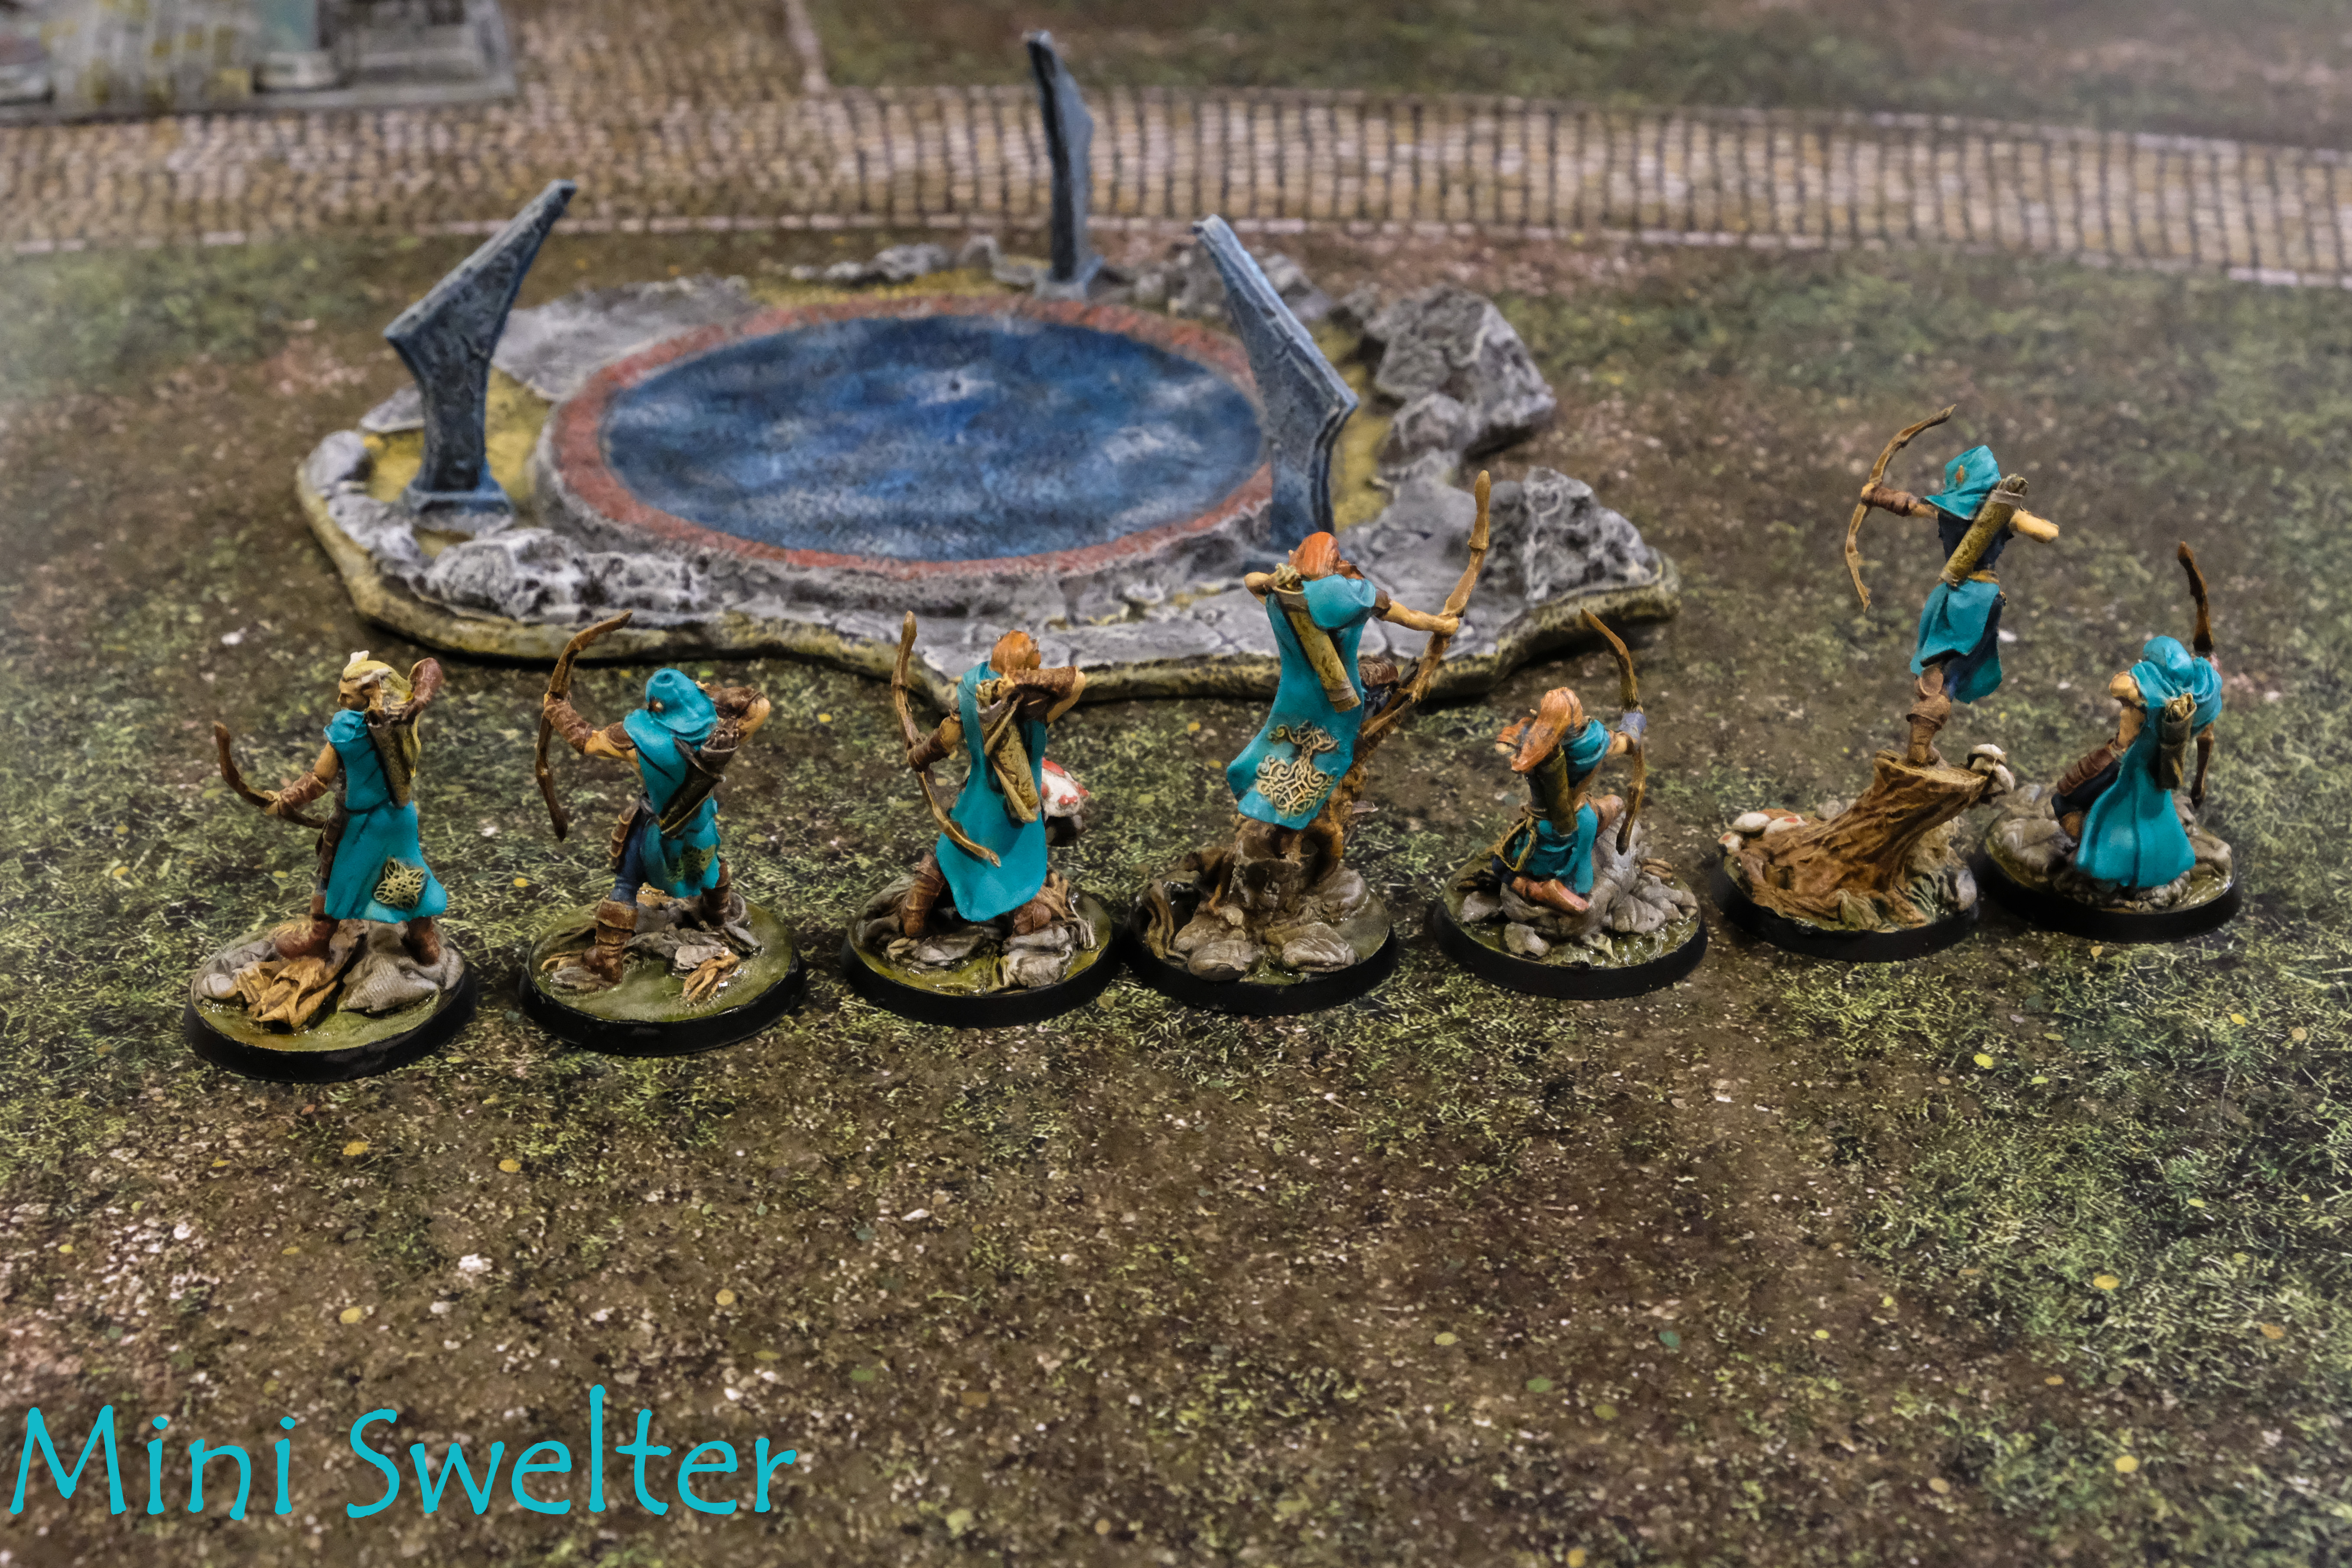
These elves are obviously Hunters and use a lot of animal components in their wardrobe.

Below are grouped by weapon type. The warband has Bow, Spear, Pole arm, and Sword represented.


Bows.


Swords.
Many of the cloaks have complex embossed symbols.


The Elf Princess and her Guard all with a type of Polearm.


The Princess is differentiated by her blue cloak but she retains the mystic green hooded robe. The Princess and the Prince lead their family's infantry in its grim task.

As for infantry... all that remains is the Prince, and a small group of spear.  The rest of the warband is the cavalry lead by male and female Warlords.

Wednesday, March 30, 2022

Patlee Salamander Stargazer on Celestial Shrine


I've always wanted a Skink Mage Priest to run as a rebel faction hero.  There have been a few notable Skink heroes but the Slann always had a lock on the Mage Priest role.

Raging Heroes Infinite comes to the rescue with the 3D printable Patlee Salamander Stargazer on Celestial Shrine.

This was printed on a Photon Ultra in Anycubic Basic Gray resin and was painted directly on the resin with no primer coat. In retrospect, models with this much gold would probably work out better over black resin.


I'm finding that I can often leverage the color of the resin to either speed up painting or to get new effects. So far paint adhesion and durability have been excellent.


In this case a regular process for the gold color is Brass Casings (Secret Weapon (SW)) base, wash with Flesh Wash (SW), Drybrush Necron Compound (GW). Over black resin that would have been all that was needed. Over the gray I ended up doing some lining with Dark Tone Ink (Army Painter (AP)). I'm still not entirely happy with the color depth for the gold.

 
I've recently been playing a lot of Horizon: Forbidden West and have really enjoyed the way colors are depicted for tribal societies. Its making me reconsider some of my more earth tone heavy schemes for medievals, elves, etc...

Speaking of earth tone heavy schemes... I've been tinkering with some Supers and Pulp Action Heroes with some 3D printable files from Bombshell. I'll also be doing some Retro Sci-Fi and messing around with Counterblast.


Back to the bench!


Wednesday, October 20, 2021

Raging Heroes Berserkers and Warriors

I've been a follower of Raging Heroes for many years now and have been an avid collector of their 3D print file Patreon, and now through their in house service, even though I didn't have a 3D Resin printer until now. I've done a fair bit of FDM Printing but that is really limited to terrain or accessories and I've never had any luck printing humanoid figures in any game scale. With the addition of the Photon Mono X printer to my workshop all of that has changed! I still have a lot to learn but the earliest results are now making their way to the paint desk.
First up are the troops from the Raging Heroes Viking Gods and Heroes theme from the Patreon.  these models have really heroic proportions and are quite beefy models in line with RH's more recent offerings.

I'm hoping to use these in Frostgrave and Kings of War. The bases are also printed from the set and painted in a winter theme. The set has bases sized from 25mm to 50mm. These are 30 mm bases.

I thought the cloaks to be made from the hides of Black Bears for which I imagined this fraternity to have traveled to the wilderness of North America to obtain.

I also had a stab at a unifying tartan for their kilts. These will be repeated throughout the warband.

Flesh tone: are Dark Flesh (Vallejo (V)),Flesh Wash (Secret Weapon (SW)), Dark Flesh (V) Layer, Sunny Flesh (V) Top Layer.

Bear Hide: Carbon Gray (Reaper (R)),Cobalt Grey (R) drybrush, Soft Body Black Wash (SW),Sunny Flesh (V) weathering. 

The Kilts are a bit more complex and I'll likely do a post on just that as I get more comfortable with the process. I think these were a good first attempt and should improve with more iterations.

Hair colors: A lot of red heads a couple of blondes and a guy with black hair... Vikings.

From a printing perspective some of the weapons, particularly the two handed axes, have a bit of a curve to them like they are flexing with the swing. I like the look as it implies motion but I don't know if its an intentional effect or just fortuitous.

The regular Warriors have much more tartan visible so it was easier to get a flow going. 

You'll notice that these guys are in super wide leg stances. So wide, in fact, that it was difficult to contain them on the 30mm bases. Since I want to use these as gaming pieces I really did not want to make the move to 40mm bases because that is usually more of a monster or crewed weapon size. The result was some creative mounting...

The first of these has a stance so wide it literally cannot be contained on a 30 mm base. I decided to mount him with one foot firmly planted on the ground and his kilt attached to a rock to support him solidly. I think its a passable look of a warrior leaping over the rocks to press the attack.

The next fellow had a ...slightly... less wide stance and has the insole of one foot and the very back of his heel touch the base... it was a little dicey and one foot has an extra bit of support on the bottom to insure continued contact.

This guy is more less aggressively spread and you can see the shield design. I kept to the same general colors as were used in the tartan to strengthen the theme.
The group Leader is, ironically, the only one that fit easily onto the 30mm base.
The group shot. One thing I'd love to see RH do is increase the number of troop poses. typically there are 3 troopers and one Troop Leader for a total of 4 discrete poses. Many games use unit sizes that range from 5 to 10. These print as a single piece so it would be nice to have a couple more unique poses. With 5 poses they could be printed as mirrors giving the feel of 10 different poses. Just a thought.

Overall I am super happy to finally be printing these out. The themes are lavish and include Centerpieces and Terrain bits that make the journey from imagination to physical model only because they can be 3D printed. 
 

Tuesday, May 11, 2021

Forward Base: Habitat 5 part 6 wrapping up


Wrapping up Hab 5 construction by adding the exterior steps, some resin details, and the exterior light acrylic.

Antenocitis Workshop have recently released some new steps and stairs for Forward Base which use acrylic steps for a super cool Sci-Fi look. I've not used them on Hab 5 because its a Vehicle Garage and Maintenance building so I rather liked the industrial grate feeling of the stock step but I will be using the new kits when some of the entertainment and command buildings show up on my desk.

As steps go these are pretty easy. I set the stringers in first and then set the steps while there was still some flex in the glue.
There are two exterior personnel doors.  In retrospect I might have made the steps removable for ease of storage between games... that may yet occur if the prove too vulnerable jutting out as they do.  The vehicle ramps are hinged and fold flat against the side of the building when not in use so they are much less of a concern. 

Next up are they acrylic exterior lights.

One of the upgrades to the building included full light brackets instead of the tiny resin caps that are usually used for mounting the lights. I really like the full brackets but they have a small disadvantage in that they have a set length... (Doh! I have, somewhat belatedly, realized I "could" have cut the bracket to alter their length a bit.  It would have been fussy but totally doable... oh well... lessons learned!)
  The acrylic rod provided with the kit was just a bit short of what is required to fully fill all the brackets.  With the stock endcaps I would measure the rod and set the individual light length according to rod supply... except... that I think of Forward Base as a modular system with many interchangeable parts which means, for example, all lights used for all "Hab 1" style buildings should be the same length... so it looks wonky fast if that is not the case. 

Left you see the universal jig that is evolving to cover the various Hab light lengths. 

Right we see... I ran out of acrylic rod! Not to worry I'll swipe some from the next building I open and fill it in. Antenocitis also sometimes has acrylic rod available separately which is super useful.
The fixture count was odd.  There were six brackets but 7 scribed locations for them. Its not a big issue as this middle location is a bit camouflaged by the other scribed details.

You can see here the Bay Doors in their closed position. The resin face is inside the bays as thsi orientation gave the best fit.

I didn't have any vehicles close to hand for a comparison but I did have the Forge World Gargantuan Squiggoth on the table for some repairs. The poor thing took a hit to the tail and some of the Big Shootas during the move here. Its all better now. You can see the Hab 5 is large enough to offer even this big fella some cover!

It also occurred to me that Hab 5 might make a good Lair for a Supers Game... Its a really big space with room for a couple of vehicles and multi level combat internally... food for thought!


Wednesday, April 28, 2021

Forward Base: Habitat 5 part 5 "Beyond the Rough Guide"


From here forward we're kind of on our own. The "Rough Guide" over at Antenocitis Workshop does not cover the interior catwalks and stairs or the external resin bits. This building is from the Forward Base Kickstarter and may have been redesigned when the range was revamped a while back.

First order of business is to identify parts and dry fit everything... and I mean everything! I can't stress this enough.

Here I've found the stringers for the stairs and set them dry into the sockets.

Here I set in the "T" shaped catwalk. My first surprise came here. The catwalk did not fall into position on  the stringers. Like by a full 1/8". I though wow... I've never had a piece, that I was certain was the right part, miss by this much. Turns out the error was entirely mine. I had assumed that the catwalk was intended to be removable and would just sit, unglued, on the frame but this is not the case.

There is a slot on the back wall that accepts the Catwalk. When in position it settles securely onto the stringers. The fit is tight enough, and the snap effect pronounced enough, that I am positive this is intended to be a one-time operation. This really exemplifies why the dry fit is such an important step.

Next up... the steps. I finally identified the yellow frames as steps... I know... I'm a bit slow... I had wondered for a while what those were... and where the steps were... and didn't put it together until now.

On the plus side these steps were loads easier to build than the usual system Antenocitis Workshop uses. they also are very broad and it looks like models with modest bases could actually stand securely on them!


I started by dry fitting all the steps to make sure they didn't need any adjustment and to note the way they fit was supposed to work. From there it was gluing the top step and the bottom step into position and then placing the stringers and Catwalk in position before everything had dried.

Once that step had dried I added in the remaining steps and leveled them as I went. The notches are a little shallow so its easy to get something just a bit tilted... you can see through he bay door that the center step droops a bit. This got adjusted after the picture.

A view of the adjusted steps through the regular door.
With the interior wrapped up it was time to look at the exterior details. Here you can see that a resin vent has been added. The upgrade kit also included resin replacements for the two lower square white vents but these were not perforated and I ended up liking the way they looked when painted so will save those bits for another project.
The large resin exhaust fans are in position. The slotted MDF remains as is on the inside and would have looked fine on the outside but the resin caps are very nice and help with the flatness that MDF designs tend to have.

At this point I began dry fitting the ladders and made a major discovery!

The ladders extended downward well below the level of the floor...
... which allowed me to finally identify what these bits were! These are part of the Hab X Booster packets. Apparently the boosters are for lifting the Habs off the ground and allow for cool stairs etc...

I got these Boosters for all the Habitats but now have to decide which buildings can take them. Habitat 3 for example is a small living quarters Habitat that can be stacked on top of other Habitat types via an MDF clip arrangement.  In that case the Booster doesn't get used.

Fortunately the Larger Habitats like Hab 5 will all take them so there is not decision to make... on with the Boosting!
Now that the building is boosted those pesky ladders fit perfectly. Another victory for the dry-fit!

There are three ladders. This long one, a shorter one that is affixed between the Bay Doors, and a very short one that allows access between the shorter roof and the taller section.  These ladders interact very much with the removable roof panels so care needs to be taken when fitting and gluing these into position. Pay particular attention to the fit of the shortest ladder as one of the roof panels has to be able to slot in under it and the other panel slots in from the side. Just be sure that the lower roof panel is not obstructed, or accidentally glued in... either condition would be a major fail!

The other two ladders can be seen here under clamps.

The bay door ladder has a tight fit between the bay doors and should be used to help position them. I did not do this and ended up having to shave  a bit off the back side of one of the lower tabs to get a flush fit.

For next time... non-functional exterior acrylic rod lights, possibly some functional interior (key fob style) lights, and some odds and ends like resin covers for the etched power couplings.


 Other than some weathering, all that will remain is to make some decisions about the various doors. Non of them are "working" doors and are either stood into place, held in place by compression, or Glued in place.  At the moment I'm leaving these unglued and will revisit them if that doesn't work out in practice. When the range was redesigned one of the big revisions was to replace the non-functional acrylic "Hologram" doors with working MDF/acrylic doors, many of which have a structure that implies a small airlock.