Labels

3D Printing (25) 40K (62) Abyssal Dwarf (2) accessories (5) Adeptus Arbites (4) Adeptus Mechanicus (1) ADMech (1) Age of Sigmar (2) Agents of the Imperium (2) Angron (2) Anime (4) Antenocitis Workshop (32) Anvil Industries (5) AoS (4) ArmorCast (3) Army (4) Army Painter (10) Astra Militaria (24) Atenociti's Workshop (7) Atenocity (1) Atlantis Miniatures (4) Avatars of War (2) banner (4) base coat (16) base color (8) bases (45) Basilean (1) Battlefoam (1) Beasts (2) big lobbas (1) Bitspudlo (1) Black Scorpion (1) Black Templar (1) Blood Rain (16) Board Games (32) Bolt Action (1) Bombshell (1) Bones (14) Bretonnian (1) Bruegleburg (4) Bruxx (2) Campaign (20) carapace (1) Carnevale (8) chaos (25) Chaos Dwarf (2) chaos gate (3) Chaos Space Marines (18) Citadel (2) claw (1) Clawed Fiends (1) clear resin (1) Construction Guide (1) Contagion (12) conversion (3) Counts as (25) Craftworld Eldar (2) Custome Counters (2) Customeeple (1) Daemon Prince (4) Daemonettes (1) Daemons (5) Dark Angels (4) Dark Eldar (47) Dark Elf (6) Dark Souls (7) Darkness & Light (3) Darksword (2) Deadzone (15) Death Guard (9) decals (1) Deepcut Studios (3) Demented Games (3) dicebox (1) Dorothy (2) dragon (2) Dreadnought (5) Dreadtober (5) Drukhari (2) Dryad (1) Duncan "Shadow" Louca (1) Dwarf (7) epicast (2) Evangelion (3) Executrix (1) eyes (2) Fallout Wasteland Warfare (11) Fantasy Battles (19) Fast Panda (3) FBN (1) Fight Like a Girl (1) Finecast (4) Flames of War (4) Fluff (14) Forest Goblins (2) forge world (50) fortress (8) fortress name (2) Forward Base (10) free hand (1) Frostgrave (8) Game Mats (3) game room (1) Games Workshop (13) gamesday 2011 (1) gargantuan squiggoth (8) Geekfest 2010 (1) Geekfest 2011 (4) ghouls (1) Gloomhaven (1) Goblins (2) gobsmasha (1) golden demon (1) Greasus Goldtooth (2) greenstuff (10) Greenstuff World (1) Grotesques (3) Guest Painter (3) gunwagon (1) GW (8) GW Technical Paint (11) Halo Fleet Battles (1) Harlequin (1) Heresy Girls (5) Heresy Suppression Force (10) Hexy-Shop (1) Hi-Tech (2) highlight (2) horror (1) Imperial Guard (23) Infinity (23) Inquisition (4) Iron Empire (17) Iron Halo (1) Jailbirds (35) Joan of Arc (3) JR Miniatures (1) juggernaut (10) khorne (1) Kickstarter (43) Kill Team (1) Kingdom Death (17) Kings of War (9) Kromlech (3) KST (4) Kurganova (3) Land Raider (1) Large Scale (4) Lead Adventurers (3) legacy models (2) lighting (7) Lizardman (1) Lost Islands KS (2) lust elves (12) made for Infinity (33) Malice (1) Malifaux (13) Mantic (37) mawloc (1) max mini (2) MDF (28) mecha (3) Mechanicum (1) Mercenary Grots (1) Metallic (1) Miniature Figure Painting (7) miniature wargames scenery (3) model building (4) Modiphius (2) Mordheim (24) Movement Trays (1) moving (6) Mystery (4) Mythic Games (1) names of things (14) narratives (22) Necrons (3) Night Goblins (1) Nose Art (1) Nurgle (16) objective markers (2) Obliterators (2) Ogre Kingdoms (6) Oldhammer (4) orange (1) Orcs (1) ork (26) osl (2) P3 (1) Patreon (1) Plague (1) Plastic (4) Post Apocalypse (8) Pre-Heresy (2) Primarch (2) Primer (6) Privateer Press (1) Project Thunderhawk (28) prototyping (1) Proxies (24) ptimer (1) Rackham (2) Raging Heroes (125) Rampage (6) Ravager (1) razorwing (1) Realm of Chaos (1) Reaper (34) red (25) repair (6) resin (28) Resurrectionist (2) Resurrectionists (1) Retinue (1) review (1) ripper swarm (6) ripperswarm (1) Roleplaying (1) RPG (31) runtbot (7) Sacred Heart (1) scatter (7) Sci-Fi Space Battles (6) Scibor (2) Secret Weapon (77) Serene Dawn (12) Setting the scene (23) Shading (1) Silver Compass Designs (1) Sisters of Battle (25) Sisters of Eternal Mercy (11) Sisters of Sigmar (4) Skaven (4) Skin (2) Skirmish Game (8) Slaanesh (1) Slann (1) SnapMaker (5) Spartan Games (1) Sslyth (1) Star Saga (32) Starfinder (4) Steampunk (2) stl (1) Stone Crusher (3) Strigoi (1) studio (1) Studio Miniatures (1) Studio Swelter (4) SUPERCaT (1) Supers (1) Tabletop (9) Tabletop Art (3) Tabletop World (36) tank pit (1) Tantalus (6) Terminator (2) terrain (58) TGG (20) TGG the Game (3) TGG2 (22) The Dickensians (2) The Old World (2) The Order of Vampire Hunters (13) The World That Was (1) Theme (33) Third Party conversion bits (1) Thor Minatures (1) Thousand Sons (1) thunderhawk (3) Titanite Demon (1) tools (2) Toughest Girls in the Galaxy (9) Toughest Girls of the Galaxy (6) Toughest Girls of the Galaxy 2 (7) trukk (3) tutorial (2) Twisted (7) tyranid (12) UAF (1) Ubiquitous Rat (1) unboxing (4) Undead (2) undercoats (4) Undertown (15) Unwritten (5) Urkin (1) Vallejo (5) Vampire Counts (4) Vampire Hunter (2) Vampires (1) Vampiric Flesh (1) Vanguard (4) varnish (2) Vatican (3) vehicle (13) Venom (3) Video (1) Vikings (1) Void Elf (17) Void Elves (15) War Machine (1) War World Scenics (1) Warbands (3) Warchimera (3) Warhammer (13) warhammer the old world (1) Warpath (18) wash (33) water effects (17) weathering (61) weathering powder (14) WFB (1) WH40K (40) WHFB (14) WiP (22) Witch Hunters (5) wood (2) Wood Elf (4) World Eaters (2) Wracks (1) wraiths (1) WW2 (1) Wyrd (5) yellow (1) Ynnari (5) Zoggit (1) zombies (1)
Showing posts with label miniature wargames scenery. Show all posts

Friday, April 16, 2021

Forward Base: Habitat 5 WiP Part 4 "The Ramps"


Today we move beyond the Rough Guide, add the ramps, and begin sorting the left over parts to see where to go next.


First up... I somehow missed installing this workbench which is clearly shown in the drawings of the rough guide. It went in without a hitch but, due to the nature of MDF, there was a risk that the back right corner would separate and tent up. To reduce the risk of that I used a chopstick to press the corner down.

Beyond the Rough Guide...
This is a first gen Kickstarter version of this building and the Rough Guide doesn't address any of the optional resin components.

I assembled and painted the garage door frames and then glued the resin garage doors to their MDF counterpart to get door textures on both sides of the piece in the same way that I did the vent covers in the walls. Unlike the vent resins, which are slightly larger then the MDF they replace, the Garage Door resin is slightly smaller than the MDF it replaces. This will be tricksey later...


The resin frames don't precisely conform to the opening so I used a Sharpie to blacken round the edges. These small spaces will be recessed once the resin is on and won't be visible. More importantly I intend to use this lip to let the garage door sit in the right position when the doors are "closed".

Above the door here you can see one of the resin Vents. Because the resin is larger than the cut-out it sits very nicely and self levels once the MDF vent is glued behind it. 


Time for more adventures with clamps, blue tape, and Super Phatic glue!

At this point I realized that the Garage Doors were going to be reluctant to sit in the door frames resin side out. The largest part of the door is smaller than the opening and the locker wall just inside the door prevents clean access to the inside lip.  I can magnetize the doors, and will probably have to anyway, so they don't fall over when bumped or jostled, but the doors sit very well in the reverse orientation.


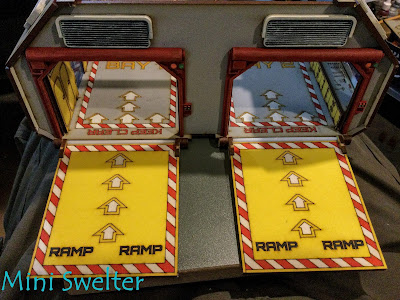
 Onward to the Ramps!

The habitat 5 ramp instructions are pretty clear and easy to follow for building the hinges. The hinges were constructed and here you see the top and bottom view of the ramps.

As always I'll go back at the end and dress up the scuffs from where the MDF parts were removed from their frame. Reaper "Nut Brown" is almost a perfect match to the seared brown edges.


I stood the building on end to line up the ramps the way I wanted and glued the hinges on. The ramps work as designed although I'm gonna have to dirty up the underside... not that the building should be deployed with the ramps in the upright position but... ya never know!


 Extra resin bits...

There are a couple of power supply panels that attach to the outside of the building, three fan covers, two vid screen frames, six light fixtures (I actually need seven but one seems to have escaped during the long Winter pause so I may need to fabricate on from the MDF Frame debris pile)

...and then came the five angular pod things... these took a minute to figure out but once I got looking at the spare MDF pile and how the ladders must attach to the building it became clear that these are Feet to support the building above ground level. Its interesting because these are optional resin bits but the ladders require the building to be elevated or the ladders would have to be cut down to fit.

Not shown are a handful of small resin vent covers that I ended up putting in the spare parts bin because the interior etched areas that they cover were not perforated like the main vents. I ended up wanting to keep the interior vent details all MDF and painted similarly. These covers won't go to waste though! Its always handy to have a few extra bits like those.

Next up... finish painting these extra resins and sort out the remaining MDF installation that wasn't covered in the Rough Guide. This is mostly exterior ladders and interior catwalks. I seem to be missing the steps for the catwalk access so I'll have to take another look round to see if they wandered off during he extended time this sat on my desk. At any rate I think general construction should be finished in one more session and then any additional weathering or detailing will be tackled. There is one spot on the outside of the building that just looks unfinished so I'll have to do something to dress that up.

Back to the desk!


Friday, March 20, 2020

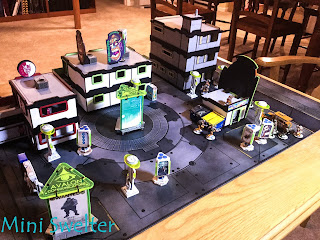
Undertown Flats, signs, scatter, a table in progress

With all the COVID-19 stuff flying around I thought it might be time to set a Mantic themed table with some Plague vs. GCPS (Galactic Co-Prosperity Sphere) vignettes.

I'm really digging into the backlog of cool Sci-Fi scenics from Antenociti's Workshop

With my wife home a lot lately I've not been able to work at the painting desk for long but its been relatively easy to sit in the living room, or kitchen, and assemble pre-painted MDF buildings.  Its surprising how quickly a viable table comes together with this stuff!
 GCPS troopers in 3 man teams containing a Plague outbreak in the Undertown while the news boards report.

The quality of the photo print components supplied with these kits is amazing and for the 'small signs' set pictured above you get a set of two triangular signs each face having a different graphic... and there are 9 to choose from in the kit so you have options right out of the box.  With a little effort you can make signs from practically anything so the possibilities are pretty cool.
The Flats are a 3 level structure with a single, full floor, elevator serviced, apartment on each level.  I've not yet done interiors for these so what you see is the kit with no additions.

The rooftop is also accessible via elevator which is shown above.  I've made the top most roof removable and may retrofit lighting to this area... and many others... the better to show the cool acrylic doors and interior graphic details that so many of these buildings sport.
 More views of the sign scatter... large enough to obscure most models and fun to look at.

The acrylic tops and rods are meant to be held in place by pressure lugs but these quickly get knocked off and go missing so I've put a tiny dab of glue on the lower part of the lug to convince them to remain in place.

Likewise the acrylic rods are meant to fit tightly into the base without glue but just slide right through so I glued some of the very good paper left from trimming the photo-prints to the bottom of the sign so the acrylic rods have a floor to rest on.  The acrylic needs careful handling during construction to avoid getting glue on it and ruining the effect.
 The benches are resin components that require a little paint which was as simple as spraying them with Rustoleum Hammered Metal, giving them a wash of Secret Weapon Armor Wash and a quick drybrush of any silvery metallic.
 The Undertown starting to take shape on a small table we usually use for card games.

Lots of scatter elements like street lights, info kiosks, adverts of various sized, vending machines, mail boxes, dumpsters and recycling bins.
The Plague erupted at lunch time with a move on the Spicy Pupniks food cart parked outside the Neo-Tiki Motel Office.
 A GCPS team clears the main building of the Neo-Tiki Motel and moves to assist the situation developing at the office.
Red Oni Sake has a location right next door to the Neo-Tiki Motel and also provides vending machines and mail drops.
 A view across the plaza.  The Game Mat is the small Undertown Mat from Antenociti's Workshop and is printed on mouse-pad material.  There is also a large version of this mat that joins nicely with the small mat for an even larger set up.

Plague taking cover behind the various bins. 
 The Undertown is relatively free of graffiti at the moment but will get tagged up... possibly during games!  I think it would be fun to put a blue tack marker on a spot to be tagged and do the actual application between games.  I mean what gang war themed game would be complete without turf and tags?
 I just managed to finish up the set of Large signs.  These are tall enough to obscure Knight Class vehicles or even low level flyers.
 A set of two, triangular, signs with 6 different graphics in the box.  You don't get the extra couple of choices that came with the "small" signs but they are really large prints with great, high quality, art so I'm not complaining.
 They even have a Sci-Fi Nun on this one!  On my table they are chronicling the adventures of the Sisters of Eternal Mercy! Although any Space Nuns would fit in.

I'm working on the Stepped Tenements today and whatever else pops out of the big box-o-MDF!


Wednesday, May 15, 2019

The Port House 3D Print

 I'm flinging paint at the model backlog in between bouts of pre-move prep so I have a half dozen projects in one stage or another of completion that I hope to finish before pack out.

This is The Port House from Rampage: The Lost Islands Kickstarter.  Rampage is very aggressive with releasing files and they often follow up the initial file release with some adjustments, improvement, or corrections soon after the initial offering. This is the 1.0 version of the Port House.  They have updated this, and several other models from the project, since I printed it and it seems that they have generally re-scaled the models for the more common Heroic scale.  That means that this model is a wee bit petite compared to my other buildings.  Its even a bit small compared to the Tabletop World buildings that are scaled for true 25mm.
 Since most of my games that use this style of build tend to be fantasy themed I'll imagine this as a mouseling, or gnome, building.  I'll have to do up some mouselings with timber floor bases!

Actually for gaming I probably should have moved to clear acrylic bases years ago... but I didn't... so now I'm not inclined to do so... maybe when I start a completely new army I'll give it a go but I'll otherwise keep trying to theme match the bases for the existing sets.

Gerystone and wood standard process.  I skipped out on plaster for this one and may go back and add it later... I had some print errors with this model and went with it being a bit run down.
 You can see the very wide back window area that looks like exposed wood... printer error... also some of the supports for the railing failed to survive the print and some outside wood supports and one face of each of the doors are a little fuzzy or deformed.  This was an early 'learn to print' model for me and I learned a lot.  Still, I think it'll be serviceable enough on the tabletop as part of the larger town so no need to let it go to waste!

For scale there are some Twisted minis, a couple of Lead Adventurer minis, and some Reaper Mouselings.  The other buildings that I'd like to compare it with have been packed so I'll have to do that on the other side.
 I've done a lot of the Greystone Village buildings and I'm trying some new things.  Since this building has a tile roof, instead of a wood shingle roof, I went with a variegated red tile.  It was fun to play with the color mix to get a more natural looking roof.  The rest of the Lost island buildings tend to have this tile roof so it'll be a nice addition to the wood shingle schemes I've already done.


The Greystone has been a theme here for a long time but I think the next step will be to add some variations to the stones.  I'll probably do that with the next several residences but stick with the more monochrome grey for working buildings like shops, forges, warehouses etc.. 

I've also skipped on putting magnets in this building as the magnets seem to have found themselves packed up already.  It holds together very well as is and each level is in two parts that are offset from the level below.  I'll likely put magnets in the bottom level at least just to encourage it to stay together through vigorous rotations but it seemed to spin and slide and stick together as it is so no rush on it... one more thing to remember on the other side.
 The roof tile started as an Amethyst (Secret Weapon) wash over the black base followed with a Gory Red (Reaper) Dry-brush then patch dry-brush areas... some with Phoenix Red (Reaper) and other areas with Scrofulous Brown (Vallejo). 
The printer error is also visible from the outside rear of the model as a elongated window but I just painted it to resemble wood slats and moved on.  I think it adds some character to the model!

Pack Pack
Paint Paint
Zoom Zoom!