Labels

3D Printing (25) 40K (62) Abyssal Dwarf (2) accessories (5) Adeptus Arbites (4) Adeptus Mechanicus (1) ADMech (1) Age of Sigmar (2) Agents of the Imperium (2) Angron (2) Anime (4) Antenocitis Workshop (32) Anvil Industries (5) AoS (4) ArmorCast (3) Army (4) Army Painter (10) Astra Militaria (24) Atenociti's Workshop (7) Atenocity (1) Atlantis Miniatures (4) Avatars of War (2) banner (4) base coat (16) base color (8) bases (45) Basilean (1) Battlefoam (1) Beasts (2) big lobbas (1) Bitspudlo (1) Black Scorpion (1) Black Templar (1) Blood Rain (16) Board Games (32) Bolt Action (1) Bombshell (1) Bones (14) Bretonnian (1) Bruegleburg (4) Bruxx (2) Campaign (20) carapace (1) Carnevale (8) chaos (25) Chaos Dwarf (2) chaos gate (3) Chaos Space Marines (18) Citadel (2) claw (1) Clawed Fiends (1) clear resin (1) Construction Guide (1) Contagion (12) conversion (3) Counts as (25) Craftworld Eldar (2) Custome Counters (2) Customeeple (1) Daemon Prince (4) Daemonettes (1) Daemons (5) Dark Angels (4) Dark Eldar (47) Dark Elf (6) Dark Souls (7) Darkness & Light (3) Darksword (2) Deadzone (15) Death Guard (9) decals (1) Deepcut Studios (3) Demented Games (3) dicebox (1) Dorothy (2) dragon (2) Dreadnought (5) Dreadtober (5) Drukhari (2) Dryad (1) Duncan "Shadow" Louca (1) Dwarf (7) epicast (2) Evangelion (3) Executrix (1) eyes (2) Fallout Wasteland Warfare (11) Fantasy Battles (19) Fast Panda (3) FBN (1) Fight Like a Girl (1) Finecast (4) Flames of War (4) Fluff (14) Forest Goblins (2) forge world (50) fortress (8) fortress name (2) Forward Base (10) free hand (1) Frostgrave (8) Game Mats (3) game room (1) Games Workshop (13) gamesday 2011 (1) gargantuan squiggoth (8) Geekfest 2010 (1) Geekfest 2011 (4) ghouls (1) Gloomhaven (1) Goblins (2) gobsmasha (1) golden demon (1) Greasus Goldtooth (2) greenstuff (10) Greenstuff World (1) Grotesques (3) Guest Painter (3) gunwagon (1) GW (8) GW Technical Paint (11) Halo Fleet Battles (1) Harlequin (1) Heresy Girls (5) Heresy Suppression Force (10) Hexy-Shop (1) Hi-Tech (2) highlight (2) horror (1) Imperial Guard (23) Infinity (23) Inquisition (4) Iron Empire (17) Iron Halo (1) Jailbirds (35) Joan of Arc (3) JR Miniatures (1) juggernaut (10) khorne (1) Kickstarter (43) Kill Team (1) Kingdom Death (17) Kings of War (9) Kromlech (3) KST (4) Kurganova (3) Land Raider (1) Large Scale (4) Lead Adventurers (3) legacy models (2) lighting (7) Lizardman (1) Lost Islands KS (2) lust elves (12) made for Infinity (33) Malice (1) Malifaux (13) Mantic (37) mawloc (1) max mini (2) MDF (28) mecha (3) Mechanicum (1) Mercenary Grots (1) Metallic (1) Miniature Figure Painting (7) miniature wargames scenery (3) model building (4) Modiphius (2) Mordheim (24) Movement Trays (1) moving (6) Mystery (4) Mythic Games (1) names of things (14) narratives (22) Necrons (3) Night Goblins (1) Nose Art (1) Nurgle (16) objective markers (2) Obliterators (2) Ogre Kingdoms (6) Oldhammer (4) orange (1) Orcs (1) ork (26) osl (2) P3 (1) Patreon (1) Plague (1) Plastic (4) Post Apocalypse (8) Pre-Heresy (2) Primarch (2) Primer (6) Privateer Press (1) Project Thunderhawk (28) prototyping (1) Proxies (24) ptimer (1) Rackham (2) Raging Heroes (125) Rampage (6) Ravager (1) razorwing (1) Realm of Chaos (1) Reaper (34) red (25) repair (6) resin (28) Resurrectionist (2) Resurrectionists (1) Retinue (1) review (1) ripper swarm (6) ripperswarm (1) Roleplaying (1) RPG (31) runtbot (7) Sacred Heart (1) scatter (7) Sci-Fi Space Battles (6) Scibor (2) Secret Weapon (77) Serene Dawn (12) Setting the scene (23) Shading (1) Silver Compass Designs (1) Sisters of Battle (25) Sisters of Eternal Mercy (11) Sisters of Sigmar (4) Skaven (4) Skin (2) Skirmish Game (8) Slaanesh (1) Slann (1) SnapMaker (5) Spartan Games (1) Sslyth (1) Star Saga (32) Starfinder (4) Steampunk (2) stl (1) Stone Crusher (3) Strigoi (1) studio (1) Studio Miniatures (1) Studio Swelter (4) SUPERCaT (1) Supers (1) Tabletop (9) Tabletop Art (3) Tabletop World (36) tank pit (1) Tantalus (6) Terminator (2) terrain (58) TGG (20) TGG the Game (3) TGG2 (22) The Dickensians (2) The Old World (2) The Order of Vampire Hunters (13) The World That Was (1) Theme (33) Third Party conversion bits (1) Thor Minatures (1) Thousand Sons (1) thunderhawk (3) Titanite Demon (1) tools (2) Toughest Girls in the Galaxy (9) Toughest Girls of the Galaxy (6) Toughest Girls of the Galaxy 2 (7) trukk (3) tutorial (2) Twisted (7) tyranid (12) UAF (1) Ubiquitous Rat (1) unboxing (4) Undead (2) undercoats (4) Undertown (15) Unwritten (5) Urkin (1) Vallejo (5) Vampire Counts (4) Vampire Hunter (2) Vampires (1) Vampiric Flesh (1) Vanguard (4) varnish (2) Vatican (3) vehicle (13) Venom (3) Video (1) Vikings (1) Void Elf (17) Void Elves (15) War Machine (1) War World Scenics (1) Warbands (3) Warchimera (3) Warhammer (13) warhammer the old world (1) Warpath (18) wash (33) water effects (17) weathering (61) weathering powder (14) WFB (1) WH40K (40) WHFB (14) WiP (22) Witch Hunters (5) wood (2) Wood Elf (4) World Eaters (2) Wracks (1) wraiths (1) WW2 (1) Wyrd (5) yellow (1) Ynnari (5) Zoggit (1) zombies (1)

Thursday, April 30, 2020

Modern and Post Apocalyptic vehicle wrecks and trash bins


 While the ubiquitous ruins frequently found on my table, and the tables of almost ever 40K player, can do great service as Post Apocalypse terrain I have just begun generating a more genre specific set primarily for use with Fallout: Wasteland Warfare, Gamma World, The Order of Vampire Hunters, and all things related to the Zombie Apocalypse.
 Starting with an old favorite Antenocitis Workshop from their Survival Vehicles category: Flipped Car, Bricked Merc, and Fender Bender.

These are really fun sculpts with lots of character and the resin material is the typical super high quality that comes from Antenocitis Workshop... smooth, very little cleaning required, and takes paint readily.


The base colors were accomplished via rattlecan Primer+Paint combos from Krylon and Rustoleum. Dry-Brushing to bring out the detail which was bloc painted in basic colors. 

Weathering started with Brown, Red, Yellow, and Orange Rust from Secret Weapon and finished with Forge World Powders Orange Rust for the Brick impact area, muffler cases and some parts of the iron beams.

 A quick side trip into an assortment of bins (Also from Antenocitis Workshop) which are useful across the genre barrier.  Sprayed Krylon Camo Green and dry-brushed these represent some common types of bins encountered in residential and shopping areas.
 Back to the wrecks!  The Flipped Car, shown with a Star Saga Veermyn lurking nearby, is covered in viney growths indicating that its been like this for quite a while.  It out of place in the Undertown and would be more at home in a junkyard or in a setting like Fallout.
 Fender Bender reminds me of the Yugo... if anyone remembers those... the implication is that the car was struck by the motorcycle and was bent by the impact... made of repurposed bubblegum wrapper!

... then there are metal beams and even a kitchen sink on it...

who know why those Plague guys are hanging out near it... but time to meet my little friend!


The Bricked Merc is fun and I wonder where all the brick came from... so I think I'll have to make a collapsing brick building in this theme just to have it sit near this one.

Plague Abomination and operative from Star Saga.

Its always fun working in a new theme.  I think a convenience store and a petrol station... and maybe a shanty saloon would make for a good start... oh and a mat...

Back to the desk!

Wednesday, April 22, 2020

Whiskey Jacks interior

 Whiskey Jacks got a face-lift this week  as part of the big retrofit of interior resin bits courtesy of a mislabeled box in my workshop.  The unfortunate bit is that I was also expecting to find led lights for the interiors of these and they were not in the box... the hunt is on!

The main Bar area got liquor shelves a cashier station, what looks like an off-track betting interface, 2 TV Screens, 3 interactive tables, and 6 seats.
 The resin is glued in place if attached to a wall (TV screens, cabinets, showers, etc) and attached with magnets for stuff that sticks into the room (beds, tables, chairs, coffee stations, etc...) or that might be good to remove for mini placement in some games.  There is also some kind of exterior machinery or power panel with a screen and number pad you can see in the picture below.
 The office space... which in retrospect should probably have been a kitchen... got a coffee station, cashier's interface, and a TV screen.

Being a sparsely furnished area I imagine it works more like a VIP room for dancers so it got some poster-style decorations from a Haganai cel phone deco set.  Featuring Sena and Kobato.  So I guess its now a cosplay Bar too!
 There is an apartment above the Bar that is smaller than a tenement room but furnished similarly to a flat with a shower, toilet, sink, TV, environment control, and a full size bed.  It might be an owner/operator living space, a VIP room, or just a room for rent.  Of course being situated directly above the Bar would make it a pretty loud place to sleep... even for the Undertown.
Next up are the interior resins for the Data Trust, which also includes a metal model drone to park on its roof, and a pair of SleepBox small format rentable rooms that can be deployed practically anywhere... like sidewalks or parking spaces... and are self serve.


Wednesday, April 15, 2020

Undertown Flats... the interior spaces...

 The interior resin for the Undertown Flats from Antenociti's Workshop are installed. 

These are from the Undertown Kickstarter and I believe the models have since been redesigned to replace the resin components with MDF and printed graphics.  Honestly I love the resin bits but the kit redesigns are faster and easier to build and leave more space available for mini placement... so for game-play probably a net improvement.
 Above are most of the elements in progress.  As the Flats are more upscale than the more "barracks like" tenements I thought I'd play with color coordinated interiors a bit... kind of in the vein of "Personalize your flat to your unique style and taste by selecting one of three standard color variations" Not high end, but a little enough above the chaff to feel like you have something to lose, the golden chains of corporate employment.
 Each Flat occupies a full level of the building and is accessible via elevator.  They are equipped with a bed big enough to share, a food storage and prep station a table that doubles as an entertainment/communication system, two bench chairs, a life support panel, one large and one small video screen a shower/general hygiene unit, a toilet and a sink.  A HUGE improvement over the equipment available to residents of the Tenements.
 The resin was washed, primed with Krylon Camouflage beige dry-brushed with Sand colored Craft paint washed with Secret Weapon Washes edged with a sharpie and trim painted Reaper Sky Grey.  Mirrors are GW Runefang Steel.


Each floor has a different layout and for added flexibility the beds, tables, and bench chairs are attached with magnets and can be removed or re-positioned as required. The other elements are glued in place.
 The next thing up will be the resin bits for Whiskey Jacks and the Data Trust.  Once all the interior resin for these is finished and installed, and (hopefully) before starting additional Undertown buildings, I'll return to these to add interior lights which should make some cool view of the interiors available through the windows and doors while the buildings are closed up.
More views of the Flats.
Back to the desk!

Sunday, April 5, 2020

Stepped Tenement interior details

 The Stepped Tenement (Antenociti's Workshop) isn't intended to be comfortable... its a barracks... a pretty spacious barracks but a barracks nonetheless.  The furniture is very institutional and there is a notable lack of personal storage space so I think of these as "first come, first serve" daily rooms for the day workers and transients of the Undertown... just the sort of place a party of adventurers would end up for a night, or a week.
 The ground level bunk on the stairs side did not fit gracefully under the floor support. It could have been made to fit without trouble but I decided to secure it in a back to back configuration with the other ground level room.  This left the media screens on opposite walls and would probably provide the best sound separation for the two units... not that the landlord was overly concerned about that!
 For the two upper floors the bunks fit easily under the support beams so I set them up on separate walls.  This meant that the media screen of one room was attached to the wall that anchored the neighboring bunk... EAR BUDS ONLY! is a sign I should probably work up to be posted next to these screens.  Each floor also has one room with a media screen under a window.  One room high, one room low.  In retrospect I might have set the screen across a corner but the room is already a bit tight for model placement and I think minimizing the furniture intrusion was a good call.
Keeping in mind that these buildings are used with game pieces the  interiors are arranged so that models on 32mm bases can move to all areas.  This gives an inefficient look to the room but works great for moving models through the space.
The top floor follows the same pattern.  Each room also has a narrow screen that I think is for climate control etc... I put them under windows as you"d find individual AC units in a hotel.  The goal of course with the screen placements was for them not to obstruct access to the windows and to intrude as minimally as possibly into the usable room space.

Next up... interiors for the Flats... a much more comfortable living space!

Friday, April 3, 2020

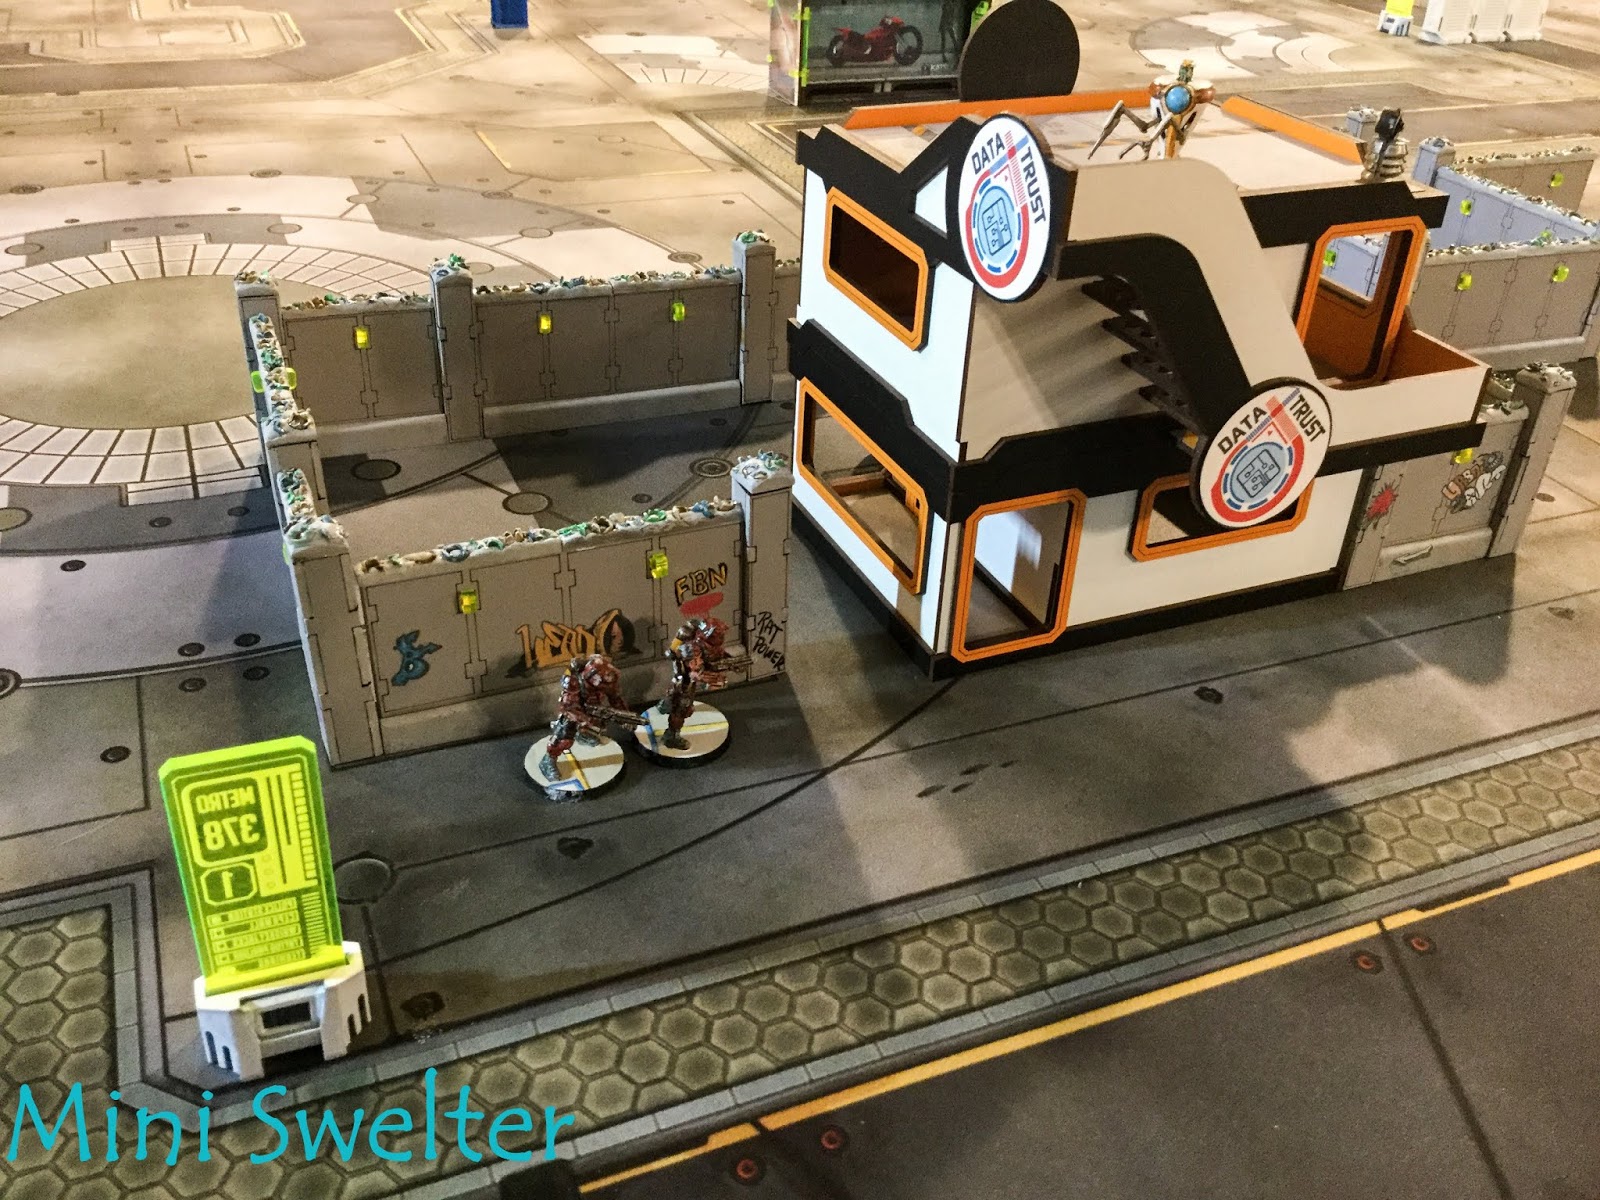
Data Trust, Concrete Walls, and Metro 378 plus Stepped Tenement interior details WiP. More "Made for Infinity" but used for everything MDF!

The completed Concrete Walls set from Antenociti's Workshop Surround the Data Trust from the same provider.  I'll visit the Data Trust in more detail later as I'm working on the interior details at the moment.
 For scale today are Mantic GCPS special forces from the Star Saga game. 

I elected to do about 1/3 of the Concrete Walls with some level of graffiti and posters etc... the rest are plain.  The walls with graffiti have the adornments applied to one side only as I think compounds generally tend to have graffiti outside but not inside.
 Metro 378 replete with adverts.  You'll see various smaller corner stops around the Undertown as well which are simple schedule posts marking a pickup point so this is a major transfer stop.
 More walls.  I learned a lot from doing these.  Importantly that the best way to reduce their MDF heritage was to paint the edges of the lugs and joins.  This can be much more easily done before assembly... but I figured that out after they were built so.. the hard way it is!
 Now I'll want to go back to the earlier builds, like the Data Trust, and paint the exposed edges... blending fun for the win!
 Another lesson was that the pre-painted MDF surfaces are a bit tricksey when applying decals.  Some of the decals came up when hit with sealing spray.  Fortunately they laid back down with no problem and were saved.  I had done a light coat of sealer prior to applying the decals but it seems like I'd have been better served with a bit more coverage and a light topcoat rather than a light base coat and a thorough top coat.  More experiments with that in mind in future.
Moving on to the interior of the Stepped Tenement.

The interior appointments of the Tenements are very institutional... almost prison grade and very uniform.  With that in mind I went with metal finished sinks and toilets while the bunks and electronic screens are white.  All the beds are tidily made up in a very "inspection ready" way so I imagine the tenements have rigorously enforced rules instead of high financial costs.
 The screens... the smaller ones kind of look like bedside health monitors... not sure what to make of that in terms of placement... of course each room has a pair of bunks, a sink, a toilet, a large screen and a small screen... but no privacy screen for the toilet... I'll be fitting all that together over the next few days and we'll see how it turns out.
A WiP shot of the Concrete Walls being assembled.  the blue masking tape is protecting the shiny broken glass wall caps from the dead flat topcoat that the rest of the structure was getting. 

Graffiti is a mix of freehand, decals, and photographic elements.  The decals are from the Urban decal sets 1 and 2 from Antenociti's Workshop.

Back to the desk!

Tuesday, March 31, 2020

More MDF Madness: Concrete Walls WiP, Sign updates, and found resin interior sets... whew!

A section of nearly complete Concrete Walling from the ever awesome Antenociti's Workshop.

Below are the resin tops being painted up with a variety of broken glass to discourage all but the most determined of intruders.
 Like everyone else in the Hobbyverse Antenociti's Workshop is being battered by the COVID-19 but are still able to fill orders at this time... and are super happy to get them!  If you have a moment to drop in and see what they have on offer please do.
 Left are the raw resin bases for the wall sections.  This is a hybrid MDF/Resin kit with the MDF being pre-painted and the resin needing paint.  They also have some super decal sheets to help graffiti up the walls.. I'll be exploring that this week.
 These signs were shown in previous posts and I become progressively less happy with the "see through" cut outs because the were hard to read at any distance.  I decided to do some simple backings to make them solid and more visible.

The rest of the set is getting this same treatment and I'm experimenting with a variety of backing materials from photo prints, to aluminium foil, to painters tape and beyond.
Once the Sign fronts are worked out there is an ugly mess on the back that needs covering so I've created completely different B sides.

In keeping with the Asian influences I've borrowed graphics from the Tiger&Bunny Anime series and from the super popular Hatsune Miku. 


In previous posts I did some buildings that were super detailed, inside and out, and some that were basically external MDF shells... I've since located the resin detailing packs for those buildings!  The good thing is that the resin bits in these hybrid kits are designed to be added after building construction to allow time for them to be painted as a separate project.  They are currently moving through the resin prep process and should be on the painting desk in no time!

Back to the Desk!

Wednesday, March 25, 2020

Whiskey Jacks and a Stepped Tenement added to the Undertown table

Whiskey Jacks is the seedy watering hole that the Undertown needs to survive.  Home of all manner of ill favored leisure pursuits its the bane and the glue of the Undertown.

The kit itself is the most complex of the Undertown buildings I've worked on to date. Its also got the most sparse set of building instructions which seem to assume that you are already familiar with these buildings.. which... I am! so its all good but if you start your Undertown journey with Whisky Jacks be aware that you'll have to search a around the blog a bit to find instructions for some of the sub assemblies.
 One of the coolest features of this kit is also super simple... but brilliant!  It includes security shutters for the doors and windows that are easily placed or removed via some hooks.  This makes the shutters themselves all single piece items and likely to stand up well to use.
 Above you see the security shutters in place and to the left they are removed to reveal the reverse etched window details and doors.  Of course this is the Undertown so the doors and storeroom windows have permanent security bars installed even during business hours.
 I re-enlisted the aid of Sister Scout Celenia for scale from the fabulous Raging Heroes lineup.  Also appearing are some police/security guards from Mantic's Star Saga as obstacles to Sister Celenia's investigation of the moment.  Fortunately she is adept at moving unseen through the Undertown and evades the very alert security team.

.
The upstairs residence (or VIP room) is an example of how it helps to understand the way these buildings are assembled.  The instructions ask you to place the front hall wall before adding the black interior  detail strips and door frame.  This is contrary to all the building instructions I've previously assembled from this series.  Adding the front wall first would make it much more fiddly to glue the interior wall details neatly into place.  Armed with the experience of the previous kits I left the front wall placement until after completing the interior hall details.
 While the interior is not the highly detailed variety that we saw with Suburban Office 2 it does have a nice, operational, bar and I'll come back and detail this up once I make certain I don't have some resin upgrade or scatter package for it in the big box o Undertown stuff.
The Office door was completely missing from the instruction write up but did show up in one of the interior pictures. Be careful when installing the Office door base plate as I got it in backwards and had to drill a new hole due to the door being directional.  Always dry fit first!  The other doors are less fussy but they get build with a definite front and back which is important for a nice fit when closed.
 Whiskey Jacks comes with two main signs... one designed for permanent mounting which, due to my failing to read the entire assembly guide before starting the build, I was unable to attach as designed.  I had already used the alternate part and the glue was well set.  No worries though the detachable sign works quite well (after modifying it to accommodate a larger border wall.  Its set up for single wall thickness and all the roof-line walls are double thick) and I'll be able to convert the other into a detachable sign as well... never too many signs!

 Random Tardus? from the Reaper Bones Line.

The Stepped Tenement allows you to be the vicious Slum Lord of your dreams! Not content with merely providing the miserably small living spaces and thin walls of the basic Tenement it lets you actively oppress the residents by forcing them to walk through every square inch of hallway and stairs in the building to get to their room!  Fiendish!
 The scene is further set with some vending machines and dumpsters.  I believe the Vending Machines here are from Armorcast and the Dumpsters from Antenociti's Workshop.  The rooftop signs are from the Forward Base Kickstarter from Antenociti's Workshop.
 Sister Scout Celenia ghosts past security as they search the Stepped Tenement. heading for the Traffic barriers that are blocking the road out of the Undertown.  The traffic barriers are also from Antenociti's Workshop and still await, as does the rest of Undertown, the addition of proper amounts of graffiti!
Internal view of the Stepped Tenement Its similar to the basic tenement except that the halls alternate sides by floor.  Great for making sure that anyone who is trying to sleep has hallway traffic noise above them, below them, and outside their door.  Evil genius!